TaylorMade

DIY, Home Decor & Sewing

  • Home
  • SHOP
  • DIY & Sewing
    • For the Home
    • Sewing
    • Costumes and Holidays
    • Cricut Projects
    • Crafting
  • Parties
  • Recipes
  • Home Tour
  • Favorites
  • About

Puff Paint Tee

May 21, 2011 By Taylor 12 Comments

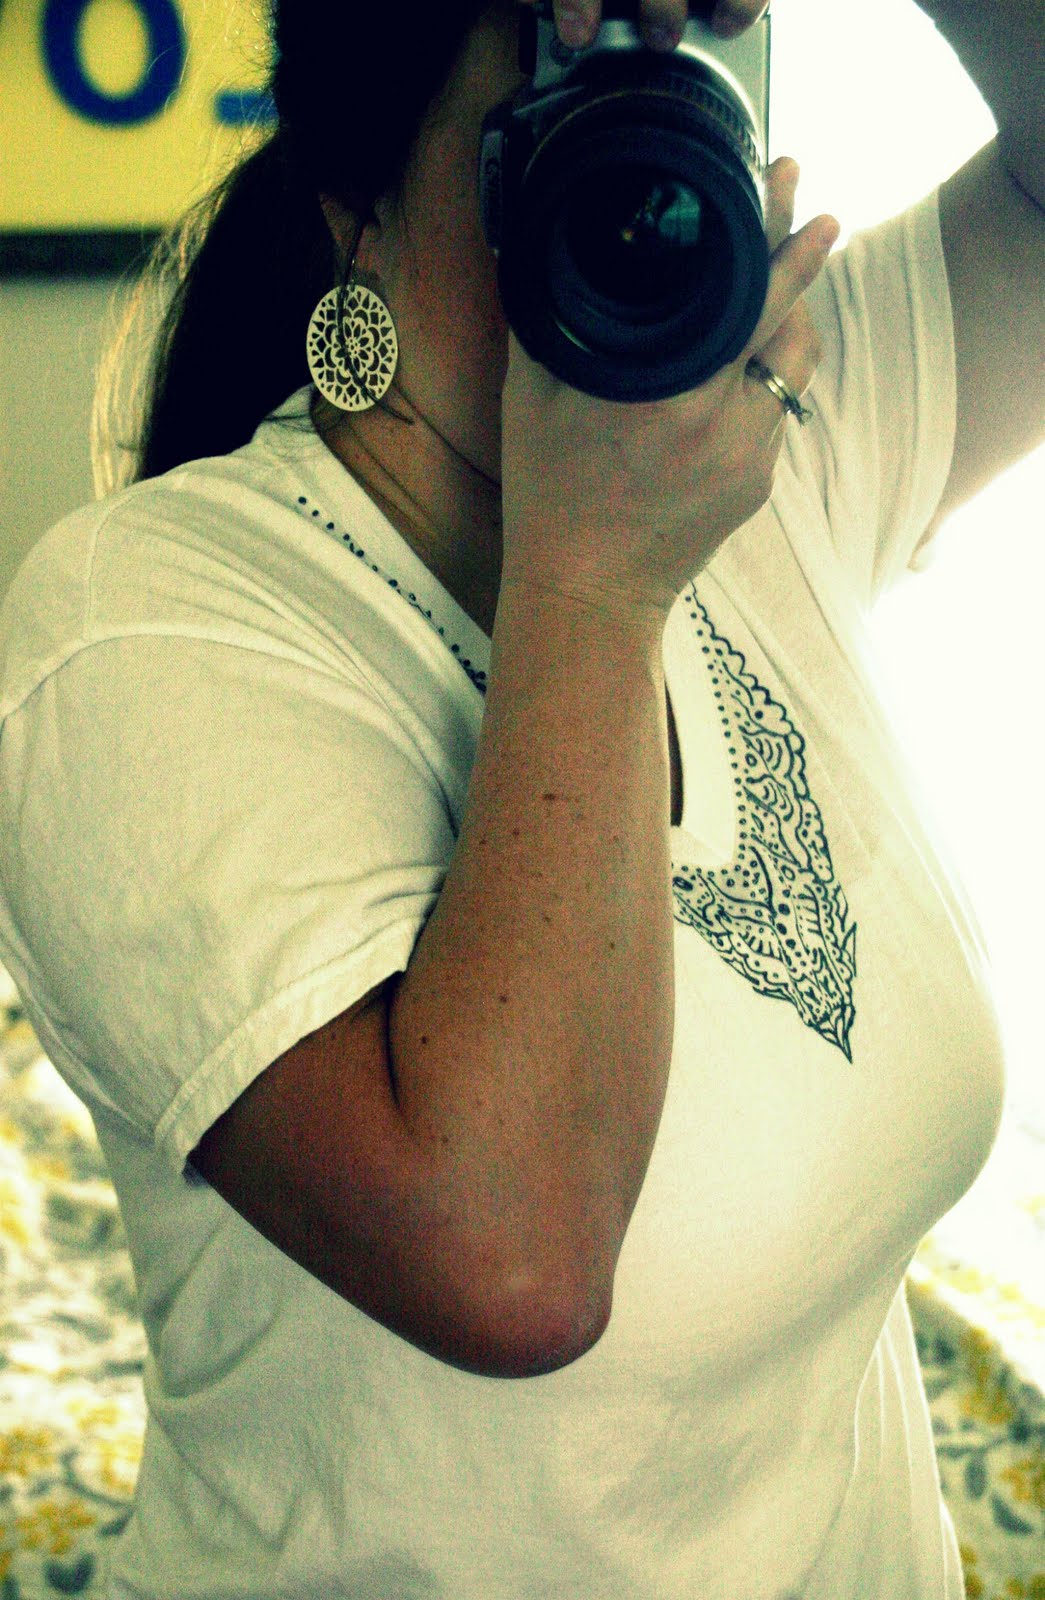
I saw something so amazingly pretty last week on Pinterest. Have you seen the Alisa Burke Blog? Its one of my new favorites. So, I had to replicate her Puff Paint Embellished Tee. I know what you are thinking, Puff Paint, like for making crafts in elementary school. Yes, but it is more sophisticated than that!
Didn’t it turn out pretty? Here is the original. It is super easy.
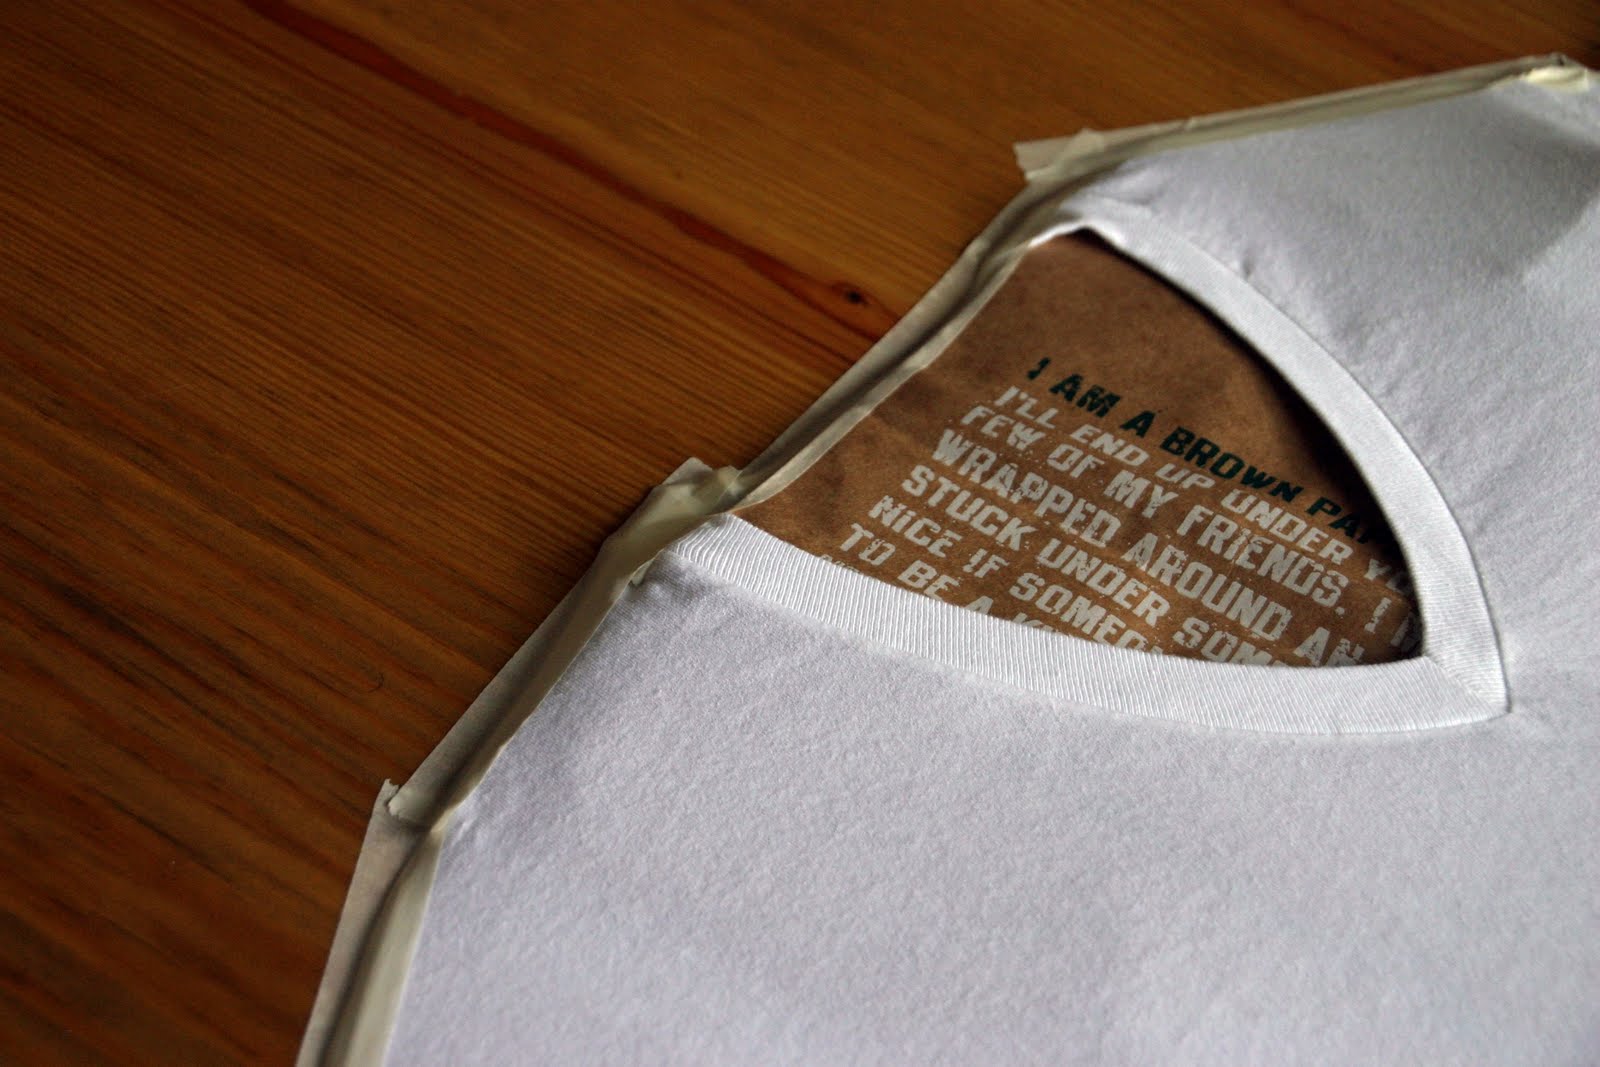
Start with a plain tee shirt or tank and tape it down so it wont move on you.
Add a paper bag to the inside of the shirt so the paint wont bleed.
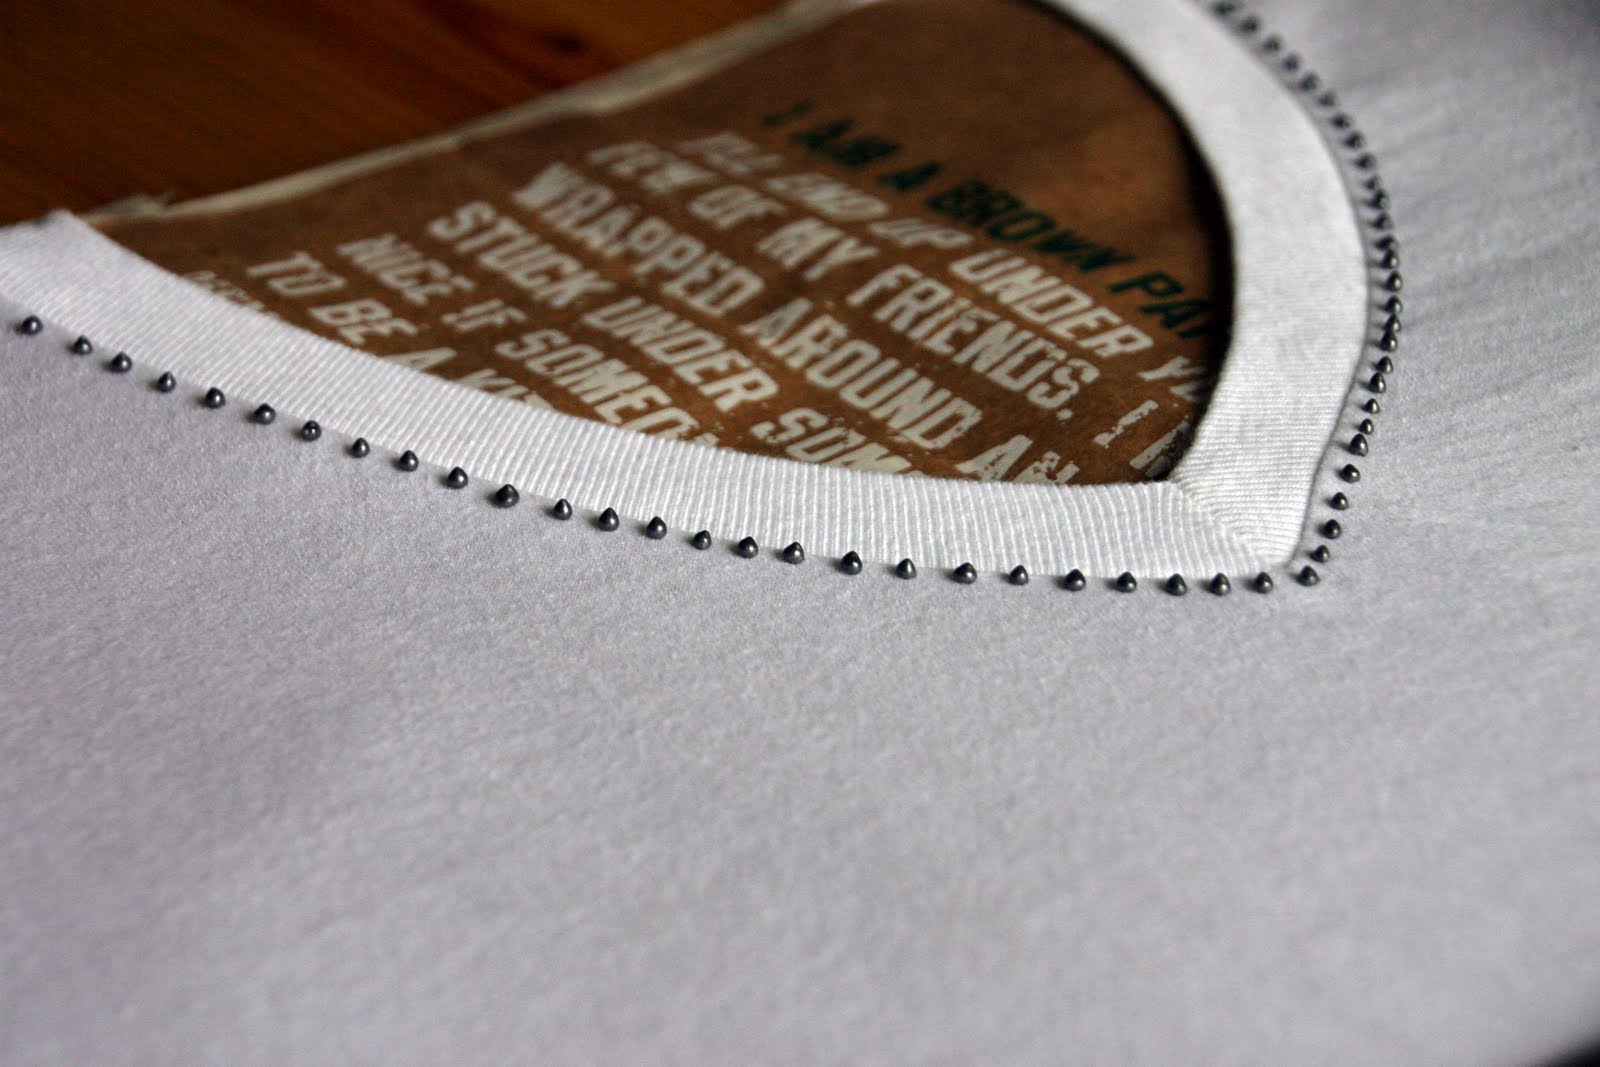
Just like Alisa, I started with dots around the collar.
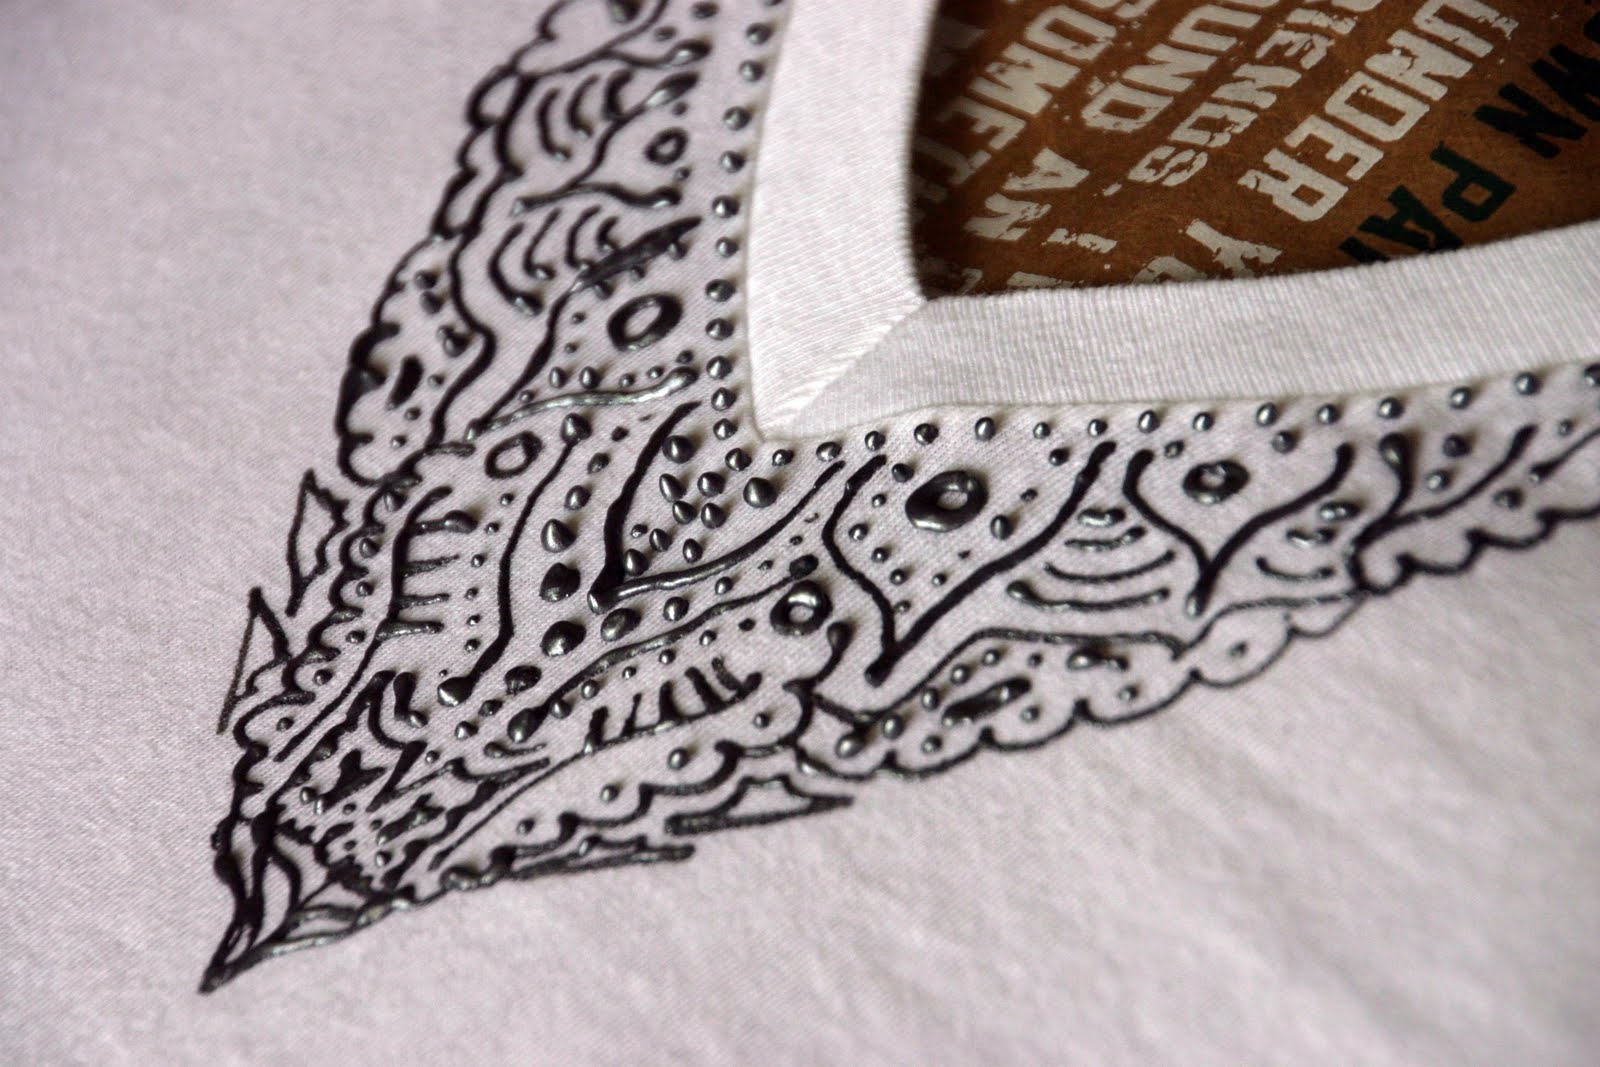
From there you can just doodle a design as it comes to you, so fun. I have a re-discovered my love for puff paint.
LOVE

Filed Under: clothes, craft, paint Tagged With: crafting

Peacock-ish Painting

May 16, 2011 By Taylor 28 Comments

I have had a blank canvas burning a hole in my closet for some time now. Then I saw this rug from Modern Chic Home. This rug is soooo beautiful and wouldn’t make it a week in my house with my dogs and babies! So I decided it should go on my wall. I changed the colors up a bit and made it look a little more Peacock-ish.
This painting is by no means a creative masterpiece but it added some much needed color to my sad bedroom walls. Does anyone else have oddly shaped rooms and walls that are too tall to paint yourself? This is the longest I have ever slept in a room with white walls :( But it is definitely happier now.
My tips… when painting a pattern that is repetitive like this one, change it up a bit. Make some circles not so round and add a few streaks of un-expected color. It will make it more interesting.

Filed Under: bedroom, home goods, paint Tagged With: decor

Etched Mommy Tree Plate

May 11, 2011 By Taylor 34 Comments

I made this cute little plate for my mom for Mother’s Day. Super simple but I think it was a hit. I made a stencil with my Silhouette, vinyl and transfer paper and used etching cream to etch the glass plate. My mom is the “M” at the bottom of the tree and the initials of her “kids” are in the branches. My husband is an honorary “kid” and of course we couldn’t leave off Clyde and Finn- her grand kids.
Have you used the transfer paper with the vinyl? I was like, what is this roll of white stuff? Then I tried it and it really helps. With a plate like this you have to etch the back of the plate, therefore you need to mirror the image. Also, this is my second time with etching cream (first project here) and just a tip, the bottle says leave it on for 10 mins, I did 30… last time I thought it was too light.
Happy Mother’s Day Mom! xoxo

Filed Under: craft, etched, gift, monogram, Silhouette Tagged With: crafting, decor

Memory Hall

May 9, 2011 By Taylor 11 Comments

Happy Monday, today, I give you my Memory Hall. My favorite moments of all time. No boring portraits or fake smiles here, all of the pictures I chose are real moments that represent something to me. I can’t think of a better way to give life to the hall in our home. I love the colorful frames on the grey wall.

How I did it:

I started by painting our hall Slate Grey. So much better than a boring white hallway already!

I added a chair rail, painted it white and hung it at eye level.
I collected different sized frames (super cheap from Good Will) and primed them with white
primer. I used the spray paint for plastic because I think the paint sticks better.

Then I painted the frames bright colors.
Printed out my “Favorite Memories” in black and white. This was the hardest part because I had to pick only ten pictures with a good mix, naturally I wanted them all of my babies!

Then I hung the pictures to the wall, with the bottoms resting on the chair rail.

(lovely camoflauged a/c controler?)
I love the way it turned out, now I am reminded of my favorite moments everyday

Filed Under: home goods, paint, pictures, wood Tagged With: room makeovers

Tealight Flight

May 6, 2011 By Taylor 46 Comments

*New Update* Thank you all for your comments,  anytime that fire is involved, please be careful! Also, the tea-lights are in a metal container and I have never had a tea-light burn the metal. Also, this goes in my fireplace so even if it did, perfect place right :) If you are too worried then please don’t make this project
Taking junk and turning it into something beautiful, what’s not to like? The first thing that came to my mind was the huge bag of used plastic Easter Eggs taking up space in my pantry. It felt wrong to throw them away and I am glad I didn’t. After some brainstorming, I came up with…. The Tealight Flight. It was super simple and came out really modern and classic looking.
Here is how I did it:
I took 12 egg bottoms (which I only ended up using 11).
I spray painted the top side and waited for that to dry, then painted the bottom side. Make sure to use a spray paint that is specifically for plastic. It took me about 3-4 coats; waiting 20 minutes between coats.
I waited for them to dry overnight before I started the next step. Then, I found a piece of scrap wood in our garage. It was flawless looking and I didn’t even need to sand it or anything. Make sure your eggs are fully covered by the spray paint.
Start by gluing the center egg to the center of the board. I used E6000, which is super strong. Use a tiny dot in the bottom if the egg then use a dot on each side of the egg to connect the ones side by side.
Keep doing this until you have glued all of your eggs down.
Wait 24 hrs before you place your tealights in!

Find the perfect spot, I put mine in my fireplace…

Filed Under: craft, home goods, wood Tagged With: crafting, decor

Union Jack Card

April 28, 2011 By Taylor 5 Comments

London Calling…
Are you still bitter about not getting invited to the Royal Wedding? Well tell someone about it, in a Union Jack Card. The Wedding is only hours away, and today I heard that over 1 billion people will be tuning in. The most watched televised event in history. Crazy.

Here is what you need to feel involved :)

  • Red, White and Blue Cardstock
  • Blank Note card
  • Sewing Machine
  • Red Thread

Cut a blue piece of cardstock the size of your Note card, mine was 5.5″ x 4.5″.
Cut out the following strips:

  • 2 thick white
  • 2 slightly thinner red
  • 2 thin white
  • 2 slightly thinner red
Place a thin white strip under a thin red strip and place it corner to corner on the blue card, sew a line down the card. Isn’t there something fun about sewing on paper? Do this again across to the other corners.
Now you have an “X” on your card and we need to add the “+” over that.
1. Place the 2 thick white strips in a cross over the “X”
2. Place the thick red strips over the whites
3. Sew down both lines
Trim the excess strips and tape your flag onto the notecard.
Here’s to William and Kate…

Filed Under: craft, paper, sewing Tagged With: crafting

Little Boy Shorts

April 26, 2011 By Taylor 17 Comments

This year I had the bright idea that I would dress my boys in matching shorts for Easter. I mean how much longer are two boys going to let me do this, right (but really how much longer)? So, I found some adorable plaid fabric and decided to make them some Little Boy Shorts. I know that the best way to make a pattern is to take another article of clothing apart and trace the pieces, so that is just what I did. Add length to the top (about 1.5″) and the the bottom of the shorts (about 3″) My sons wear 2T and 6mo.

Supplies:
1/2 yd fabric
1/2” elastic
white paper for pattern
safety pin & sewing pins

1 – Trace an old pair of shorts onto a piece of paper
2 – Pin the pattern pieces to your fabric
3 – Cut the new pieces out

This is the first pair of shorts I have made for the boys and I kind of just sat there after this step. I had a million ideas for the order of construction but because I was making these the night before Easter (oops) I didn’t have time for that. I remembered that one of my favorite blogs MADE has a tutorial for a Basic Kids Pants and thought it had to be pretty similar. So thanks MADE!
She says the easiest thing (which totally makes sense) is to sew up the crotch of the pants first because they are already together. If you have a fabric with a right and wrong side, flip your fabric before sewing.
After every step, serge the seam if you have a serger and press with your iron for a more professional look.
Next, pin and sew the inseam together. Then again,serge the seam and press it down.
Next, pin and sew the legs together. Serge that seam as well.
Next, I serged around the top of the pants and the bottoms of the legs because I had to try them on the boys and I didn’t want them to fray. Dana (from MADE) said that the front of the pants will be lower than the back, which is something I had never noticed. She said it will make for a more comfortable fit, so on the 6mo shorts, I actually just cut a little dip after I took this picture.
Next, we will add the elastic. Measure your little boy’s waist and add one inch. For example my oldest son’s waist is 18.5″ so I cut my elastic to 19.5″. Fold down the top of the pants with about 1/4″ overlap and use the elastic as your guide as you pin. Leave an opening of about 1″ and take the elastic out. Sew to top of the shorts closed but remember to leave that 1″ opening to put the elastic back in.
Now insert the elastic using a safety pin. Make sure it is flat all the way around. The elastic will be shorter in length that the shorts. Scrunch the shorts up, pull the elastic out a little and sew the elastic together. I used a zig-zag stitch in 2 places to make sure the elastic stays together.
Lastly, turn the shorts inside out and sew the bottom of the shorts. I sewed in two places. On the top of the serged line and on the bottom right next to the seam.
I added my fabric labels to the back.
Look at these sweet boys in their matching Little Boy Shorts.
Perfect for Egg Hunting
Stay tuned next week for an exciting project because I am a contestant on Season 3 of One Month to Win it! Woo Hoo!

Filed Under: baby stuff, clothes, fabric, holidays, kid stuff, serger, sewing, tutorial Tagged With: kids

Black Bean Salad

April 15, 2011 By Taylor 2 Comments

Are you feeling springy yet? I sure hope so and if you are I’m jealous because I am feeling summery already and I don’t like it. If you know me, you know that I am extremely hot natured and wear my flip flops all winter long. So, I’m not happy that it has been in the upper 80’s all week, Houston, its April… you are killing me!

What does this ramble have to do with Black Bean Salad? Its hot, and when its hot I like cold food. So I made Black Bean Salad the other night on the side of our Chipotle Pork Tenderloin and Baked Sweet Potatoes. Its simple, healthy, cold and Finn couldn’t stop eating it!

Black Bean Salad:
– 2 cans of Black Beans
– 1 avocado
– cilantro (I love a ton but add as much or as little as you like)
– 4 scallions
– juice from 2 limes
– 2 tablespoons olive oil
– salt to taste

Filed Under: dinner, recipe, salad Tagged With: food

Stethoscope Covers

April 13, 2011 By Taylor 25 Comments

Do you have a special nurse in your life? ‘Cause I do… my sister hehe! Not only is she about to graduate from nursing school but it is also her birthday this week. (Last year I made her this) So, I cant think of a better gift than some handmade Stethoscope Covers. The sad part is after I decided to make her a few, I realized – I don’t have a stethoscope to try them onto. Oops, I hope they fit.

Materials:
– one yard of fabric (you wont use it all, you just need it for length)
– button
– elastic
– sewing machine
– serger (optional)

Directions:

Cut your fabric into a piece that is 34″ x 6″
Serge the ends (the sides that are 6″ in length) If you do not have a serger, get online right now and buy one you will have to press the ends and sew a clean edge. Do this to both the top and bottom of the cover.
Next we will add the elastic to the bottom of the cover. If your fabric is a print like the floral one I have then just pick a bottom. My other fabric with the hearts has a specific bottom and top so don’t confuse the ends.
1. Cut the elastic about 2″ shorter than your width, so in our case 4″. Pin it to the bottom of the cover.
2. Start sewing it on.
3. Once it is on, pull the elastic with your hand while you are sewing.
4. It will look like this when you are done.
Next, pin right sides together lengthwise all the way down the cover and sew.
Turn the cover right side out. This is the main part of our cover. You can tell that my covers are a little different in width. I used two different seam allowances only because I wanted them to look a little different.
At this point I realized I had to come up with a way for the cover to stay on the Stethoscope. Do you see where it has a “Y” in the top. I decided to use a little flap with a button and a button hole. You could use Velcro, snaps, etc.
 I had scraps left over from the original cutting of the fabric so I used these two scraps. I folded it in half with wrong sides together and serged it into a rectangle flap. Sorry, I don’t have an exact measurement. Again if you don’t have a serger then you will have to sew right sides together leaving an opening, turn it right side out and sew again. Make sure the flap is the same width as your cover, length does not matter.
1. I added my TaylorMade label (tutorial here) to the back of the flap
2. Make a button hole on the flap
3. Pin the flap to the back of the cover
Sew the flap to the back of the cover
Last step is to add the button to the front side of the cover
Don’t you love this vintage mustard button?
Happy Birthday Sis!

Filed Under: birthday, fabric, gift, serger, sewing, tutorial Tagged With: accessories

Etched Juice Glasses

April 11, 2011 By Taylor 5 Comments

I think I am having a love affair with Monograms (as seen in my recent post here). I know I’m not alone, right? You know who else loves monograms; couples getting married that’s who. I know when I was engaged I loved receiving gifts with my new name on it. It seemed so magical.

Our friends are getting married next month and we got them a juicer off their registry but I of course like to add something personal too. So I found these cute juice glasses and I monogrammed them. (I also maybe wanted an excuse to use my new Etching Cream that I just got.)

I created a stencil with vinyl using my Silhouette but you could easily just cut out the letters with an Exacto. Then I followed the directions on the back of my Etching Cream, kind of. My directions said to apply a thick, even layer, wait for 5 minutes then completely wash off. I looked after 5 minutes and it wasn’t a very strong etch, so I left mine on for about 12 minutes. I picture the newly weds having fresh squeezed orange juice out of these on Sunday mornings.

Related Posts Plugin for WordPress, Blogger...

Filed Under: craft, etched, gift, kitchen, monogram, Silhouette Tagged With: crafting, DIY

  • « Previous Page
  • 1
  • …
  • 21
  • 22
  • 23
  • 24
  • 25
  • …
  • 27
  • Next Page »

Welcome to Taylor Made

http://www.taylormadecreatesblog.com/about-me Hi Yall! I'm Taylor... an artsy mom of three from Houston, TX. I love sewing, collecting floral fabric, eating Mexican Food, photography, brights colors, rearranging, and rolling clay. Taylor Made Creates is all about creating a fun, colorful home, sewing cute things and eating good food. Check out my SHOP HERE HERE! Thanks for stopping by!

Search

Pin with me!

Like Me :)

Facebook Pagelike Widget

More Recent Posts

  • Kid's Animal Room
  • Kids Camping Shirts
  • Mermaid Birthday Party
  • Conversation Heart Cold Packs
  • Holiday Apple Tea Punch
  • Purple Princess Costume
  • Letterboard Costume
  • La Croix Costume

FAVORITES

  • Casserole Carrier
  • Triangle Baby Quilt
  • Happy Rocks
  • a Happy Birthday Quilt Block
  • Cider Beetles: A Teacher Gift
  • Stethoscope Covers
  • Briar Rose Strip Quilt
  • Fabric Storage and a Craft Room Update
  • Mexican Cheesecake

Copyright © 2026 · Web Hosting By RFE Hosting