TaylorMade

DIY, Home Decor & Sewing

  • Home
  • SHOP
  • DIY & Sewing
    • For the Home
    • Sewing
    • Costumes and Holidays
    • Cricut Projects
    • Crafting
  • Parties
  • Recipes
  • Home Tour
  • Favorites
  • About

Custom Pillowcase Tutorial

March 7, 2019 By Taylor Leave a Comment

This is a sponsored conversation written by me on behalf of Cricut. The opinions and text are all mine.

A few weeks ago my sister asked me to make my niece a custom nap mat that needed to be the size of a pillowcase. I knew just what to do! I used to make these Custom Pillowcases by hand (!) but with my new obsession over my Cricut Maker and the rotary blade attachment I whipped this one up in under an hour! This would make a great gift for a kid birthday or a new mom to be… I also think adults would love one too. I mean, who doesn’t love something with their name on it?!

Here’s what you need:

  • a pillowcase (source for this one HERE)
  • fabric scraps (size will depend on the size of your pillow but I made sure mine were at least 6″ x 6″)
  • double sided interfacing
  • Cricut Maker
  • Cricut Rotary Blade
  • Cricut EasyPress 2
  • Sewing Machine

Choose some fabric scraps or pieces for the letters in the name and then you will want to decide on how tall the letters will be. I made my letters about 5.5″ tall so I just made sure all of my scraps were around 6″ x 6″.

Next, we need to iron the scraps. This is one thing that I love about the Easypress 2, it is a little larger/more square than an iron but just as easy and actually much quicker! You can read my honest review about the Cricut Easypress 2 HERE.

Then press a piece of fusible interfacing to the back of the fabric scraps. I like Wonder Under by Pellon. Be sure that the interfacing is a tad smaller than the fabric so interfacing doesn’t adhere to your EasyPress Mat. You will press it on for about 30 seconds and once it is cool, peel the back side of the interfacing off. You will know you did it right if the back now looks shiny.

Now here comes the fun part! We are going to cut the letters out using the Cricut Maker and the Rotary Blade attachment. I love using the Snap Mat Feature in the Cricut Design Space for this… if you haven’t used this feature yet you HAVE to try it, its pretty life changing!

Start out by placing as many fabric scraps (right sides up) as you can on your Fabric Cutting Mat and leave just a little room around the scraps.

When you open the app on your phone you can start by writing out the letters you are going to use for your pillowcase. My niece is named Collin so I plugged those letters in individually. Add each letter one at a time so you can move them freely in the next step.

Place your fabric mat with the scraps on it, on a flat surface. When you have the letters written out in your canvas choose “make it” in the bottom right hand corner and on that next screen that is when you will see the option for “Snap Mat”. Choose the Snap Mat and you will see a square that is shaped like your mat and your camera will open. Line your Cricut cutting mat up with the mat guidelines. The app will pick up the image and that will become your new background on your working canvas.

What is so cool about this is now you can place your letters EXACTLY where you want to on the fabric… you can line a pattern up perfectly or do fussy cut letters or quilt blocks, the options are endless! I was using pretty large letters so I had to split my fabric and letters into two groups. See how I was able to get a little part of everything on the blue floral fabric by moving the “C” around?! So cool!

Load your fabric into your Cricut Maker. Use the Rotary Blade and cut your letters out. Look at those sharp lines!!! Seriously so satisfying every time haha!

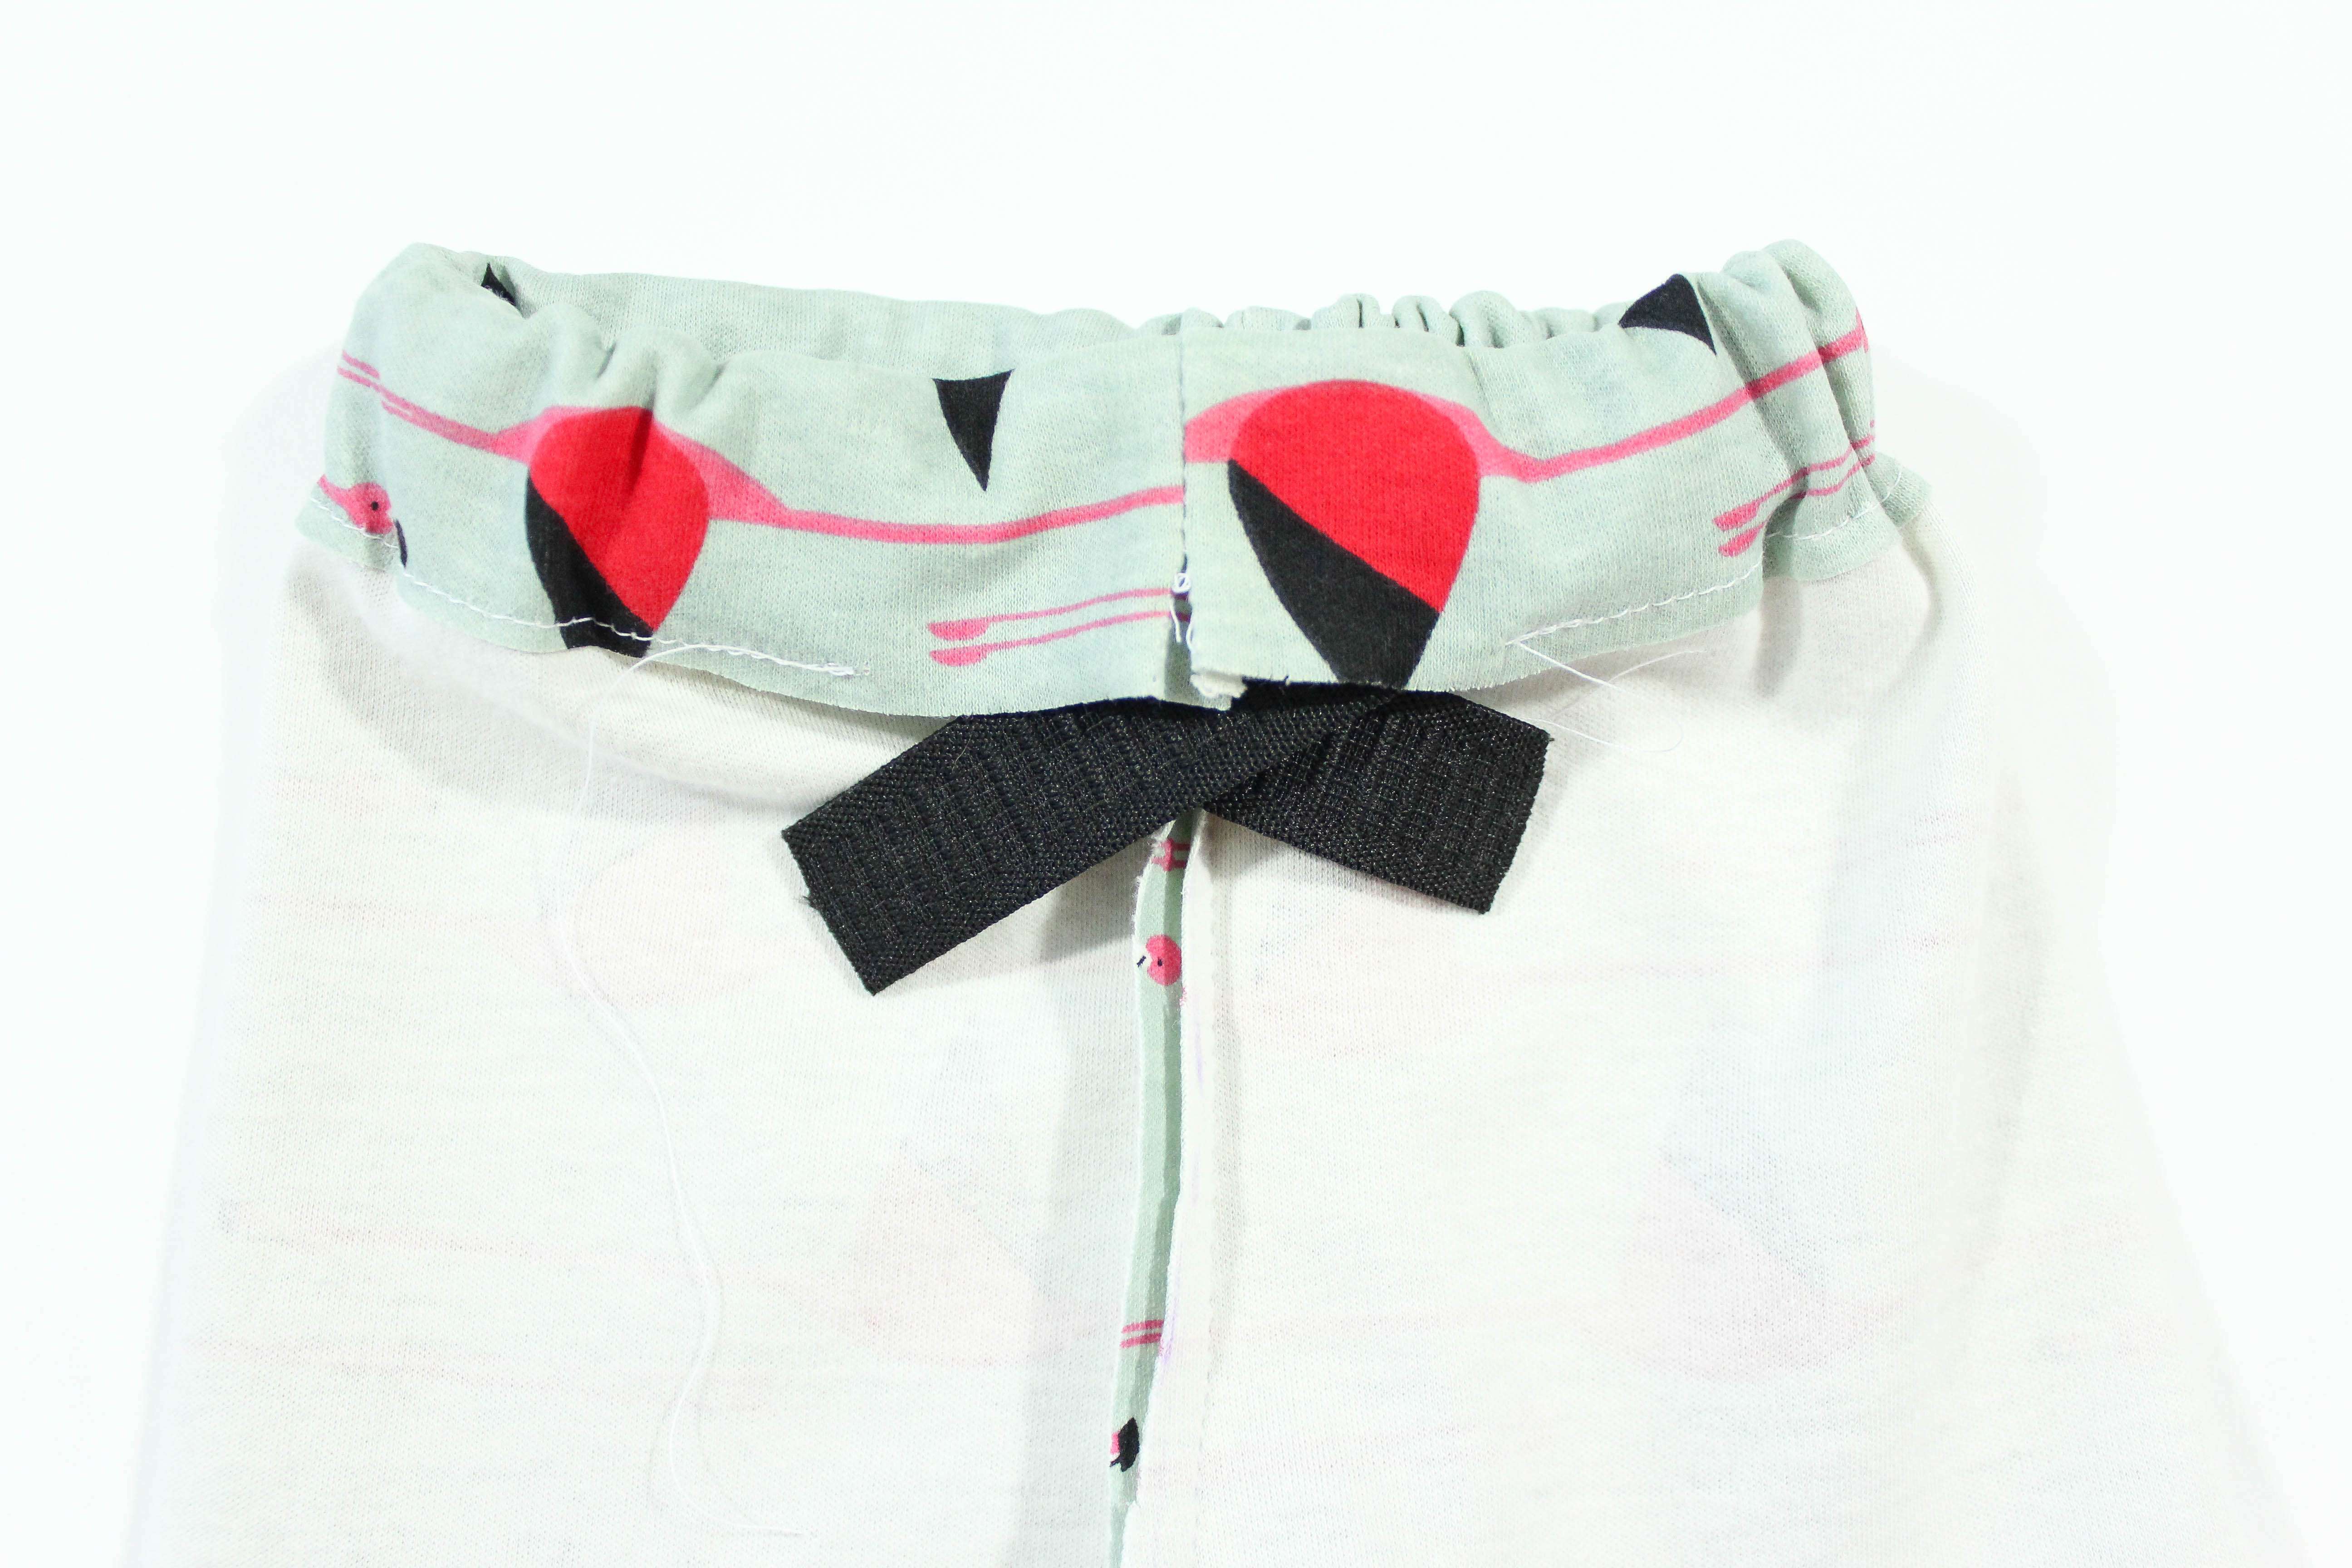
Find the center of your pillowcase and place your letters where you would like them. A trick I learned to mark the center of the pillowcase easily is to fold it in half then in half again and press that corner for a few seconds and it leaves a perfect little centered crease.

Once the letters are in place it is time to press them on to the pillowcase. The interfacing is already adhered to the back of our letters and the back of the interfacing is already pulled off (remember we did that before cutting the letters on the Cricut Machine). It’s always a good idea to preheat the surface a little before pressing anything on to it. I used the Jumbo EasyPress 2 for this part.

After pressing, your letters should be very secure at this point but after a few washes they would come right off so we are going to sew around the edge of each letter.

Sew 1/4″ around the edge of each letter, don’t worry about it being perfect!

And in under an hour we have an amazing Custom Pillowcase/nap mat cover that is totally machine washable!

Filed Under: craft, cricut, fabric, sewing, tutorial Tagged With: cricut, home goods

Shiplap Wall Tutorial

January 13, 2019 By Taylor Leave a Comment

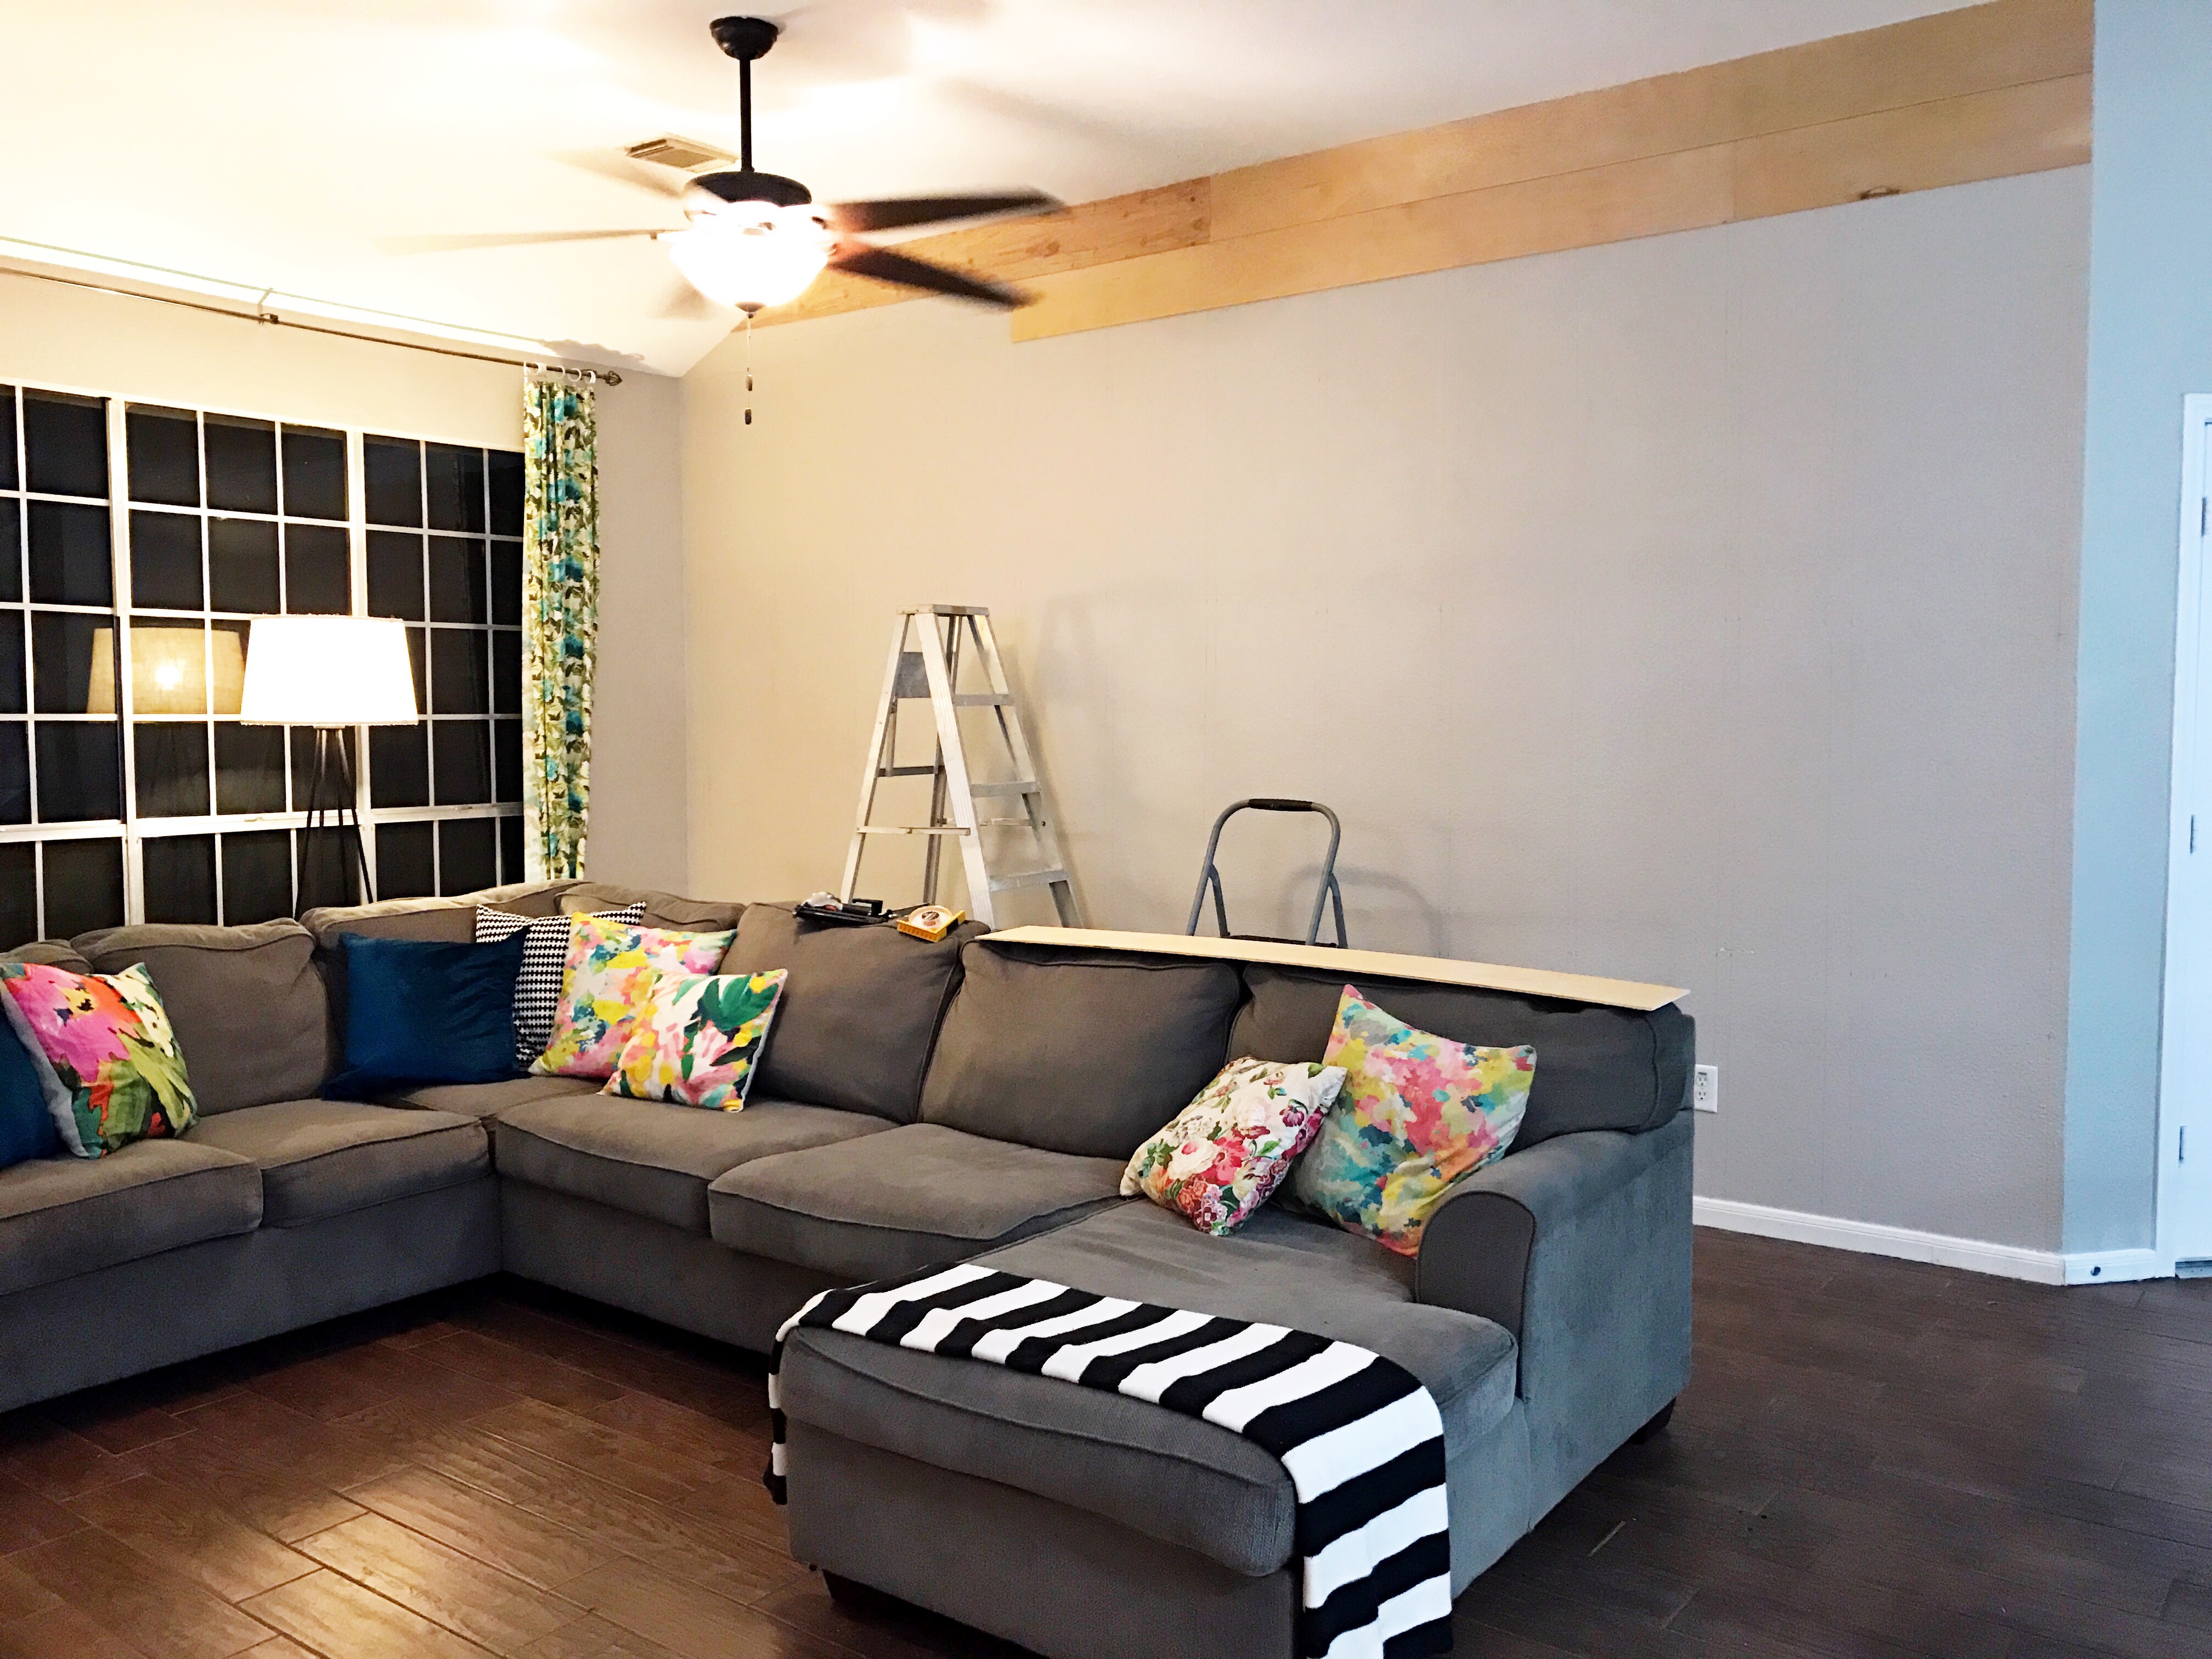
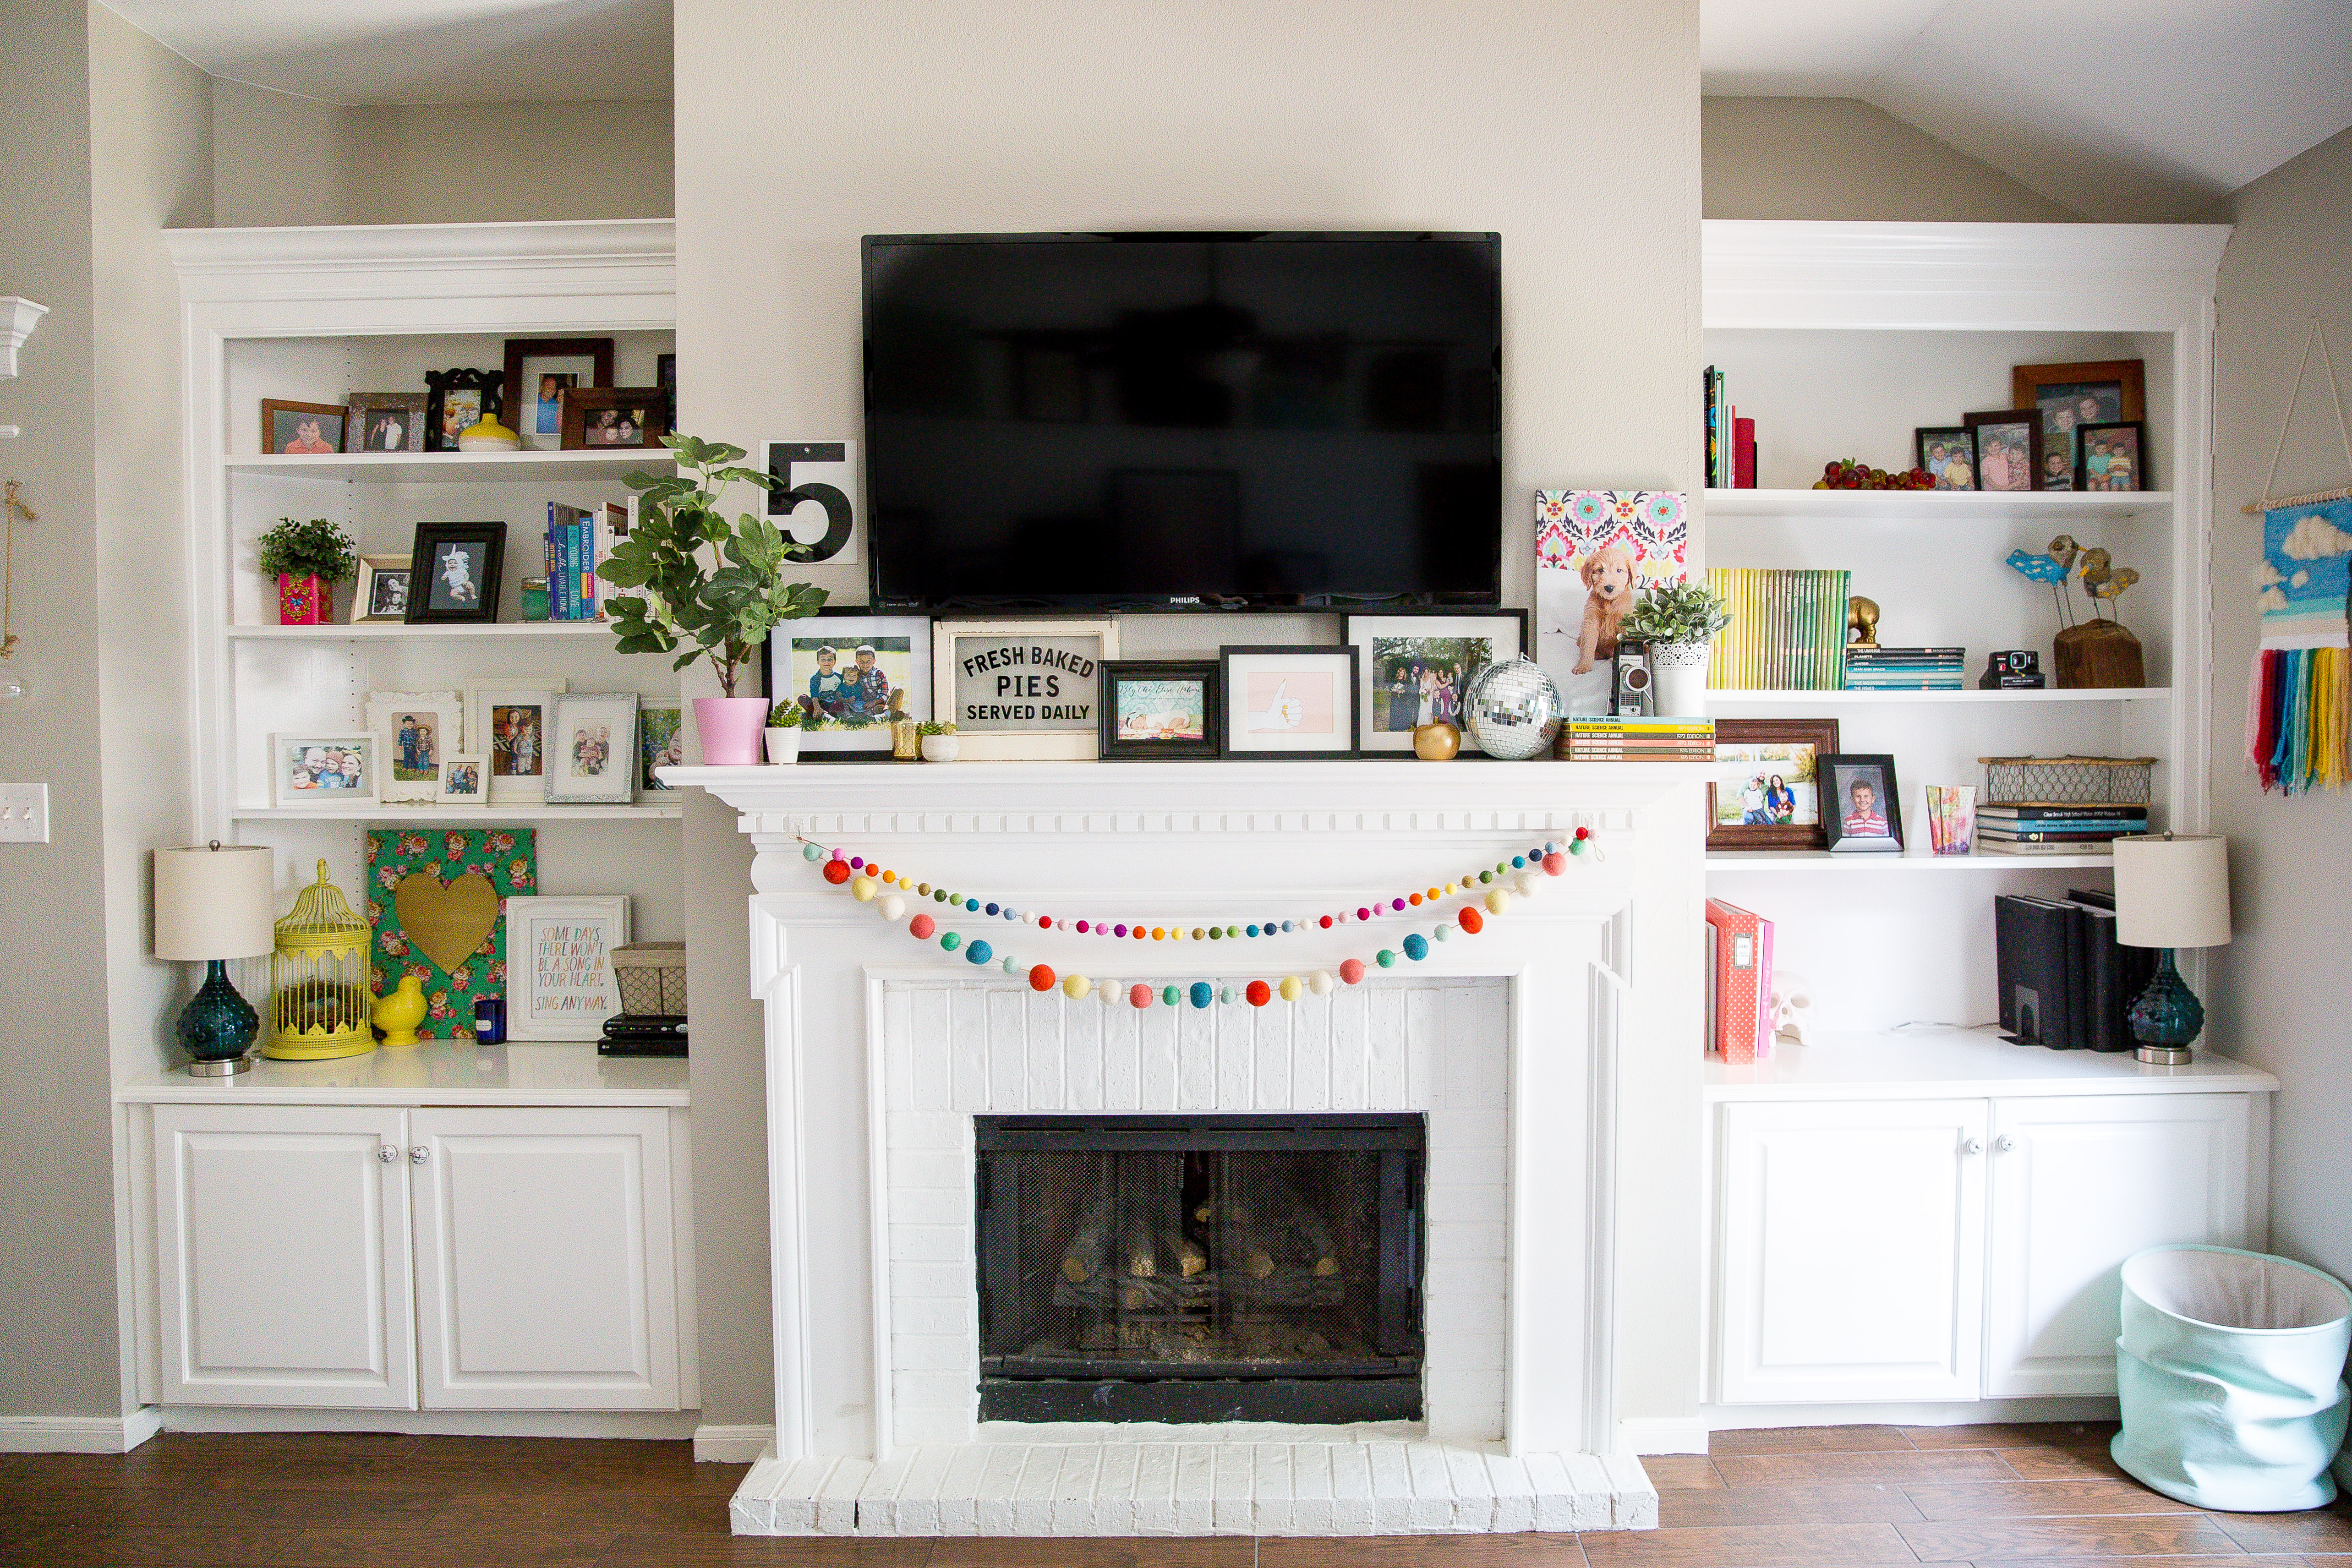
First post of 2019! I finally got around to organizing my shiplap photos to share our Shiplap Wall Tutorial! You all probably have a shiplap wall in your house at this point haha, but for those who don’t, This is for you :) This treatment is so pretty and looks so put together but it’s actually really easy!

We have 10 foot ceilings and this wall is about 16.5′ wide so that is the area we are working with here. We went to Home Depot and got the super thin 3/16th” plywood (which my husband said is sometimes called paneling). We did the math and with our area we purchased 6 sheets and that worked out perfectly for us. A sheet of plywood is 8′ x 4′ so, we had it cut into 8″ strips (longways) because that way you don’t have any waste and you get 6 long boards out of one sheet. Don’t forget that hardware stores will cut your boards for you! We could have done it at home very but it’s free and why not just have it done before you even get home, right?! We found a super nice Home Depot employee and on their fancy machine it took him 10 minutes!


So, like I said with our 6 sheets of plywood that we had cut into 8″ strips that left us with 36 boards. You will have to do the math depending on your wall size but it should be pretty easy to figure out… each board ends up measuring 96″ x 8″. We started our boards at the top because if we had to cut anything to fit later on in the project it would be the part that is hidden by the couch. We used a nail gun and used two nails on the right, two in the center of the board and two on the left side.

I wanted it to look a random but that also took a little planning. I wanted to make sure that no seams ended up right over each other but also not “perfectly” bricked either.

Please excuse the terrible, badly lit cell phone pictures on this project. We had to work on this after Bryan got home from work and after the kids were fed and bathed. Get it in where you can fit it in right? Here are a few pictures I shared on Instagram stories. We used the “nickel method”. When we started a new board we each held up a nickel on both ends of the board then butted the new board up against the nickels. We did that on the horizontal gaps but not the vertical gaps.

Once we got going, we got into a grove and it came together quickly! We did have that corner angle and two electrical outlets that we had to cut around.

Then it was time to paint. I don’t love painting but painting one wall is doable for me haha! We had to stop for a few days in between for kids activities and Bryan actually loved the raw wood, I on the other hand could not wait to paint it white! I used Sherwin Williams Pure White.

These boards were super thirsty so I had to do 3ish coats.

Because of the “nickel” gap in between the boards the paint started filling in the spaces in some spots. I used business cards to go between each space and clean the paint up.

Finally after 3+ coats it started coming together! Before the shiplap was installed I always has a gallery wall over the couch but wood isn’t nearly as forgiving with holes like sheetrock is and I move pictures around a lot. So, I decided we needed some picture rails over the couch so we could move things around easier. 

I drew the rails out and this is what Bryan came up with. We used 1″x4″ boards which are 8 feet long. He stripped down a little ledge into a 1″x1″ for the front of the rails. It looks like 2 rails but there are actually 4 rails that are just hung right next to each other.  Again, our wall is a little over 16 feet wide so the two 8 feet rails fit almost just right. There is about two inches on each side of the rails.

Overall I LOVE how it turned out! It took a few days but the work was easy once we got going. It actually makes the room look so much bigger too, maybe with the help of the picture rails. We have a pretty small living room (or cozy as I like to call it :) so we have to utilize all the space.

Let me know if I left anything out or if you have any other questions about doing a Shiplap Wall. I will link sources down at the bottom :)

Sources:

Couch – Ashley Furniture – Loric Smoke Sectional

Rug – Rugs USA

End table – Tutorial HERE

Small Lamp – Target

Floor Lamp – World Market

Big watercolor art – Emily Jeffords for Minted

Letteroard – Letterfolk

You are loved sign – Bonnie Christine

Rainbow wall hanging – my mom made it and its so beautiful!

Filed Under: home goods, remodeling, tutorial Tagged With: decor, room makeovers

Easy Legging Tutorial

February 26, 2016 By Taylor 1 Comment

Easy Legging Tutorial

Leggings are one of the the easiest things that I keep in my sewing arsenal! I’ve been using this method for years, first with my boys and now with my girl. The best part is you don’t need a pattern, you just need an existing pair of leggings that currently fit! Knits can be a little intimidating but all you really need is the right needle and some good quality fabric.

Easy Legging Tutorial

I had the pleasure of trying out some Charley Harper Birch Organic Knit and I can’t even explain how good this stuff is! It doesn’t even sew like a knit because it’s so soft and has such a nice rich thickness to it! Knit fabric sometimes has the tendency to slip around while you’re sewing but not this. I highly, highly recommend it… and especially this line, Maritime. You had me with clouds, fish and these amazing flamingos :) I have to get my hands on the octopus and sandling fabric to make my boys some shorts! Let’s get started on some leggings…

Easy Legging Tutorial

Easy Legging Tutorial

You will need: knit fabric (about a yard give or take depending on the size you are making), elastic, a knit needle (ballpoint needle) for your sewing machine, thread and pins, and an existing pair of leggings that fit your kiddo.

Easy Legging Tutorial

Start with your existing leggings, I like to size up when I’m making handmade clothes so they can wear it for a really long time :)

Easy Legging Tutorial

Fold the leggings and your fabric in half longways and place the leg seam of the leggings on the fold of your knit making sure to line that up.

Easy Legging Tutorial Easy Legging Tutorial

Using a pencil or a water soluble marker, add in your seam allowance and trace. I add in about 1 1/2″ for both the waistband and the bottom of the legs, and about 3/4″- 1″ on the inner seam depending on what kind of seam allowance you like. Cut out your knit.

Easy Legging Tutorial

Easy Legging Tutorial You will need to make two cuts just like this so do this same thing twice so that you have two pieces that look like this:

Easy Legging Tutorial

I like to hem up the bottom of the leggings at this point because I find the opening to be too tiny for me to make them as pretty once everything is assembled. Fold the bottom of the pants (the more narrow side) up 1/2″ then press and another 1/2″ and press down. Pin that and sew it down for both legs. I like to hem with double lines but that’s not necessary, a zig zag stitch also works well if your fabric is really tight. DON’T FORGET YOUR BALL POINT NEEDLE… PSA of the day!

Easy Legging Tutorial

Easy Legging Tutorial

Easy Legging Tutorial

Next, lay the knit pieces on top of each other, right sides together. You want to sew starting at the top where the waist is and down the curve then stop once you get to the legs.

Easy Legging Tutorial

Then turn them and lay the legs together, right sides together. Now you want to sew from one inner leg all the way around to the other inner leg matching up seams and the ends of the legs.

Easy Legging Tutorial

Easy Legging Tutorial Next, fold the waistband part under by 1 1/2″. Sew all the way around but make sure to leave a 1″-2″ opening for your elastic. I like to mark my opening so I don’t forget.

Easy Legging Tutorial Easy Legging Tutorial

Almost done! Time to cut your elastic, measure your baby’s waist and cut the elastic to that measurement. If you add anything it will be too loose so I always cut it to the exact measurement. Once you have sewn all the way around, insert your elastic with a safety pin making sure it stays flat. Bring it out and around the other side.

Easy Legging Tutorial

Easy Legging Tutorial

Now use a zig zag stitch and sew up the elastic overlapping it by 1/2″ on both pieces.

Easy Legging Tutorial

Last step… close up that hole on the back of the waistband where we inserted the elastic.

Easy Legging Tutorial TaDa! We made leggings! Super simple right?!

Easy Legging Tutorial

Now it’s time to break in your new leggings! Baby aerobics optional :)

Easy Legging Tutorial

Easy Legging Tutorial Easy Legging Tutorial Easy Legging Tutorial

Easy Legging Tutorial

Filed Under: baby stuff, clothes, fabric, girl, kid stuff, sewing, tutorial, Uncategorized Tagged With: kids

DIY TeePee with Forest Fables Fabric

December 9, 2015 By Taylor 33 Comments

Bohemian TeePee with Forest Fables Fabric Bohemian TeePee with Forest Fables Fabric

I have had a DIY TeePee on my to-make list for years now! When Meaghan and Lindsay of Hawthorne Threads asked me to participate in a Blog Hop for their new in-house fabric line Forest Fables, of course I said yes. We bounced around a few ideas and then I remembered my TeePee idea and everyone was excited!

Bohemian TeePee with Forest Fables Fabric

DIY TeePee with Forest Fables Fabric

I have followed Hawthorne Threads for years so I knew they sold designer fabric but I really had no idea that they had so many of their own fabric lines that they printed themselves! The best part is they print the fabric to order so they never run out :) When I received the fabric it felt different than usual quilting cotton, they sent a note about washing and about using a finer needle since their thread count is so high. I always prewash when making clothing but this TeePee won’t ever be washed so I worked with it how it was, which was awesome since the fabric is somewhat stiff after printing.

Bohemian TeePee with Forest Fables Fabric

Their newest line, Forest Fables was inspired by the classic tales of “Three Billy Goats Gruff” and “Chicken Little”, as well as handcrafted embroidery and paper cutting. As soon as I read that I was all in haha! I love the blush and mustard colors in the Harvest Palette. I obviously had to go with the Folk Tails for the main body and I accented with Floral Stitch for the door.

DIY TeePee with Forest Fables Fabric

I did a little bit of “DIY TeePee Research” and it seemed like all the ones that I found online that I like originated from this one HERE. The tutorial is great and worked perfectly for me! I love when I don’t have to reinvent the wheel :) I was inspired by a few solid lace TeePees I have seen in blogland so I wanted to incorporate some lace in mine too. I traced out a pattern piece for the panels that I found in the tutorial but I just hacked it on the top part. I cut fabric panels of the bottom pattern piece and lace panels for the top (don’t forget seam allowances on both pieces). Then I sewed them together, ironed the lace toward the fabric side and top stitched. From there I could just follow the original tutorial just the same.

DIY TeePee with Forest Fables Fabric

DIY TeePee with Forest Fables Fabric

DIY TeePee with Forest Fables Fabric

DIY TeePee with Forest Fables Fabric

I was originally going to make my own bias tape but I had been hoarding that gold tape for almost a year and this project seemed perfect!

DIY TeePee with Forest Fables Fabric

DIY TeePee with Forest Fables Fabric

DIY TeePee with Forest Fables Fabric

Lastly, I added some “Bohemian Flair” to the top. I wrapped yarn around the top and attached it with hot glue.

DIY TeePee with Forest Fables Fabric

DIY TeePee with Forest Fables Fabric

I used some more fabric from the line and a scrap of gold that I had to make some hanging embroidery hoops. I also did a little fabric bunting out of long scraps that I had.

DIY TeePee with Forest Fables Fabric

DIY TeePee with Forest Fables Fabric

DIY TeePee with Forest Fables Fabric

We basically all (the kids and I) love it! And the fabric couldn’t be more perfect! Let me know if you have any other questions about the TeePee! But now for the best part…
DIY TeePee with Forest Fables Fabric

DIY TeePee with Forest Fables Fabric

DIY TeePee with Forest Fables Fabric

 A GIVEAWAY!… One lucky reader is going to win a Forest Fables Fat Quarter Bundle in the Harvest color way!

a Rafflecopter giveaway

Bundle Image copy

blog hop logo

Be sure to check out all of the other fabulous blogger on the blog hop!

Monday, December 7th – Brooklyn Pattern Co.
Tuesday, December 8th – Clover and Violet
Wednesday, December 9th – Taylor Made
Thursday, December 10th – Film in the Fridge
Friday, December 11th – Hawthorne Threads


Related Posts Plugin for WordPress, Blogger...

Filed Under: fabric, kid stuff, sewing, tutorial, Uncategorized Tagged With: furniture

  • 1
  • 2
  • 3
  • …
  • 9
  • Next Page »

Welcome to Taylor Made

http://www.taylormadecreatesblog.com/about-me Hi Yall! I'm Taylor... a crafty mom of three from Houston, TX. I love sewing, collecting floral fabric, eating Mexican Food & Margaritas, photography, brights colors, rearranging, and decorating. Taylor Made Creates is all about creating a fun, colorful home, sewing cute things and eating good food. Check out my SHOP HERE HERE! Thanks for stopping by!

Search

Pin with me!

Like Me :)

Facebook Pagelike Widget

More Recent Posts

  • Kids Camping Shirts
  • Mermaid Birthday Party
  • Conversation Heart Cold Packs
  • Holiday Apple Tea Punch
  • Purple Princess Costume
  • Letterboard Costume
  • La Croix Costume
  • Phineas and Ferb Costume

FAVORITES

  • Triangle Baby Quilt
  • How to do a Patterned Dot Wall
  • Winged Peasant Dress
  • DIY Leather Tote
  • a Happy Birthday Quilt Block
  • Mini Fabric Lamps
  • Stethoscope Covers
  • More Casserole Carriers
  • Built in Bunkbeds

Copyright © 2021 · Web Hosting By RFE Hosting