TaylorMade

DIY, Home Decor & Sewing

  • Home
  • SHOP
  • DIY & Sewing
    • For the Home
    • Sewing
    • Costumes and Holidays
    • Cricut Projects
    • Crafting
  • Parties
  • Recipes
  • Home Tour
  • Favorites
  • About

Shiplap Wall Tutorial

January 13, 2019 By Taylor Leave a Comment

First post of 2019! I finally got around to organizing my shiplap photos to share our Shiplap Wall Tutorial! You all probably have a shiplap wall in your house at this point haha, but for those who don’t, This is for you :) This treatment is so pretty and looks so put together but it’s actually really easy!

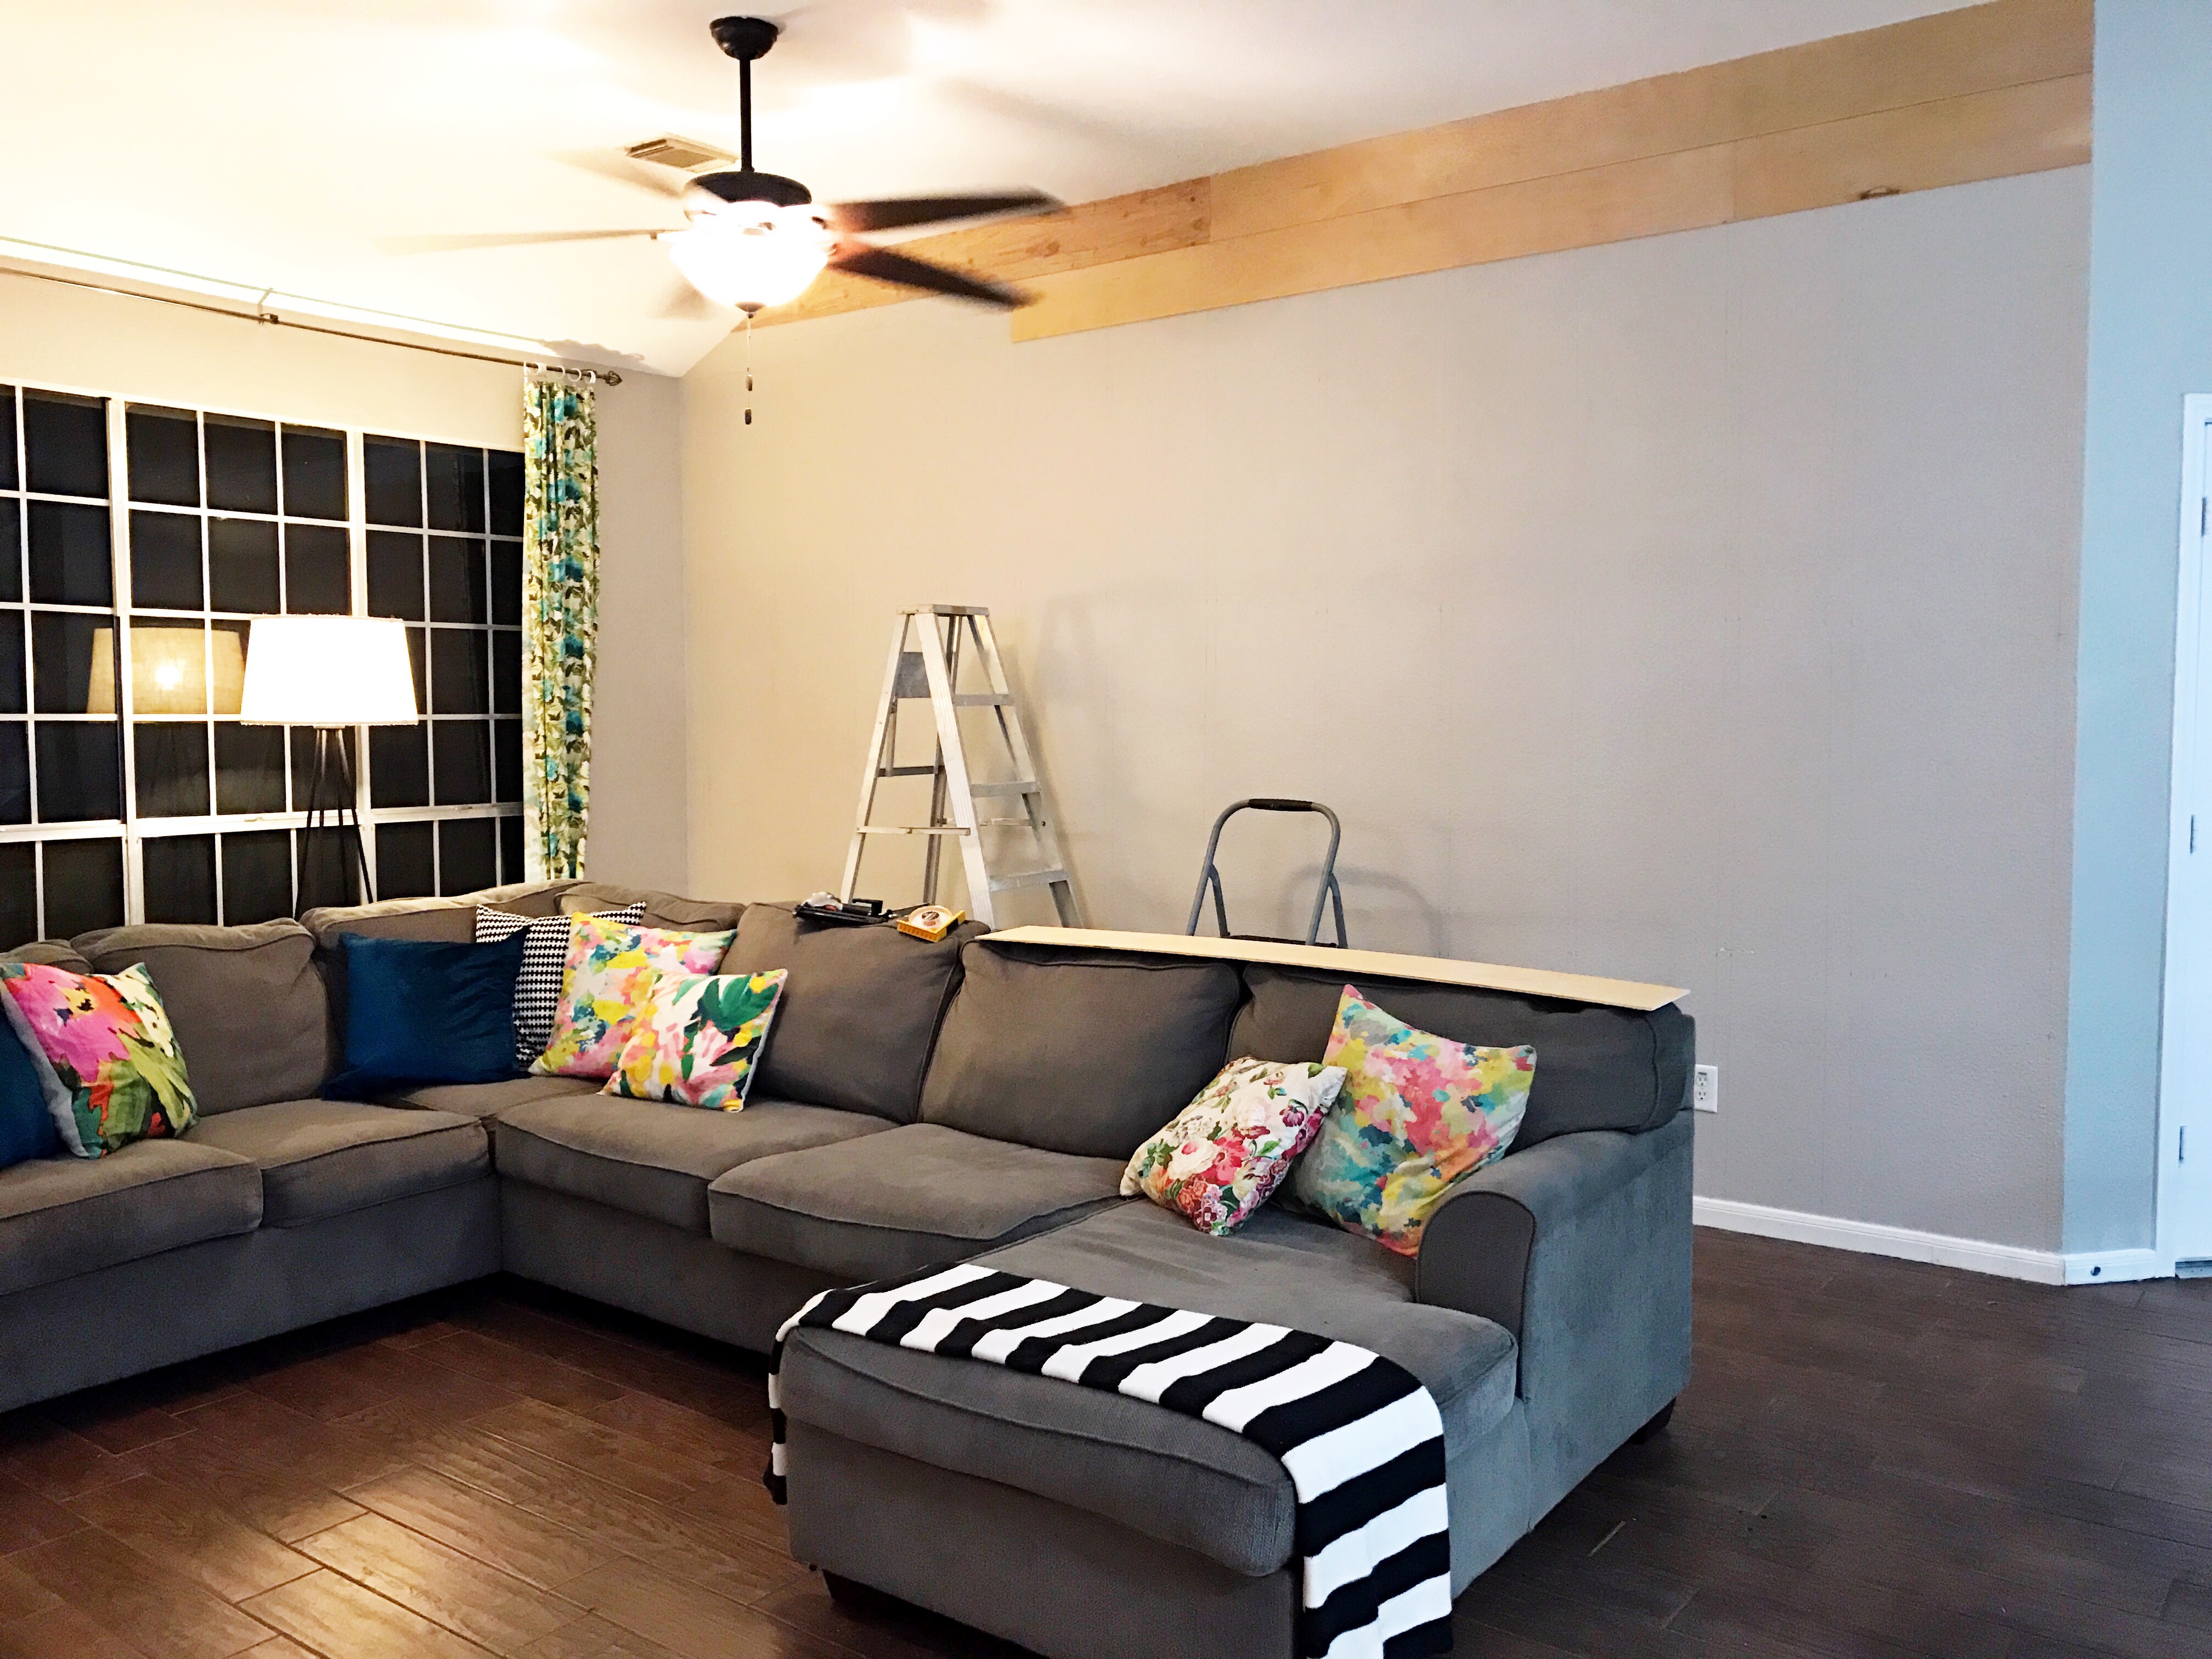
We have 10 foot ceilings and this wall is about 16.5′ wide so that is the area we are working with here. We went to Home Depot and got the super thin 3/16th” plywood (which my husband said is sometimes called paneling). We did the math and with our area we purchased 6 sheets and that worked out perfectly for us. A sheet of plywood is 8′ x 4′ so, we had it cut into 8″ strips (longways) because that way you don’t have any waste and you get 6 long boards out of one sheet. Don’t forget that hardware stores will cut your boards for you! We could have done it at home very but it’s free and why not just have it done before you even get home, right?! We found a super nice Home Depot employee and on their fancy machine it took him 10 minutes!


So, like I said with our 6 sheets of plywood that we had cut into 8″ strips that left us with 36 boards. You will have to do the math depending on your wall size but it should be pretty easy to figure out… each board ends up measuring 96″ x 8″. We started our boards at the top because if we had to cut anything to fit later on in the project it would be the part that is hidden by the couch. We used a nail gun and used two nails on the right, two in the center of the board and two on the left side.

I wanted it to look a random but that also took a little planning. I wanted to make sure that no seams ended up right over each other but also not “perfectly” bricked either.

Please excuse the terrible, badly lit cell phone pictures on this project. We had to work on this after Bryan got home from work and after the kids were fed and bathed. Get it in where you can fit it in right? Here are a few pictures I shared on Instagram stories. We used the “nickel method”. When we started a new board we each held up a nickel on both ends of the board then butted the new board up against the nickels. We did that on the horizontal gaps but not the vertical gaps.

Once we got going, we got into a grove and it came together quickly! We did have that corner angle and two electrical outlets that we had to cut around.

Then it was time to paint. I don’t love painting but painting one wall is doable for me haha! We had to stop for a few days in between for kids activities and Bryan actually loved the raw wood, I on the other hand could not wait to paint it white! I used Sherwin Williams Pure White.

These boards were super thirsty so I had to do 3ish coats.

Because of the “nickel” gap in between the boards the paint started filling in the spaces in some spots. I used business cards to go between each space and clean the paint up.

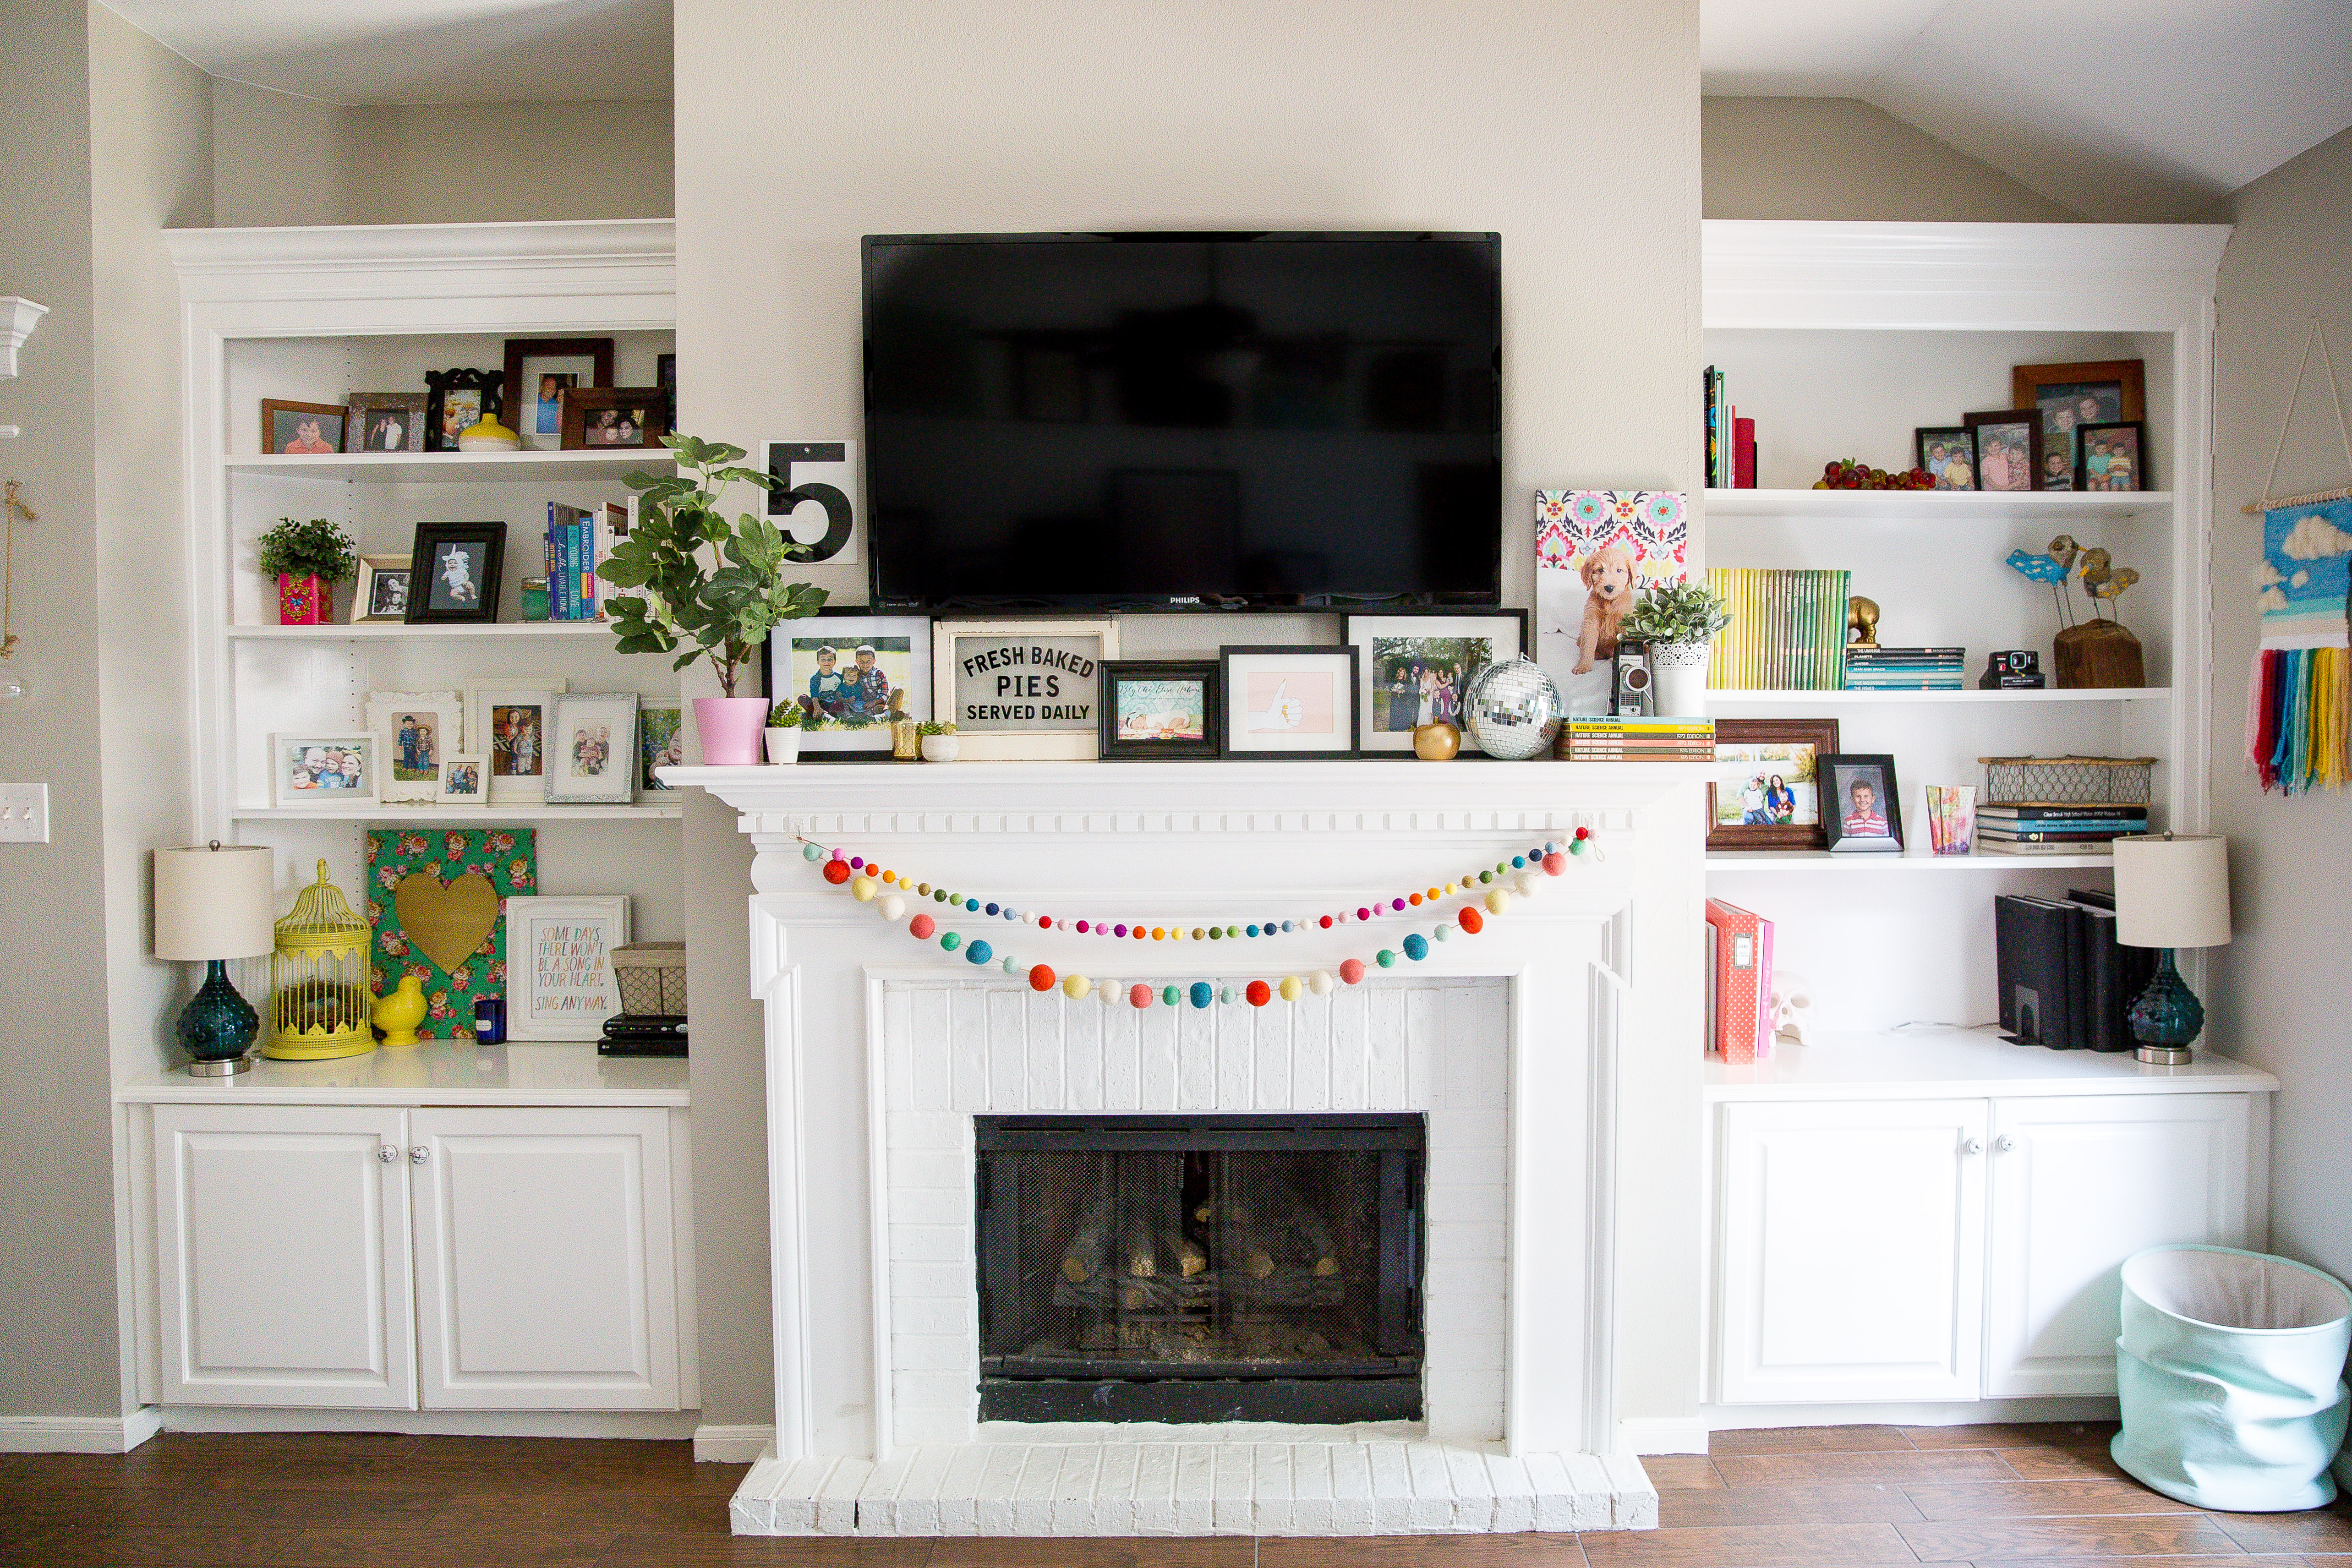
Finally after 3+ coats it started coming together! Before the shiplap was installed I always has a gallery wall over the couch but wood isn’t nearly as forgiving with holes like sheetrock is and I move pictures around a lot. So, I decided we needed some picture rails over the couch so we could move things around easier. 

I drew the rails out and this is what Bryan came up with. We used 1″x4″ boards which are 8 feet long. He stripped down a little ledge into a 1″x1″ for the front of the rails. It looks like 2 rails but there are actually 4 rails that are just hung right next to each other.  Again, our wall is a little over 16 feet wide so the two 8 feet rails fit almost just right. There is about two inches on each side of the rails.

Overall I LOVE how it turned out! It took a few days but the work was easy once we got going. It actually makes the room look so much bigger too, maybe with the help of the picture rails. We have a pretty small living room (or cozy as I like to call it :) so we have to utilize all the space.

Let me know if I left anything out or if you have any other questions about doing a Shiplap Wall. I will link sources down at the bottom :)

Sources:

Couch – Ashley Furniture – Loric Smoke Sectional

Rug – Rugs USA

End table – Tutorial HERE

Small Lamp – Target

Floor Lamp – World Market

Big watercolor art – Emily Jeffords for Minted

Letteroard – Letterfolk

You are loved sign – Bonnie Christine

Rainbow wall hanging – my mom made it and its so beautiful!

Filed Under: home goods, remodeling, tutorial Tagged With: decor, room makeovers

DIY Ombre Curtains

June 15, 2015 By Taylor 4 Comments

ombre curtains

When I envisioned my dream craft room I knew I wanted everything very white so I could decorate with my bright (and loud) craft supplies and fabric. I searched for some fun curtains for months but couldn’t find any (that I could afford ha!). So I decided to make my own DIY ombre curtains! I went with pink but the color possibilities are endless. This project was so simple but I took a few pictures of my steps, I also did this in the middle of the day and the garage lighting is terrible.

ombre curtains

Materials:

– White Curtains ( I found mine at World Market)

– Liquid dye (I used Rit Liquid Dye in Fuchsia)

– A large bucket

Instructions:

Fill your dye bucket with the hottest water from your sink and add a little salt. The salt helps the color stay vibrant! Then add your dye, I used two bottles because I had four panels and I wanted the color really bright.

ombre curtains

Hang the curtains up somewhere that you can adjust the height, I used  two hangers and my overhead garage door.  My curtains were super long so I had to fold the fabric over on the top.

ombre curtains

ombre curtains

Then, start dipping the bottoms of the curtains in and out of the dye bath.

ombre curtains

Pull them out a little then hang them and leave them in that spot for about 8-10 minutes or so.

ombre curtains

Repeat this same thing a few more times. Every 8-10 minutes, pull the curtains in and out of the dye bath a few times then hang them a few inches higher than you did the last time and leave them for another 8-10 minutes. I did this about 4-5 times total until I was at the bottom of the curtains.

ombre curtains

ombre curtains

Then, ring the remaining dye out and rinse them in cool water. I sprayed mine out with the hose and let them drip dry in a tree because I like to make my neighbors think I’m crazy ;)

ombre curtains

I let mine dry over night then I ironed them. I didn’t want to wash and dry them because I was afraid of them shrinking and mine are just the right length but washing and drying after dying would be just fine!

ombre curtains

ombre curtains

ombre curtains

ombre curtainsombre curtains

I really love how they turned out! They are a fun pop of color but still mostly white just how I like it :) Stay tuned later this week for some updated craft room shots!

Filed Under: craft, fabric, home goods, tutorial, Uncategorized Tagged With: decor

How to do a Patterned Dot Wall

April 22, 2014 By Taylor 99 Comments

patterned dot wall

When I found out I was pregnant last year I was of course thrilled for a new little bundle to join our family. Soon after it sunk in,  I got super excited to do another nursery! We didn’t find out the gender with either of our boys and they were so close in age that I just used the same nursery for both of them. It was gender neutral and of the “pre-pinterest era” so I have had years to collect ideas and get inspired :) I already knew what I wanted long before I even knew the gender so when I found out this girl was a girl… I knew a dot wall was happening.

I know I’m a little late to the gold-vinyl-dot-wall-party but I still love it, so I thought it would be perfect for the wall behind the crib. I have seen the gold dots randomly placed on walls and while I do love random I wanted a pattern this time. I searched and searched for a tutorial on how to get THIS LOOK  in my inspiration photo but I wasn’t able to find much. I called for backup, my mom and sister. I’m sure there are many ways to achieve this look but this is what we did.

I bought gold sticky vinyl online and used my cameo to cut 1.5″ dots. I have the silhouette file saved, if anyone wants it let me know.gold vinyl gold vinyl dotsgold vinyl dots

Other than my dots, I used these supplies: a ruler, tape measure, piece of cardstock, scissors, some very sticky double sided foam tape and a pencil. The other must have tool is a laser level. I found this one at Home Depot for around $8.patterned dot wall

lazer level

After measuring my wall, my mom (the math star of the team) figured out how far apart my dots could be based on how many dots we had. I bought 8 feet of vinyl (8’x12″) and the dots were 1.5″ in diameter so she figured each dot needed to be 6.5″ apart. The very first two rows are the hardest because you have to get everything set from those, so we started at the top of the wall. Thank goodness for my mom and sister! My sister climbed the ladder for all of the tall dots, I didn’t take over until we were about halfway done. (grainy iphone pic)

patterned dot wall

 The whole trick to getting the pattern to look like a pattern is getting straight lines on your wall, enter the laser level. I’m sure you could also use other methods like an overhead projector, use a regular level with a tape measure and pencil, pop a chalk line, etc. But I really liked this little tool. We used the double sided foam tape on the back which needed to be changed every few rows. Once you get it taped it up it rotates 360 degrees so you can get it lined up correctly after mounting it to the wall.

laser level

There is a level on the back but it wasn’t super accurate because of you move it just a hair the line at the end of the wall moves inches up or down! For the first row we started measuring from the ceiling and made a pencil line 6.5″ down on both sides of the wall. For the other rows we measured from the previous dot line. Then we just played with the laser until the line was touching both pencil marks on both sides of the wall.

patterned dot wall

patterned dot wall

patterned dot wall

This is a very hard picture to see but the laser line on the left is below the pencil marks so you have to play with the laser until the the line is perfectly on the marks like the picture on the right. patterned dot wall

As far as the spacing on each row we also spaced the dots 6.5″ apart. Instead of holding a ruler or tape measure between every dot we measured a piece of cardstock and used that as the ruler. We measured 6.5″ from outer edge of each dot and made sure the top of the dots lined up with the red laser line.

patterned dot wall

patterned dot wall

After you get your first two rows up, its pretty easy. A few other tips… every other dot on our left side had to be cut in half. And I did have one dot that I had to put under the power outlet plate.

patterned dot wall

patterned dot wall

I really love how it turned out and I can’t thank my mom and sister enough! We worked one night from about 2-3 hours then I finished it up the next afternoon so it was a pretty quick project. The most time consuming part is getting the level lined up but I love the patterned look so it was worth it!

patterned dot wall

Here is a little peek at the crib. I will have the details on the bedding and quilt next week.

patterned dot wall

patterned dot wall

So does anyone else have a dot wall at their house? Let me know if I left any info out… I am suffering from pregnancy brain lately :)

Filed Under: bedroom, home goods, Silhouette, tutorial, Uncategorized, vinyl Tagged With: decor, DIY

Gallery Wall Update, a New Piece and a Giveaway

August 6, 2013 By Taylor 17 Comments

gallery wall

Look Familiar? Same Gallery Wall, Different House. When we moved (2 months ago) we didn’t have a dresser, and the boys had a mattress on the floor but you better believe I found the wall decor box a hung this ASAP! Previous Wall HERE and HERE.

I love having a fun wall like this because it gives me an excuse to collect unique things and I love the way it looks, a bunch of random stuff that I love all coming together :)

IMG_6587

If you are really good, you might have noticed a new piece up there. When I started gathering things for this a few years ago, I wasn’t ever going to put photographs up there because they are so typical. But then a few weeks ago, Ink361 contacted me about reviewing something for them.

Ink361 is a website for photography lovers and especially Instagram fans, you can order professional quality prints and photo products (from 4x4s to iPhone cases), view amazing photos and get inspired. My favorite part about the site is that you log in with your Instagram ID and there are all of your pictures just waiting for you. They let me choose what I wanted to review; I think I spent about 3 hours trying to decide :/

I went with the Metal Print for the Wall and I even got 2 Mosaics. There are the 10″x10″ size… I think I am going to frame these for another area of my house.

IMG_6484

And I LOVE the way the Metal Print turned out. It has a little spacer on the back so its stands off from the wall and that’s also how you hang it.

IMG_6490 IMG_6486

I think it’s right at home on the gallery wall.

IMG_6589

IMG_6590

The exciting part for you? The amazing people at Ink361 are giving away $50 to one lucky reader and a coupon code for everyone! Enter the giveaway below but of you just cant wait…

use the code TYLRMD30 for 30% off until the end of August! (Code is not valid with any other offer, expires 11:59pm PST Aug 31st) Good Luck!

a Rafflecopter giveaway

Related Posts Plugin for WordPress, Blogger...

Filed Under: home goods, pictures, Uncategorized Tagged With: decor

  • 1
  • 2
  • 3
  • …
  • 5
  • Next Page »

Welcome to Taylor Made

http://www.taylormadecreatesblog.com/about-me Hi Yall! I'm Taylor... a crafty mom of three from Houston, TX. I love sewing, collecting floral fabric, eating Mexican Food & Margaritas, photography, brights colors, rearranging, and decorating. Taylor Made Creates is all about creating a fun, colorful home, sewing cute things and eating good food. Check out my SHOP HERE HERE! Thanks for stopping by!

Search

Pin with me!

Like Me :)

Facebook Pagelike Widget

More Recent Posts

  • Kid's Animal Room
  • Kids Camping Shirts
  • Mermaid Birthday Party
  • Conversation Heart Cold Packs
  • Holiday Apple Tea Punch
  • Purple Princess Costume
  • Letterboard Costume
  • La Croix Costume

FAVORITES

  • Group Fruit Costume for Kids
  • Mini Fabric Lamps
  • a Happy Birthday Quilt Block
  • Octopus Costume
  • How to do a Patterned Dot Wall
  • Handmade Mother’s Day: Recipe Oven Mitt
  • A Peppa Pig Tea Party Birthday
  • Preppy Blue Laundry Room
  • Frida Kahlo Costume

Copyright © 2023 · Web Hosting By RFE Hosting