TaylorMade

DIY, Home Decor & Sewing

  • Home
  • SHOP
  • DIY & Sewing
    • For the Home
    • Sewing
    • Costumes and Holidays
    • Cricut Projects
    • Crafting
  • Parties
  • Recipes
  • Home Tour
  • Favorites
  • About

the taylor tote

March 17, 2013 By Taylor 15 Comments


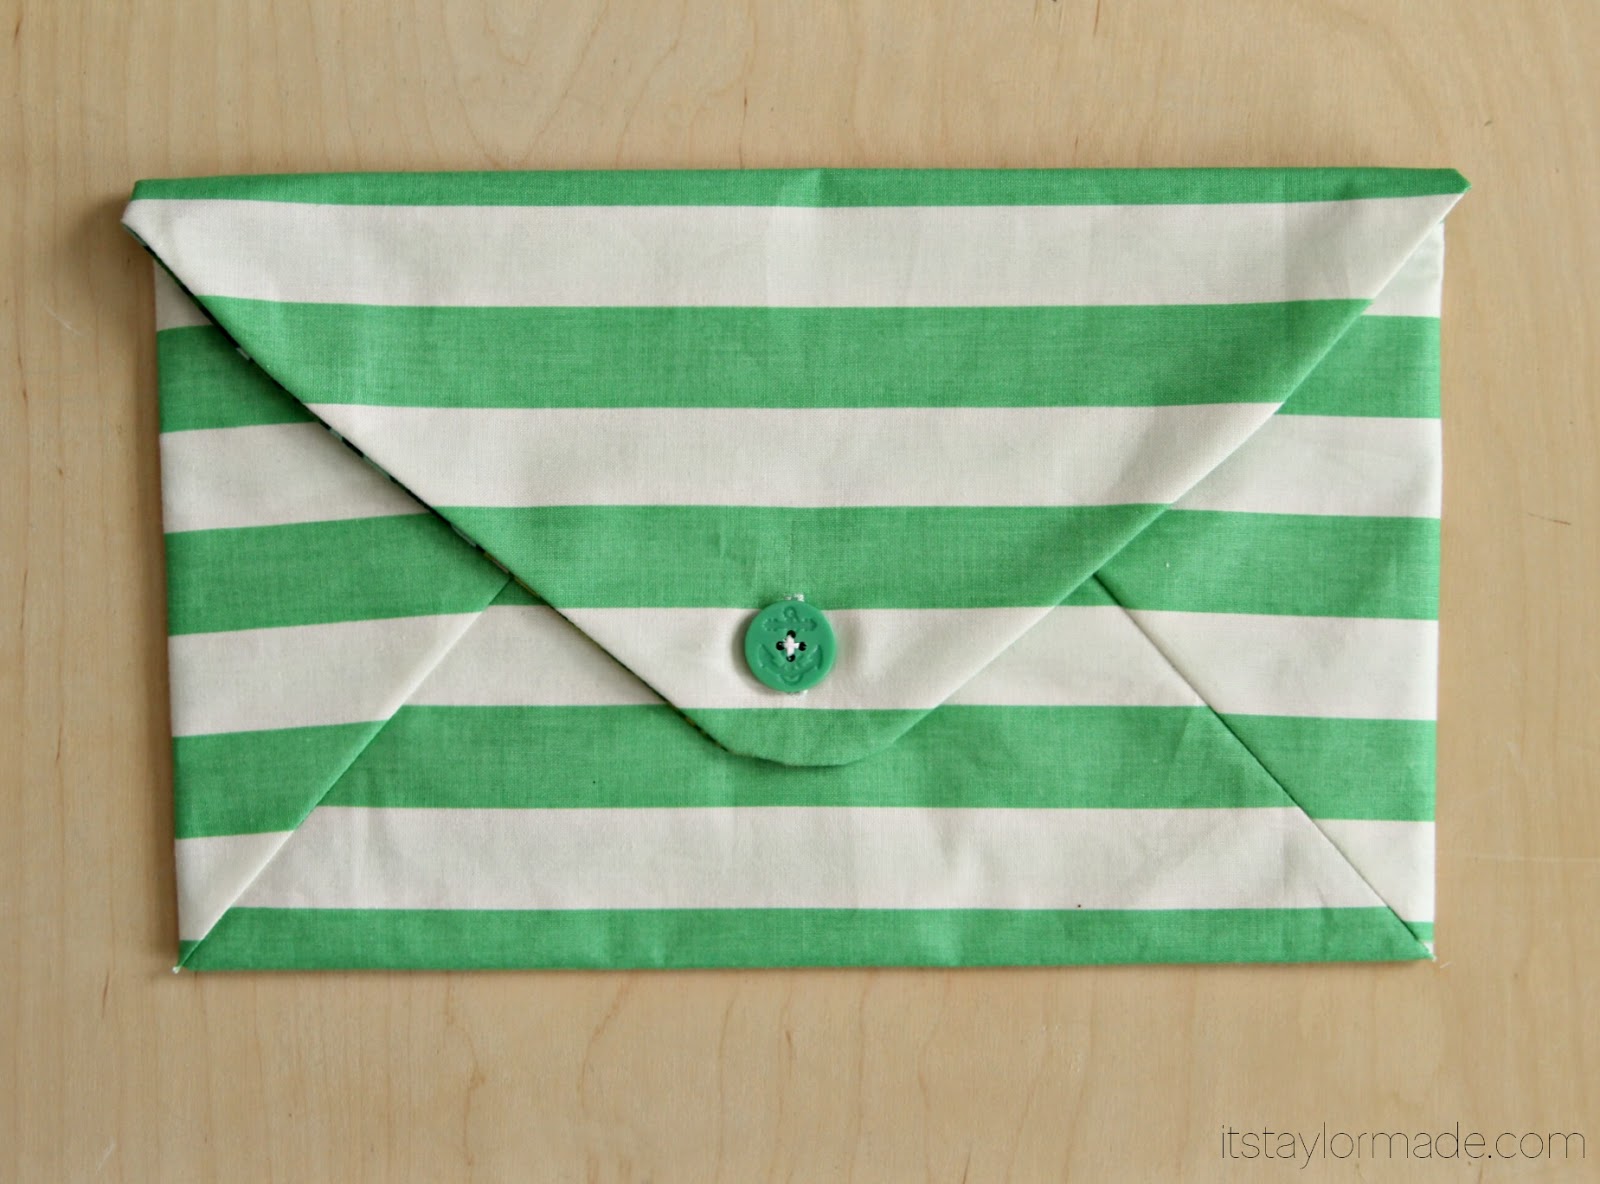
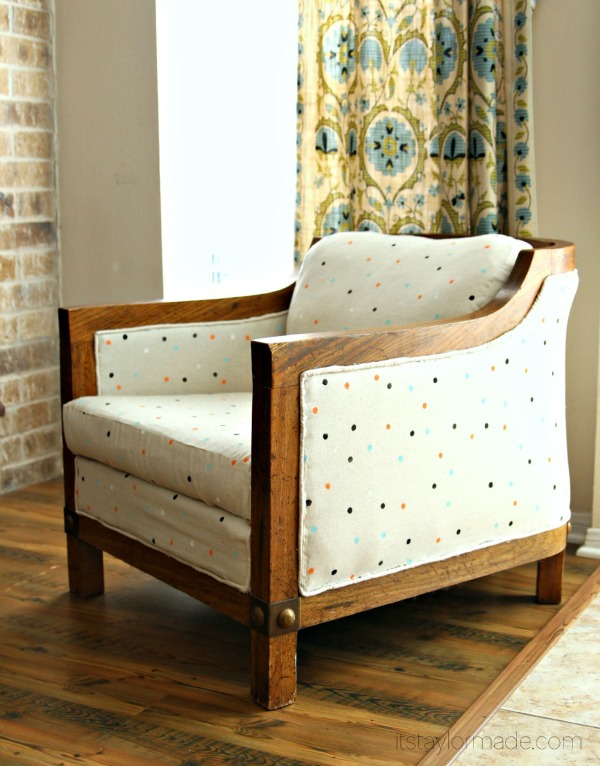
Meet my new favorite thing; The Taylor Tote. I am headed to Blissdom this week (eeek!). I should be planning what I am going to wear or packing or doing laundry. But instead I prepared by making a tote bag, And I love it.

I wanted black and white stripes, hot pink trim and brown leather… but after a late night JoAnn’s visit that involved all the boys, a toddler meltdown and one throwing up – this is what I came home with (yes one really did throw up at JoAnn’s)

From what I hear, I will need to carry around a lot of stuff. There are 3 classes the first day and 2 on the second day. I’m going to bring my DSLR and I need space for all the i’s- so made an iPad and an iPhone pouch.

I also made extra wide handles, which are a definite must so I can load my bag full of stuff from the handmade market :)

Apparently everyone loves the new tote, including a red wasp who tried to be a part of my photo session.
Random fact- last summer I was attacked my a ball of red wasps that my son was trying to grab, he was un-phased and I couldn’t walk for days. Now I call them tracker jackers.


Speaking of packing, if you have been to a blog conference pretty please give me some tips!! What does everyone wear on the dress up night? How fancy do people get for the classes? And what do I need to bring besides the “regular stuff”? And if you are going to Blissdom in Dallas this week then leave your info!!

Pin It

Follow on Bloglovin

Filed Under: fabric, sewing Tagged With: accessories

Boy Shorts – Stars and Checks

March 5, 2013 By Taylor 4 Comments

This week Dana and Rae are Celebrating “The Boy“. It might be one of my favorite blog series all year, boys need clothes too right. I was inspired to sew up some new shorts for the boys- I also needed a reason to buy some Lizzy House Constellations fabric. My youngest can totally pull off Constellation Shorts. My oldest likes more “traditional” prints, stripes, solids and plaid. He turned 3 and got picky about what he wears?!

I used Dana’s Kid Pant Pattern for the 2T and just cut them down to shorts. Her kiddos look super tall and skinny so I should have added even more width than I did. They fit for now but there isn’t a ton of growing room in the legs, my son is kind of on the edge of 2T-3T anyway (and kinda cute baby chubby still hehe).

For the 4T I used a free pattern from My Growing Home. Those fit great!

I serged all of my seams and added labels with a size tag so I was feeling pretty professional :) However, I wasn’t feeling professional enough to change my serger thread color because that’s just too much work.

Each pair only used 1/2 yd so I have fabric left over, yay for fabric hoarding.

Look at these two scheming. These little outfits would be cute for St. Patty’s Day, now pretend you didn’t see them. Have you done any boy sewing lately? I will be honest, It’s hard to see all the cute dresses and tunic tops for girls everywhere but I love making stuff for my cute boys too :)

Pin It

Filed Under: boy, fabric, sewing Tagged With: kids

Envelope Clutch

February 27, 2013 By Taylor 7 Comments

Last week Kate from See Kate Sew announced a new Sew-Along. And I never miss a See Kate Sew Sew-Along :) She has the free pattern HERE if you want to jump on in. It was super easy to follow, I whipped mine up from start to finish in less than an hour!

I originally wanted a gold button but I vowed to make this only from things I already had in my craft room, and this button was the perfect shade of green. Also, I love anchors. Does anyone else have issues cutting into their own hoarded fabric?

I am in LOVE with the lining!!

I wanted to make it look like a real envelope so I added an “address and stamp”.

Thanks Kate for another fun sew-along!

Pin It

Filed Under: fabric, sewing Tagged With: accessories

Barrel Chair Makeover

February 17, 2013 By Taylor 30 Comments

This is the story of a chair. It all started two years ago when I bought a chair at a garage sale and was so happy to take it home and give it the makeover it deserved. Then I threw it in the garage because I don’t know the first thing about reupholstering furniture. I called around locally to find a place that would recover it… I was looking at over $400. I didn’t need it that bad, so there it sat collecting sawdust. Then I got a crazy thought… maybe I could do it? I said to myself- you’re crafty, how hard could it be… get out there and recover that chair. So I drug it inside, And I did it! Probably the most challenging DIY to date! It wasn’t that easy… and now I know why people wanted to charge me $400. It’s not perfect but I have a new chair and I’m glad I challenged myself.

Just in case my crazy plan didn’t work I didn’t want to spend a fortune on fabric. When I got the original quotes a few companies told me I would need about 6 yards of fabric, and upholstery aint cheap. I was telling my super smart mom all about my chair and she suggested getting a cheap muslin/canvas and make my own fabric. So that was my first step, props mom :) I got 6 yards of muslin for $2.99 and used my 40% coupon. Then I found a color palette I loved and some small foam pouncers.

The trouble was finding where to hand stamp 6 yards of fabric with two little boys on a rainy day. I left our only table to eat on like this for 3 days, my husband loved it :) Sometimes we have to make sacrifices for creativity, right?

After I took 1 million pictures of the chair “before” to reference, I started ripping it to pieces. I even posted a pic on Instagram about the OTHER fabric I found underneath. That’s right, this was not its first experience with reupholstering. That orange tweed was on the bottom and the whole inside of the chair.

This step also included some “outside time” on a pretty day… after the orange tweed situation there was dust and a smell :/ so I broke out the Lysol and some hot soapy water and went to town.

After my fabric was done my plan was to just lay out each piece on the fabric using that as a template, which worked really well.

I made sure to take out all of the previous staples that I could. I also used man tools like pliers and clamps :) Then I made yards and yards of piping. Overall, piecing the chair together was really fun, it was just a puzzle then involved a lot of staples. The cushion and the pillow were the only sewing I had to do. The hardest part was that back pillow because it was such an odd shape. 

The very last thing was the piping, and I just used hot glue because that’s how it was when I took the chair apart.

I really love the way it turned out. I also loved doing it, yes it was hard but this is my hobby… I don’t like boring crafting haha. It was a challenge but I am glad I can say I once reupholstered a chair. I will also be glad to pay someone else to do it next time :) 
Before and After

a million chair shots….

So what do you think? Have you ever reupholstered any furniture? Or does anyone have any tips?

Pin It

Related Posts Plugin for WordPress, Blogger...

Filed Under: fabric, furniture, home goods Tagged With: furniture

  • « Previous Page
  • 1
  • …
  • 11
  • 12
  • 13
  • 14
  • 15
  • …
  • 23
  • Next Page »

Welcome to Taylor Made

http://www.taylormadecreatesblog.com/about-me Hi Yall! I'm Taylor... an artsy mom of three from Houston, TX. I love sewing, collecting floral fabric, eating Mexican Food, photography, brights colors, rearranging, and rolling clay. Taylor Made Creates is all about creating a fun, colorful home, sewing cute things and eating good food. Check out my SHOP HERE HERE! Thanks for stopping by!

Search

Pin with me!

Like Me :)

Facebook Pagelike Widget

More Recent Posts

  • Kid's Animal Room
  • Kids Camping Shirts
  • Mermaid Birthday Party
  • Conversation Heart Cold Packs
  • Holiday Apple Tea Punch
  • Purple Princess Costume
  • Letterboard Costume
  • La Croix Costume

FAVORITES

  • Swan Wings + Hello Ollie Fabrics
  • How to Glaze Furniture
  • Color Wheel Clock
  • Pippa Peplum Piggy Dress
  • Mini Fabric Lamps
  • Triangle Baby Quilt
  • DIY Chalkboard
  • DIY Roach Costume
  • Christmas Candy Tablecloth

Copyright © 2026 · Web Hosting By RFE Hosting