TaylorMade

DIY, Home Decor & Sewing

  • Home
  • SHOP
  • DIY & Sewing
    • For the Home
    • Sewing
    • Costumes and Holidays
    • Cricut Projects
    • Crafting
  • Parties
  • Recipes
  • Home Tour
  • Favorites
  • About

Car Seat Strap Covers

January 30, 2011 By Taylor 3 Comments

Don’t you love an easy project that you can finish in just about an hour? I know I do, especially because I have problems a little trouble finishing projects in a timely fashion. I wanted to recover baby #2’s car seat and realized that was going to lead me to my previous problem, an unfinished project. I just don’t have enough time so I though I would spruce up his/her car seat straps! Not to mention, the old straps were looking a little rough. Does anyone have the Chicco Car seat? I LOVE it but the strap covers that came on it were sewn-on which made them super hard to wash. I decided to make my own with Velcro so I could wash them easier.

This project is really easy, all I did was use the existing strap covers as a template, a little quilt batting and used some existing fabric that I had. I did make my own bias tape (which is a little more time consuming) but you could just buy some for an even easier time.
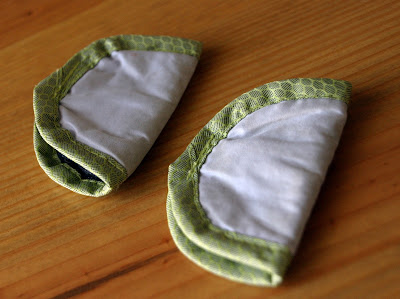
Here are the original strap covers and the fabric I picked out, I wanted it to still match the carrier. I used the star fabric for the bias tape. I didn’t include how to make your own bias tape in the tutorial, you can find it online or like I said you can buy it from any craft store.
Lay out the original strap covers as a template. Trace onto your fabric and cut 4 new pieces. Front and back for both.
Don’t forget to cut the batting for the inside of the pieces like I almost did, oops!
Make (or buy) your bias tape, for the Chicco covers you need about 35″”. By the way… I have made my fair share of bias tape and I just found out that there is a cheap tool that folds the fabric for you and makes it so much easier! Where have I been? That is on the to-do list for this week.
Sew the “circles” of the strap covers with wrong sides together and the layer of batting in between. So it should be fabric facing down, batting and fabric facing up in your sewing machine.
Pin the bias tape all the say around on both covers and sew it on.

Lastly, I used a small strip of Velcro as the closure. Here is the before and after!

Not only will these be easier to take on and off, the original fabric was so scratchy and the new covers are soft fleece. I think baby 2 loves them already!

Filed Under: baby stuff, fabric, kid stuff, sewing Tagged With: kids

Bulls-eye Pillow

January 12, 2011 By Taylor 6 Comments

My house is feeling the effects of the “nesting phase”. I had a productive weekend and almost have the “babies” rooms switched out (Yes, I am still calling Finn an baby!). With all the baby preparedness I have been doing, I thought I would take a little break and do a quick craft for my own room. I whipped out this super easy pillow in 40 minutes! I saw something yesterday that reminded me of my Mom’s old bedding from when she was little (because she still has the pillowcases to prove it). So here is the 60’s inspired Bulls-eye Pillow.

 
This is the most unscientific tutorial ever!
 
Supplies:
– 4 pieces of felt
– stuffing
– 1/2 yd of solid fabric
 
Directions:
-Cut 2 14″ squares from your solid fabric
 
 
-Pick out 4 pieces of felt (in a monochromatic family and sort lightest to darkest)
 
 
– Use a template of some sort (even a bowl) to trace your smallest circle. Mine is about 5″ in diameter. Sew that circle onto your next color. Use a very small seam allowance. Then carefully cut around it about 1/2″ all the way around. (I told you this is not scientific)


-Keep doing this with all of the “layers”. Then pin the bulls-eye to the front of the pillow and sew into it the same way you were sewing onto the felt.
 
 
– Finish just like you would any pillow, pin and sew right sides together leaving room for flipping. Stuff and hand-sew the opening. Voila!


Look at it’s new happy home :)


Filed Under: bedroom, fabric, felt, home goods, sewing, tutorial Tagged With: home goods

Yo Gabba Gabba… Yoooooooo

December 10, 2010 By Taylor 1 Comment

 
Finn loves Yo Gabba Gabba, at first I thought it was a little creepy, but I have to admit I kind of like it too. The other day we were playing a game online at Nick Jr.com and I saw a little section called crafts. So, of course, I had to interrupt the game and see what it was all about. My eye was suddenly drawn to… a Brobee Snuggle Pillow! Are you serious, Finn would love that. The Nick Jr website even has a template for all of the parts of the face and has all of the characters. Brobee is Finn’s favorite so I made him but I might make the others soon. Their version is a “No Sew” version, but sewing it will make it last so much longer. I also used a thin fleece for the back instead of felt so it will be even softer. 


You can print the template right from the website HERE! Hi Brobee.


Finn is going to be so excited… I hope I cant wait until Christmas, only 14 days!

Filed Under: craft, fabric, felt, kid stuff Tagged With: kids

Framed Tablecloth

June 10, 2010 By Taylor 1 Comment

This Friday I am having a Dinner party for my friends who are moving :( Sad that they are leaving… but excited to host a dinner party! It is going to be super casual, we are having a Taco Bar with Fresh Mojitos and Tres Leches! Pics and recipes soon to come….
I need to get to work on some stuff for the Dinner Party, so meet the Framed Tablecloth. This couldn’t be easier!
All you need is : (This fits a breakfast area table that seats 4)
1 1/2 yds. of fabric
6 yds. of quilt binding.
Only 2 “ingredients”! The binding usually comes in 3 yd packs and it is about $2.00 a pack from JoAnn Fabrics. I found this amazing floral fabric at Garden Ridge Pottery of all places and it was $3 for 3 yards! I think I might make half-curtains for our kitchen out of the extra fabric. I like to mix colors, so for the binding I got a buttery yellow. All you have to do is attach your quilt binding all the way around. 
There you have the Framed Tablecloth, custom made and under $7.00! Looking at the picture of the Tablecloth laid out makes me think that it would be super cute as a picnic blanket! Too bad I live in Houston and it is 200 degrees and I hate being outside… but it would still be cute. Now I need to get to work on my never ending to-do list! Wish me luck!
Related Posts Plugin for WordPress, Blogger...

Filed Under: fabric, home goods, sewing Tagged With: home goods

  • « Previous Page
  • 1
  • …
  • 21
  • 22
  • 23

Welcome to Taylor Made

http://www.taylormadecreatesblog.com/about-me Hi Yall! I'm Taylor... an artsy mom of three from Houston, TX. I love sewing, collecting floral fabric, eating Mexican Food, photography, brights colors, rearranging, and rolling clay. Taylor Made Creates is all about creating a fun, colorful home, sewing cute things and eating good food. Check out my SHOP HERE HERE! Thanks for stopping by!

Search

Pin with me!

Like Me :)

Facebook Pagelike Widget

More Recent Posts

  • Kid's Animal Room
  • Kids Camping Shirts
  • Mermaid Birthday Party
  • Conversation Heart Cold Packs
  • Holiday Apple Tea Punch
  • Purple Princess Costume
  • Letterboard Costume
  • La Croix Costume

FAVORITES

  • Swan Wings + Hello Ollie Fabrics
  • How to Glaze Furniture
  • Color Wheel Clock
  • Pippa Peplum Piggy Dress
  • Mini Fabric Lamps
  • Triangle Baby Quilt
  • DIY Chalkboard
  • DIY Roach Costume
  • Christmas Candy Tablecloth

Copyright © 2026 · Web Hosting By RFE Hosting