TaylorMade

DIY, Home Decor & Sewing

  • Home
  • SHOP
  • DIY & Sewing
    • For the Home
    • Sewing
    • Costumes and Holidays
    • Cricut Projects
    • Crafting
  • Parties
  • Recipes
  • Home Tour
  • Favorites
  • About

A Juice Fast

February 24, 2013 By Taylor 5 Comments

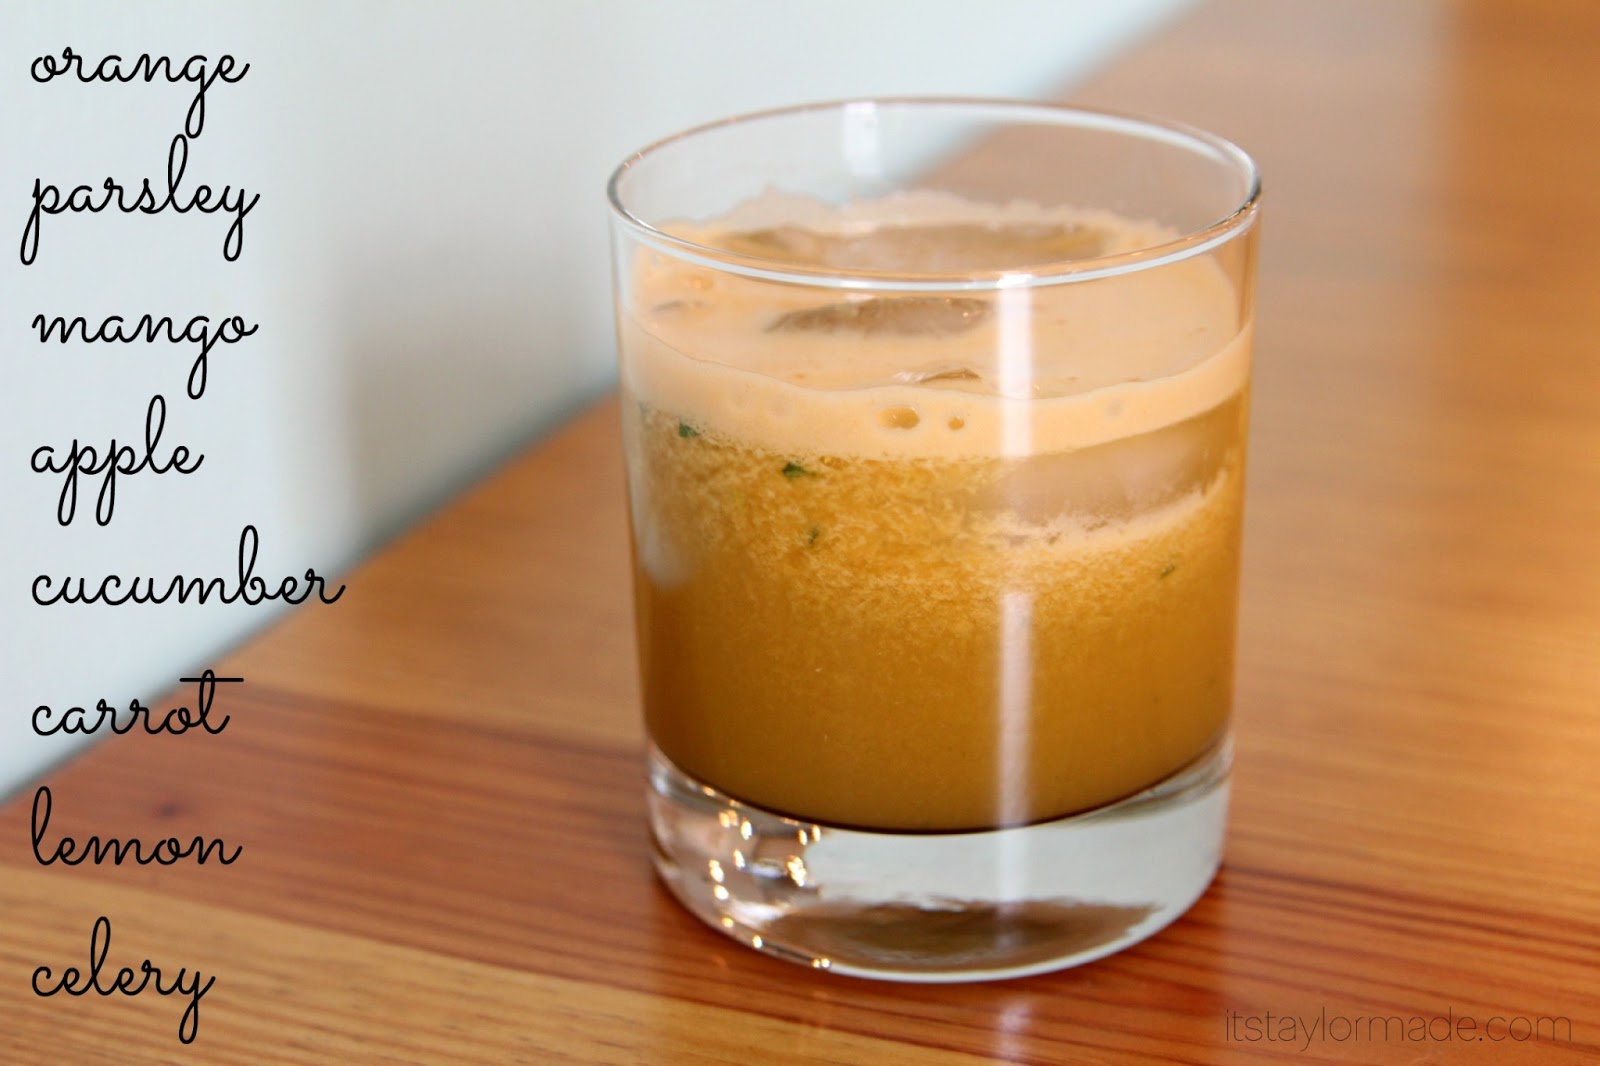
Tomorrow marks the beginning of something super exciting and kind of crazy. Tomorrow I am going to start my Juice Fast. I am shooting for 10 days but if it goes well I would love to do 14 (my crazy husband thinks he can do 30). So what is a juice fast? It’s nothing but fruits and vegetables in the juicer for 10 days straight! No food at all, just homemade fresh juice 4 times a day. I got my juicer last mother’s day and every week I make a big batch of juice for the fam to drink with meals or for a snack. I wanted us to make up for some of the fruits and veggies that I know we don’t get enough of.

Just a few weeks ago I became interested in a juice cleanse/detox and started researching. Then I watched something life changing… literally the most inspiring movie I have ever seen; Fat, Sick and Nearly Dead. A movie about a man with an autoimmune disease who goes on a 60 day Juice Fast. He travels around the US teaching people about juicing and nutrition. To be honest it had been in my Netflix Queue for a while and I thought I could get a recipe or two from it. Also, Joe had the same juicer I have and the cover looked cute :) I had no idea I would love it so much. I think anyone and everyone should watch this documentary! So, I talked my husband, mom and sister into watching it- and guess what they are doing the Juice Fast too! My mom and sister even started 2 days ago. I learned so much about micro-nutrients vs. macro-nutrients and what they do for of our bodies. I might or might not be in love with Joe Cross by the way.

I made this juice last week with what I had left (to make room in the fridge) and we loved it! It could use a few more veggies but this could be a good “gateway juice” for your kids or husbands who are tentative juice drinkers.

So here we go, I’m super excited. If you have any advice, wisdom, or just some words of encouragement for me (and my fellow juice fasters) then please share! I will keep everyone updated here and I will post my concoctions daily on instagram too (@taylormadeblog) Wish me luck!

Pin It

Filed Under: Uncategorized Tagged With: drinks

Barrel Chair Makeover

February 17, 2013 By Taylor 30 Comments

This is the story of a chair. It all started two years ago when I bought a chair at a garage sale and was so happy to take it home and give it the makeover it deserved. Then I threw it in the garage because I don’t know the first thing about reupholstering furniture. I called around locally to find a place that would recover it… I was looking at over $400. I didn’t need it that bad, so there it sat collecting sawdust. Then I got a crazy thought… maybe I could do it? I said to myself- you’re crafty, how hard could it be… get out there and recover that chair. So I drug it inside, And I did it! Probably the most challenging DIY to date! It wasn’t that easy… and now I know why people wanted to charge me $400. It’s not perfect but I have a new chair and I’m glad I challenged myself.

Just in case my crazy plan didn’t work I didn’t want to spend a fortune on fabric. When I got the original quotes a few companies told me I would need about 6 yards of fabric, and upholstery aint cheap. I was telling my super smart mom all about my chair and she suggested getting a cheap muslin/canvas and make my own fabric. So that was my first step, props mom :) I got 6 yards of muslin for $2.99 and used my 40% coupon. Then I found a color palette I loved and some small foam pouncers.

The trouble was finding where to hand stamp 6 yards of fabric with two little boys on a rainy day. I left our only table to eat on like this for 3 days, my husband loved it :) Sometimes we have to make sacrifices for creativity, right?

After I took 1 million pictures of the chair “before” to reference, I started ripping it to pieces. I even posted a pic on Instagram about the OTHER fabric I found underneath. That’s right, this was not its first experience with reupholstering. That orange tweed was on the bottom and the whole inside of the chair.

This step also included some “outside time” on a pretty day… after the orange tweed situation there was dust and a smell :/ so I broke out the Lysol and some hot soapy water and went to town.

After my fabric was done my plan was to just lay out each piece on the fabric using that as a template, which worked really well.

I made sure to take out all of the previous staples that I could. I also used man tools like pliers and clamps :) Then I made yards and yards of piping. Overall, piecing the chair together was really fun, it was just a puzzle then involved a lot of staples. The cushion and the pillow were the only sewing I had to do. The hardest part was that back pillow because it was such an odd shape. 

The very last thing was the piping, and I just used hot glue because that’s how it was when I took the chair apart.

I really love the way it turned out. I also loved doing it, yes it was hard but this is my hobby… I don’t like boring crafting haha. It was a challenge but I am glad I can say I once reupholstered a chair. I will also be glad to pay someone else to do it next time :) 
Before and After

a million chair shots….

So what do you think? Have you ever reupholstered any furniture? Or does anyone have any tips?

Pin It

Filed Under: fabric, furniture, home goods Tagged With: furniture

I Wheelie Like You Valentine

February 10, 2013 By Taylor 6 Comments

Last week Jamie from C.R.A.F.T. asked me to share a cheesy valentine craft for her series “Share the Love”. In case you missed it over there, here it is again! (fun fact, Jamie and I are going to be roomies at Blissdom Conference in a few weeks, yay!) When she asked us to choose a saying naturally I picked a boy friendly one :) My boys are obsessed with cars/trucks/boats/planes/trains… the usual boys stuff. So, I knew they would love a Car Valentine to give to their friends!
All you need:
cardstock
dollar store cars/trucks
washi tape
free printable
printer and scissors
I found these neon trucks at the dollar store, 12 for $1 – score!
Link to the Free Printable. Just print at 100% for 6 Valentines!
I used a small piece of washi tape and cut it in half lengthwise.
Super easy…
…and Boy Approved :)

Filed Under: boy, holidays, paper Tagged With: holidays

Super Scarlett Juice

February 6, 2013 By Taylor 1 Comment

Welcome to TaylorMade’s new series, “The Juice Journals”. I am so so soooo excited about having a excuse to make even more juice :) Last Mother’s Day I introduced my new juicer and I made my very first juice, Dr. Oz Green Drink. With the “trendiness” of juicing, that post has been a hit on Pinterest. I am constantly looking for more recipes and more recently have started making my own concoctions. I am not a big breakfast eater but I actually look forward to my juice. I also love all fruit but I hate to admit that I’m not as fond of vegetables. I eat them because I know I need to but I’d rather eat Mexican Food :) So this is a good way for me to sneak in a bunch of extras for me and my kids.
Every month I will try out new juice recipe and let you know how it goes. Without further adieu, here is the first ever Juice Journals recipe – Super Scarlett. The color came out so pretty, I knew it was perfect for February.
Super Scarlett:
1 green apple
4 carrots
1 beet
kale
pomegranate
celery
2 oranges
About the taste… I will be honest, this was my first time to juice a beet so all I did was wash it. It was so pretty so I took a huge gulp and the juice had kind of a dirt flavor. Not as in I’m trying to insult by calling it names, it actually had a soil/earth flavor. I realized later I should have peeled the beet. Beets are a root vegetable so they have that same flavor as a potato peel. I peeled another beet and juiced it again in a smaller batch and it was so much better. Moral: peel beets, sweet potatoes, carrots etc. Overall, I would definitely make it again as long as I PEEL THE BEETS :)
This has been your first installment of the Juice Journals. I already have so many ideas… If you have any juice recipes you have posted/tried or anything you want me to try, pretty please leave it in the comments!
Happy Juicing.

Pin It


Filed Under: Uncategorized Tagged With: drinks

Valentine Mantle

February 4, 2013 By Taylor 5 Comments

Happy February
happy garland (tutorial at MADE)

heart banner (tutorial HERE)

birdcage with a fresh coat

Pin It


Filed Under: holidays, home goods Tagged With: holidays

Diaper Bag Tag

February 1, 2013 By Taylor 3 Comments

Welcome to the last installment of the baby shower :) You can read more about the shower HERE and about the Baby Quilt I made HERE. I just needed a little something to add to the baby’s basket. I always wanted to make one of these for my boys, but they are kind of too big now. Big boy backpacks and lunchboxes that they hold themselves…. so sad.
For the tag, I kind of added as I went but I did snap a new (night) pics. First, I used my PSA Monogram Stamps and stamped right on the solid pink fabric. I used really stiff interfacing and sandwiched each fabric with that in between.
Then I started layering by sewing directly onto the next fabric.
I traced a tag shape onto the base fabric with fabric marker. Then added a ribbon and backed it with felt. I sewed directly on that line.
Then I put it all together.
This is really cute added to the wrapping of a baby gift too!

I also made little tags for the headband bar at the shower.

Remember this.

For the “activity” all of the guests made Gabby a headband.  I made 3 different sized headbands and I wanted Gabby to know who made which band. So I made these little gift tags and used my Cameo to cut uniform circles quickly.

Then I used another PSA stamp to add the cute little animals.

I added bakers twine and just hand wrote “size” and “from” on the back.

Last shot of what the new mommy got to take home :)

Whew… and there you have my (what took me two weeks) round up of the Baby Shower Events. It’s always fun to plan something crafty. I have another shower I’m co-hosting coming up in April, yay! 

For more ideas on how to use these stamps visit PSA Stamp Camp blog!

Pin It

Filed Under: baby stuff, fabric, felt, girl, paper Tagged With: kids

Baby Blanket with Name Applique

January 28, 2013 By Taylor 4 Comments


A new mom can never have too many baby blankets, right? Especially ones with names on them. You want every excuse to see your new baby’s name in action. And a handmade baby blanket is something you keep forever. Here is Gabby’s baby blanket I made for her Shower last week. (Shower details HERE)

I started by making the ruffled edges. I found pretty pink gingham and tore it into strips.

Then I used my ruffle foot. And ruffled, and ruffled and ruffled.

I used a yard of minky for the back and a yard of the floral print cotton for the front.
I rounded the corners with a bowl. Then, put the minky aside because its time for the appliqued name :)

For the applique, I ironed wonder-under to the back of the fabric. I printed out the name and traced the letters (BACKWARDS) on the back of the wonder-under.

Then I cut out the letters (and took the back of the WO off) and placed them on the fabric. Next, Iron.

Then I used a very sloooow zig zag stitch around each letter. Voila, easy applique done.

To put the quilt together, I actually sewed my ruffle to the minky first. The minky can get slippery and I tend to get messy so this made it nice and neat.

Then, put right sides together with the ruffle in between. The line from the ruffle serves as a guide, I used a 1/4″ seam allowance from that seam. Don’t forget to leave an opening to flip.

Once you have flipped, Press the seams down and top stitch all the way around.

What baby girl doesn’t love pink minky?

Pretty pink package :)

Stay tuned later this week for more shower details, including flag bunting that I may or may not have wanted to keep, a baby bag tag and some cute stamped gift tags!

Pin It


Filed Under: fabric, girl, quilt, sewing Tagged With: kids

Cirque Du Bebe themed Baby Shower

January 21, 2013 By Taylor 8 Comments

You all know my excitement for things related to crafting for baby girls. Imagine my excitement when I found out we would be throwing a girl shower… ahhh- pink! And remember my group of girlfriends called “The Coyotes”? I introduced them properly in THIS post, we have been friends for 20+ years. One of them announced her pregnancy last summer and we obviously started planning the shower right away. But her precious baby girl decided to come too early and had to spend some time in the NICU. She is such a strong healthy girl is currently home now :) We had the shower last week right before she came home. 

I was responsible for the decorations and  helping set up the headband bar. I really can’t take credit for anything else. Our Theme: Cirque Du Bebe – french circus, pink and grey, elephants, polka dots, stripes and more pink :) I made the GABBY banner with my Cameo, and the ruffled streamers (via MADE).


For the Headband Bar; I made 3 different sized headbands in 6 colors. I also made gift tags that I will share later this week. Then we just got buttons, flowers, sequins, ribbon, felt, and fabric scraps to set on the table. We set out some “instructions” and a hot glue gun. One of the girls found an Eiffel Tower to display the finished headbands on.


The girls did an amazing job with the food. 

They even made paper cones for popcorn and “french fires” and displayed them in peanuts in keeping with the French Circus theme. 

I also made a bunting using Gabby’s nursery colors so she could use it at home too.

We had a little punch bar complete with mason jars and paper straws. 


The cake was not only beautiful but was so good too! I made the cake bunting with the scrap fabric from the name banner. I double sided the flags and glued them to bakers twine.

I have talented friends :)
I made some happy garland (also via MADE), because it’s so easy that I am now addicted to making it. One of the girls brought a baby book to match our theme.

Here are all of the hosts. With an action shot of my bunting.

It was such a success. How could it not be with a pink theme :) Happy Shower Day Gabby!


Filed Under: girl, party Tagged With: parties

DIY Kids Play Market

January 17, 2013 By Taylor 17 Comments

A few months ago, I had the really great idea that Santa would bring the boys a Play Market. Then all of a sudden it was Dec 20th and we had nothing. But thankfully Santa is really talented and he can stay up really late and he did just that :) I told my husband Santa just what I wanted and I drew it out. Then I came home from dinner with some girl friends one night and pulled up to the garage to see a market! He’s the best.

Imaginative Play is my favorite mainly because it’s what I would do if I was 3, and I’m here all day too so I am really catering to myself. But seriously who doesn’t love to play pretend? My mom and I used to play “checker lady” when I was little. I think I could go to the Children’s Museum without the kids and have fun.

I don’t have specific measurements or steps but here is kind of what we did. As usual, Bryan constructed and I designed and staged. He used a little over a half sheet of plywood for the top and the shelves. And scrap wood for the posts on the sides and the legs. We used metal dowels for the awning and I used the most perfect fabric ever for the top.

It is big and it does take up a lot of room but I wanted it “L” shaped so it felt more like a market with a counter. I also gave Bryan the measurements for the Land of Nod shopping cart and he custom built the little lip so it fits perfectly to that size.

For the Chalkboard  he cut me a piece of scrap plywood with two holes and I added a ribbon and sprayed it with Chalkboard Paint. Oh good they’re serving hot dogs this week.

I really wanted the baskets to sit at an angle so Bryan built them just to my liking and added a little lip so they stay in place.

He Braced everything and added these brackets for the back part that has legs. We also white washed the whole thing because I still wanted the wood to show through but I didn’t want it raw.

I found the shopping basket at a teacher store and the Shopping Cart and Register are from the amazing people at Land of Nod, who sent us these to review and giveaway last month. They boys still love them! Finn is only 3 so we pretend that everything is $1 to make it easy and he rings me up :)

This little critter snuck into my photo shoot :) Rough hair day.

I would say Santa did good under pressure. You always hope when you spent time on something that your kids will love it, thankfully this time they do! They still play with the Play Kitchen from Santa 2 years ago every single day! That Santa does good work.

What other “pretend play” toys do your kids have? I unfortunately don’t have any doll houses, doll beds, cute tiny ironing boards or washing machines, I’m the only girl here remember.

Pin It

Filed Under: wood Tagged With: furniture

Mini Casserole Carriers

January 13, 2013 By Taylor 8 Comments

Did you know that my casserole carriers are my most popular TaylorMade craft ever? It’s true, they have more views, comments and “pins” than any other craft every single month. I also get many emails every week asking about them. So naturally, it is kind of a go to gift for me- I like to make them as a wedding gift or a Christmas present. But what if the recipient doesn’t need a whole casserole? They are only one person and they just want to take their lunch in a cute little mini version… so I created the Mini-Casserole Carrier. It might even be cuter than the original. Why is everything cuter if its small? The cuteness started with this tiny little 3cup glass Pyrex dish I found, the perfect lunch size.

The cover couldn’t be easier…
All you need:
fabric 
insul-bright 
velcro

Cut both pieces of fabric and the insul-bright to 16 1/2″ x 6 1/2″. Put right sides of fabric together with the insul-bright on top then sew all the way around leaving an opening. Flip and top stitch all the way around. Then add the Velcro. I also added a TaylorMade tag.

I also had to add the name to the Pyrex in tradition Casserole Carrier Style. I think that is why people love them so much. Just like on my other Pyrex dishes, I using etching cream and a vinyl stencil for the name. Find the originals here and here.

Pin It
Related Posts Plugin for WordPress, Blogger...

Filed Under: etched, sewing Tagged With: home goods

  • « Previous Page
  • 1
  • …
  • 12
  • 13
  • 14
  • 15
  • 16
  • …
  • 27
  • Next Page »

Welcome to Taylor Made

http://www.taylormadecreatesblog.com/about-me Hi Yall! I'm Taylor... an artsy mom of three from Houston, TX. I love sewing, collecting floral fabric, eating Mexican Food, photography, brights colors, rearranging, and rolling clay. Taylor Made Creates is all about creating a fun, colorful home, sewing cute things and eating good food. Check out my SHOP HERE HERE! Thanks for stopping by!

Search

Pin with me!

Like Me :)

Facebook Pagelike Widget

More Recent Posts

  • Kid's Animal Room
  • Kids Camping Shirts
  • Mermaid Birthday Party
  • Conversation Heart Cold Packs
  • Holiday Apple Tea Punch
  • Purple Princess Costume
  • Letterboard Costume
  • La Croix Costume

FAVORITES

  • Casserole Carrier
  • Triangle Baby Quilt
  • Happy Rocks
  • Stethoscope Covers
  • Briar Rose Strip Quilt
  • Cider Beetles: A Teacher Gift
  • How to Shorten a Shirt
  • Peacock-ish Painting
  • 5th and Frolic Project Life Core Kit

Copyright © 2026 · Web Hosting By RFE Hosting