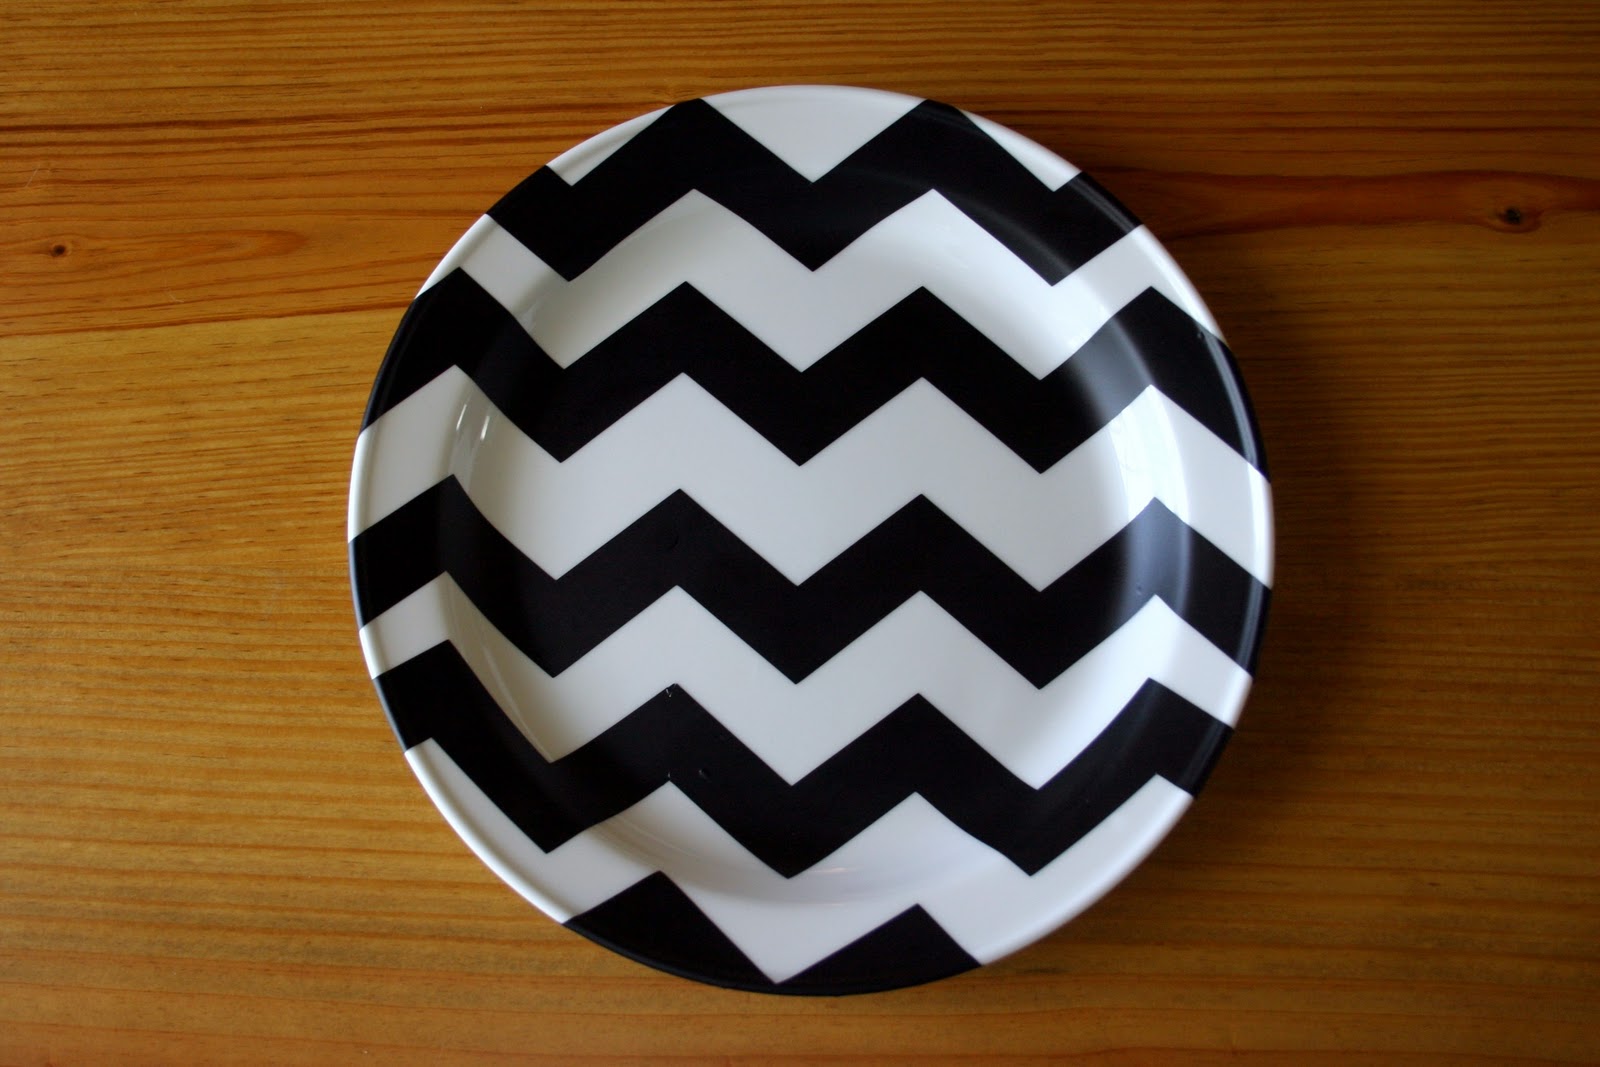
Last night, after sulking all day about my crafting slump, I crawled in bed with my copy of Martha Stewart Encyclopedia of Crafts (best book ever). I think I am healed, I knew Martha would help! I remembered something I have been thinking about – of a Chevron Striped Plate. Let me explain, I have a plate collection on the walls of my dining room, they all mean something and they all have a story. I even have two plates from two of my great-grandmothers, one of which is handmade. I thought a modern looking Monogrammed Chevron Plate would really give the wall a fresh “springy” look.


Plate Wall
Supplies:
-plate
-paper for the monogram
-vinyl
-Mod Podge
-Silhouette (Cricut or an exacto knife)

I wanted to do a Chevron Stripe on the background of my plate but any graphic pattern would work. I, of course used my trusty Silhouette! First of all you need to clean your plate so the vinyl will stick. Measure the center of your plate making sure to measue the curves of the plate too. Mine was a little over 10″ so I made my chevrons 10.5″ long. In my Silhouette software I used the chevron shape (which was the free shape of the week a few days ago) and loaded my premium vinyl into the machine.
About the Monogram… did you know that you can search “free fonts” in google and there are millions of fonts that are way better than the stadard loaded on your compuer. All you do is downloard them to your computer, then install them and they will show up in all of your programs like Power Point, Word and your Silhouette Software! So, I searched for a free Monogram Font and found the perfect one. Here is the link. Make your last name inital larger than the other two initials because that will be the one in the middle. Load your bright colored cardstock and cut!
I have no scientific instuctions on how to place your vinyl, if you are a perfectionist I’m sure you could measure but that is just too hard for me. So I eye-balled it. Just make sure to get out all of the air bubbles.
Apply a thin layer of Mod Podge down on the plate. I didn’t Mod Podge the outer ring of the plate. I used the Matte finish because it’s my favorite.

Carefully place your letters down, make sure they are all pressed down well by using a pin or tweezers and get out the air bubbles.
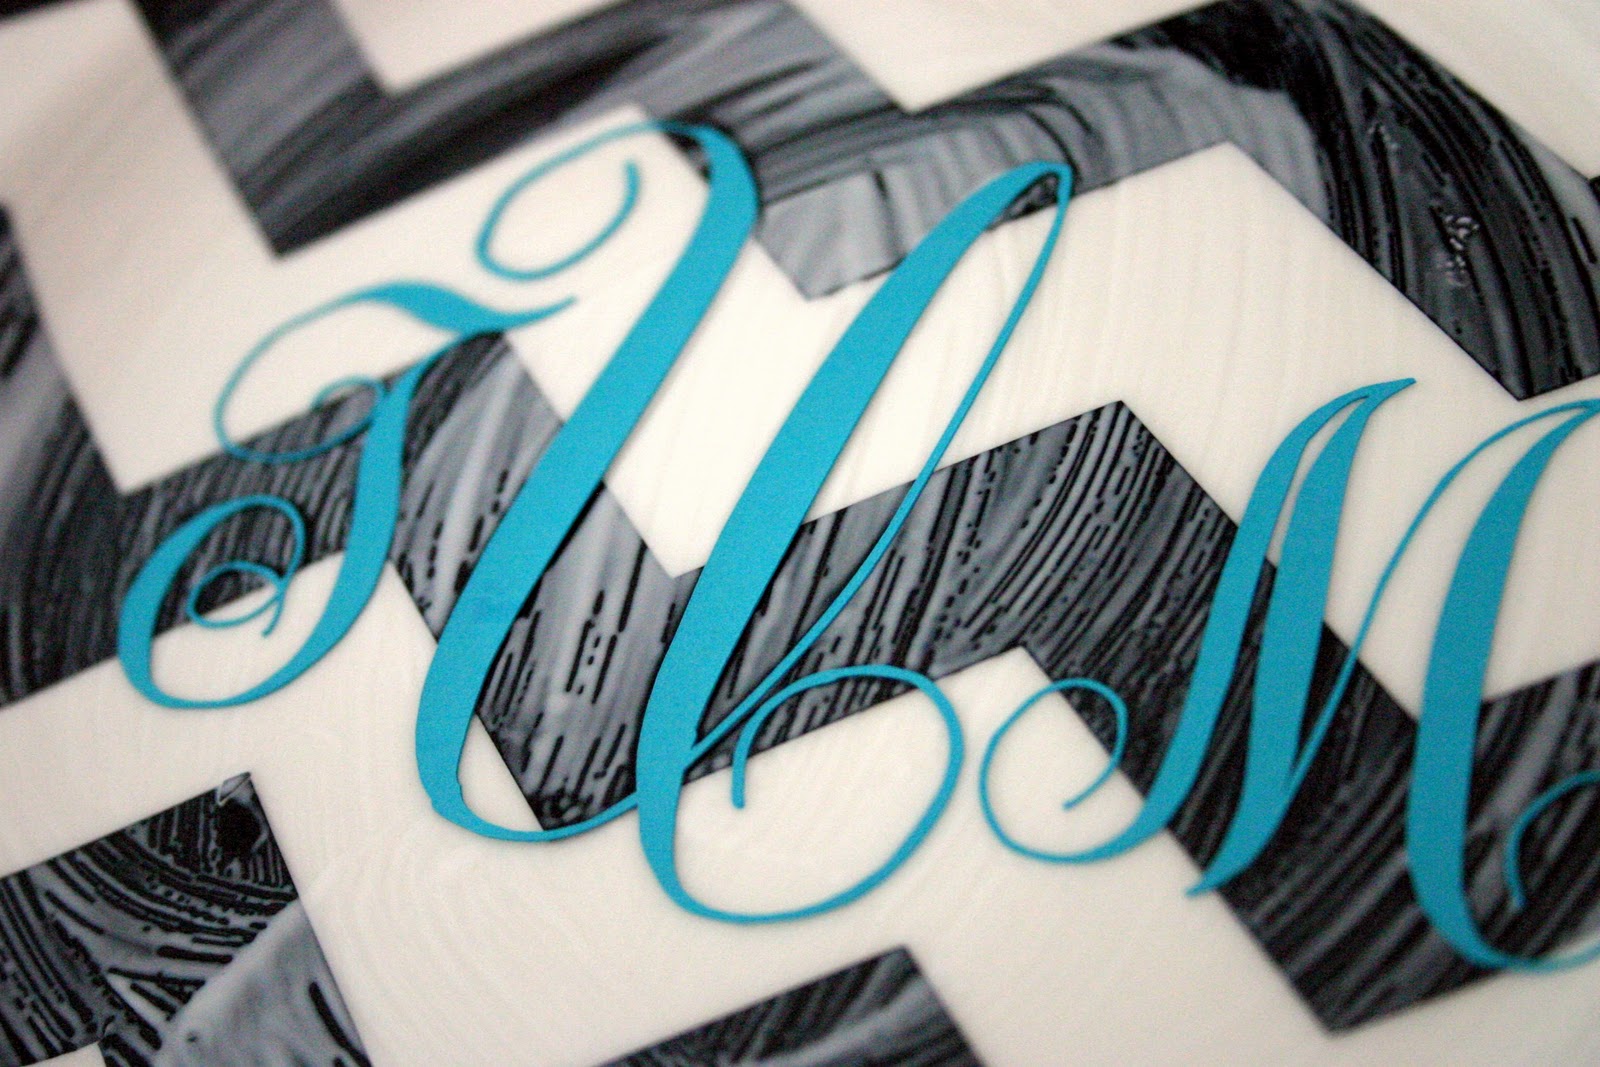
Apply a top coat of Mode Podge to the inner curcle of the plate. Make sure to get in between all of spaces in the letters and again, pop the air bubbles with a pin because they will dry funky if you don’t.
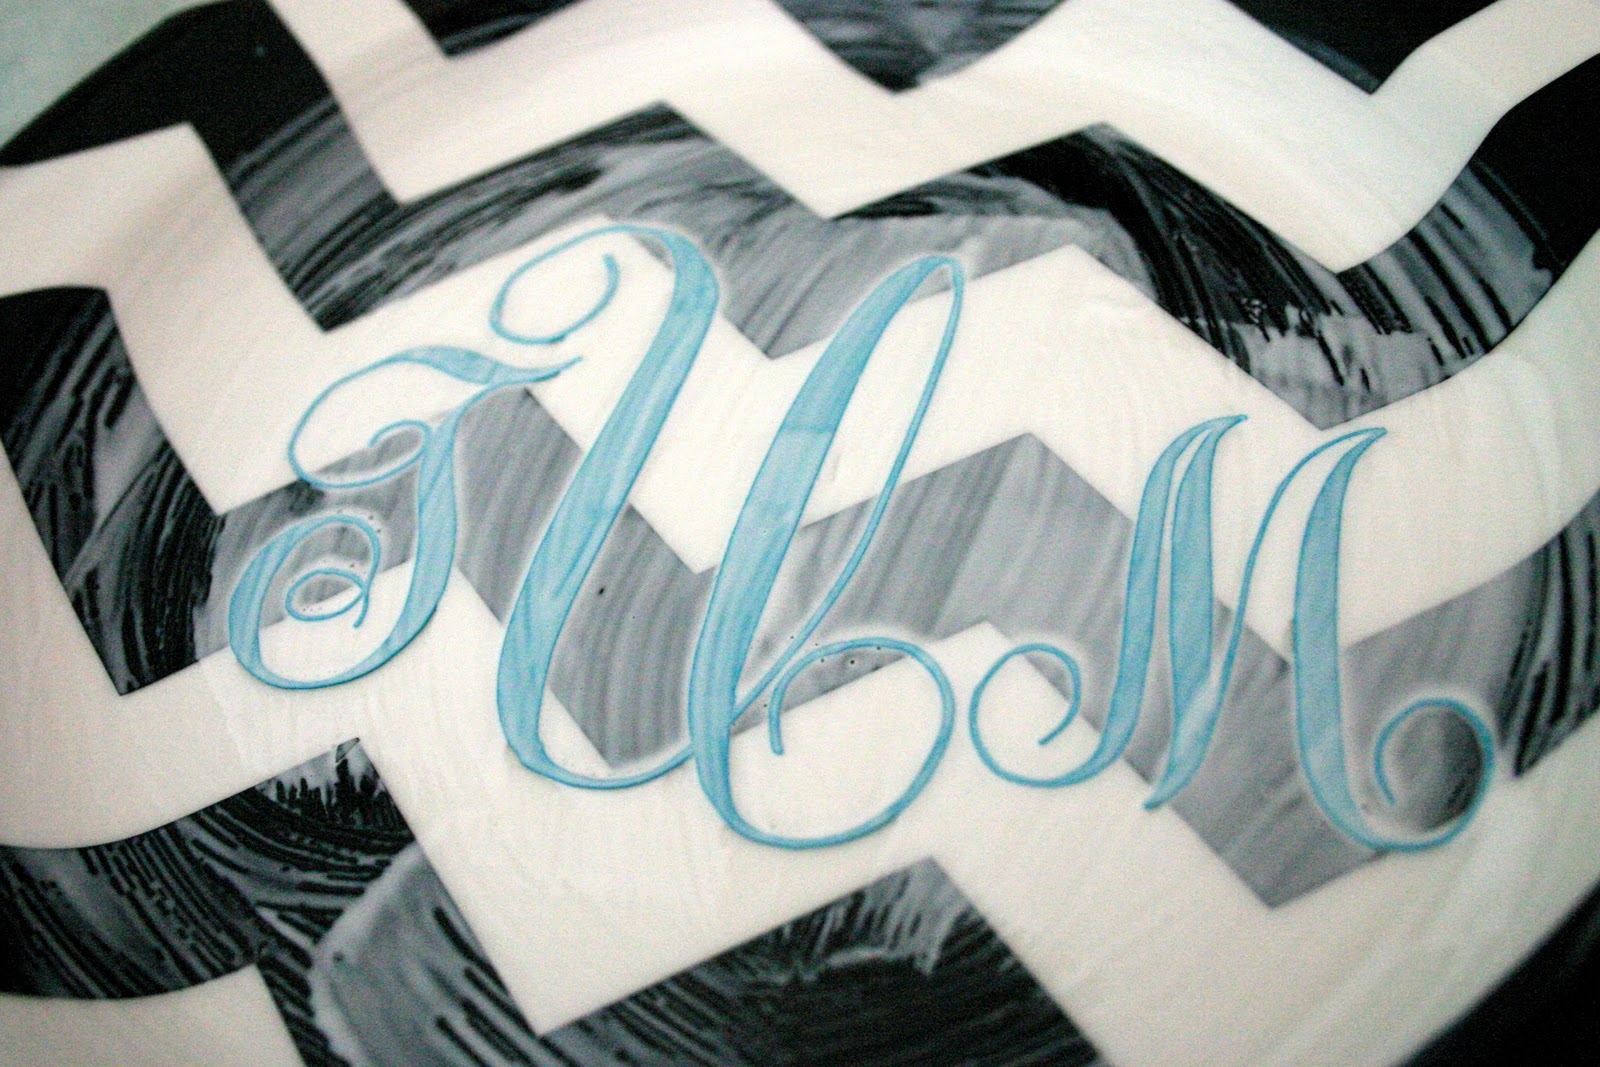
Now just wait for your plate to dry, and hang that baby up, it looks so profesh!

Just adorable – love the chevrons, love the color combo and love the monogram!
So cool! I had never heard of a ‘silhouette’ before…only the circut…Now I want one! I am diggin those chevron stripes, but I wanted to see a pic of the plate hanging on the wall with all the others!
I found you at the creative girls blog hop. Stop by some time and say hi!
~Laura
www,hayestone.blogspot.com
Oh my gosh! I love this idea! I unfortunately don’t have a cricut and I wish I did because I am seeing vinyl everywhere and there are so many great ideas! Do you sale these? You totally should!
I am so excited to be a new follower of your blog. You have so many fun ideas! Keep up the good work. You have a great blog!
Amanda @ Our Life on a Marquee
Found you on TTJ… LOVE this! Black, white and turquoise are perfection.
I absolutely ADORE this! I love the chevrons and turquoise monogram! Awesome job! Thanks for the tutorial!
I LOVE THIS!!!! I just found you through the Silhouette fb page – I saw your tutorial post and am so glad I did! I just ordered a Silhouette, and this might have to be the first project! Thanks for sharing this great idea!
I love so many different things about this plate. The chevron, the colors, the cheapness of the supplies with a fabu professional outcome! LOVE!
I love this! I keep seeing all these wonderful uses for Silhouettes, I think I need one!
omgoodness!
this turned out aweome!
i was thinking about applying mod podge to vinyl for another project…this is the answer now for sure.
your plate looks awesome.
happy weekend.
kellie
LOVE this! I SO want a Silhouette! I love your blog! I am a new follower via TGC. Stop by and say Hi sometime! :)
Crysta
http://www.homemakerinheels.com
Love this,and the colors.
You did such a good job with those chevron stripes that I thought they were “premade” on the plate at first. Love the beautiful monogram too!! :)
Thank you so much for joining my Weekend Bloggy Reading party. :) If you could add a link back to me too, I would really appreciate it. :) Have fun finding a new blog friend or two, and I hope you’ll visit me at Serenity Now again soon! :)
Very stylish – you did an amazing job!
Fabulous addition to your sentimental plate wall! It is gorgeous!!!
Visiting from Dittle Dattle, Amaze Me Monday. Stop by and say hi to me at cookscleansplayswithpaper.blogspot.com
Love the color combo! Very cute!
Hey Taylor!
Thank you for commenting on my blog bc now I found your amazing blog! I am your newest follower :) This project is awesome–cute, modern, cheap, and easy! It’s perfect!!!! Thank you for a great tutorial, I’m excited to read more of your blog! Thanks again for finding me!
Katie@Little Things Bring Smiles
Gorgeous. Love the chevron, love the monogram, and LOVE that plate wall. I featured you today on my favorite things :)
http://sunshineandchaucer.blogspot.com/2011/03/my-favorite-things_28.html
So cute!! I shared this on my FB page today. Hopefully you get some new lookers and followers. Saw you on CSI.
Kelly
http://www.facebook.com/pages/The-Creative-Chickadee/165378730142858
http://thecreativechickadee.blogspot.com/
WOW! Great job! I am so loving anything chevron right now.
Thanks so much for sharing!
Love this-the contrast of the monogram is great. I might just have to attempt this myself!
I LOVE this! Its PERFECT for you to Link up at my Linky PAR-TAY,
Whassup Wednesday!!!
And I have a party button you can grab so your friends can come too:)
*ENTER LINKY PAR-TAY Here! *
xoxokara
This is just darling. Well done. You have inspired me.
I love that! Looks so professional!!! I wish I had that magical machine! will have to find a way without it!
Thanks for linking up this week! I’ll be featuring this on my blog on Saturday!
http://sumossweetstuff.blogspot.com
Thanks!
Sumo:)
Fabulous project! Thanks for linking to “Amaze Me Monday”. Have a great weekend :D
This is GREAT! I have a silhouette too and I am always looking for ideas! Thanks for sharing! :)
Totally want to do this one!!! I have all the stuff I need to do it too! Now to find the time! : )
I love this plate !!! I need to see if I can find that for my cricut !!!
looks great! Thanks for auditioning for American Crafter- good luck:)
This is just further proof that the simplest projects are the best!! I love it – and you made it look so easy!
Love it!!!
This is a sweet project and Ilove the plate of walls and how they tell a story.
Holly
504 Main
Love this idea! Such a cute plate. Guess this is another reason I need a cricut… or a steadier hand!:)
I LOVE every part of this! The monogram, the chevron pattern, the black and white with teal… seriously, you just combined several of my most favorite things! I love it! : )
I just found your plate via Pinterest and think it is an amazing idea. I teach Pre K and I’m going to try this with the kids for a Mother’s Day project. Did you happen to use a glass or plastic plate and in your opinion, which one would work the best? Thanks for your help!
I love your project!! I just featured it on my blog! I’m a new follower!
xoxo,Patty.
wwww.mycraftspotlight.com
That is such a great idea! I’m planning on doing a plate wall too. Will definitely try to add a chevron plate in there too. Thank you for sharing.
Could you potentially eat off of this plate?
I definitely wouldn’t eat off of this plate! Just decoration only :)
Can I ask a question? Does Mod Podge dry “sticky” as I am reading that a lot online?
hmmm how do i describe it?? its not super sticky but it does have some tackiness to it!