TaylorMade

DIY, Home Decor & Sewing

  • Home
  • SHOP
  • DIY & Sewing
    • For the Home
    • Sewing
    • Costumes and Holidays
    • Cricut Projects
    • Crafting
  • Parties
  • Recipes
  • Home Tour
  • Favorites
  • About

Union Jack End Table

September 9, 2014 By Taylor 1 Comment

union jack end table
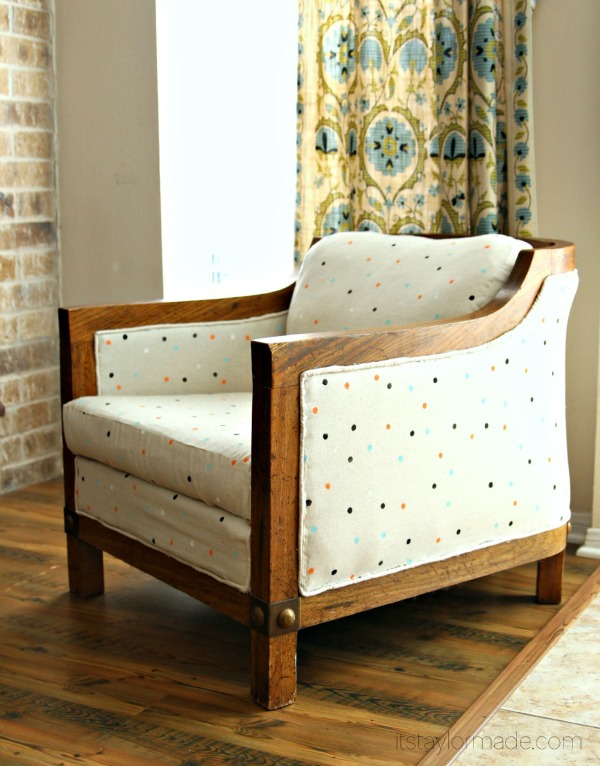
This project has been in my head for about two years now. I’m so happy to see it come to life! This piece of furniture because it was a little blah but my main problem (and why I didn’t try it for two years) is that I hate sanding and worried about being able to cover the black. Then, the one and only Martha came out with a new line of paint products… Vintage Decor Paint :)  A Matte Chalk Finish, requires no prep, is self priming, and comes in 22 colors! OK!!

union jack end table

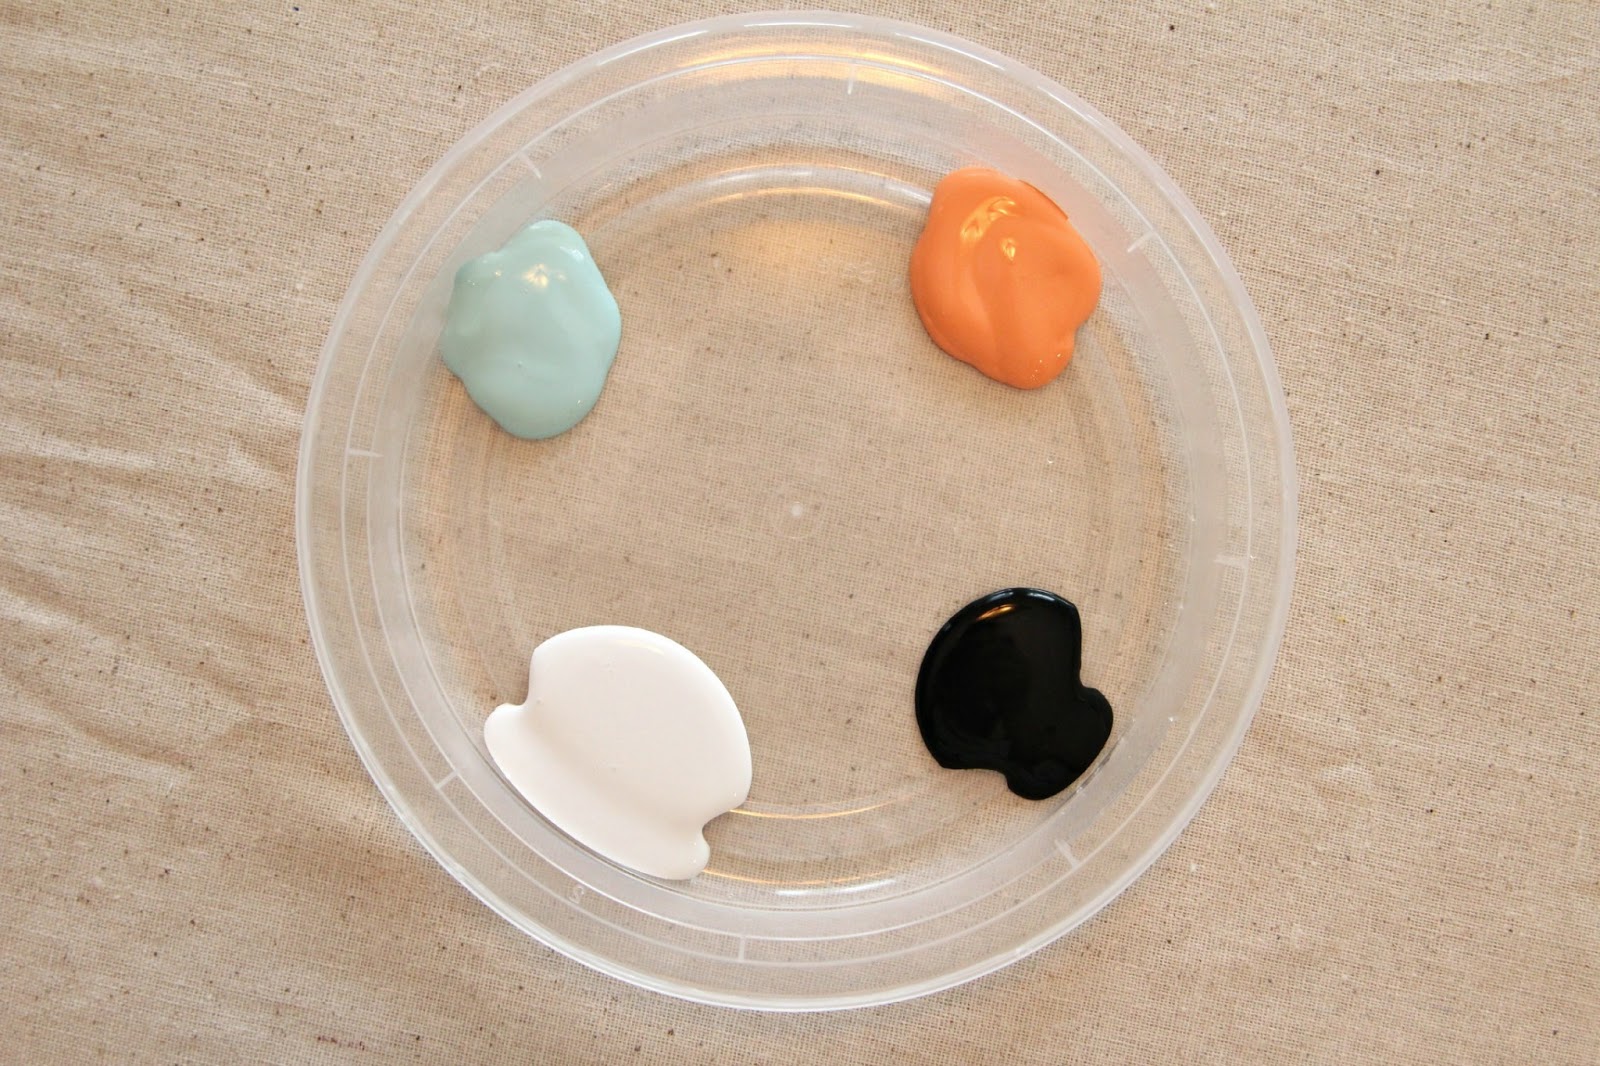
I used 3 colors for my end table: Red Wagon, Wedding Cake and Sailor Blue. I also used the Antique Wax and the Vintage Decor Paintbrush.

union jack end table

union jack end table

I started out by painting the sides, back and top of the table blue. The paint is super thick, almost like a thick gluey consistency.

union jack end table

I was super impressed at how well it covered the table! This is a very thin coat on one side. I could have gotten away with one coat but I waited about 30 minutes and did a second coat just for extra coverage.

union jack table

Next, I taped off the Union Jack. All of the tape lines are where the white parts will be.

union jack table

I also did two coats for the front of the table too. On the left is one coat and on the right is two coats.

union jack table

When I pulled off the tape I had some major bleeding but it was because of my tape job (oops). This shows how I taped off the rest of the table to paint the white parts. I waited about 1-2 hours between each step to make sure I didn’t tape over any wet paint. I used three small paint brushes at the very end for all of the touch ups from the  bleeding and that worked great!

union jack table

I waited for it to dry overnight and the next day I sanded it to look more “antique”. I sanded the corners and edges as well as some flat surfaces.

union jack table

union jack table

The last step was to apply the wax. The instructions said to apply a thin layer and then wipe off the excess with a wet lint free rag. I was nervous about it because it was super thick and very brown but after you wipe, it all makes sense. You can see how it gives it a richer, darker more aged look.

union jack table

On the left I had used the antique wax and I hadn’t on the right yet… it’s more obvious on the white parts.

union jack table

After drying for a few hours you can buff it with another clean rag.

union jack end table

IMG_9279

union jack table

I am pretty much in love with the way it turned out! It looks so at home in our living room! Speaking of at home… I couldn’t get a certain five year old to move from the couch before these pictures were taken :)

union jack table

union jack table

union jack table

union jack table

Here is a video introducing the line and a coupon code for you to get 25% OFF all Vintage Decor Paint that is valid at Micheals Stores through 9-12-14. Be sure to visit Plaid Online and check out their blog for more project ideas. For even more inspiration you can find them on Pinterest, Facebook, Instagram, Twitter and Google+.

I wrote this post as part of a paid campaign with Plaid Crafts and Blueprint Social. The opinions in this post are my own.

Filed Under: furniture, home goods, Martha Stewart, paint, remodeling, tutorial Tagged With: furniture

DIY Headboard

October 10, 2013 By Taylor 37 Comments

DIY Headboard 1

I am so excited to share this project! I thought about doing my very own DIY Headboard in our Master Bedroom years ago but I wanted to wait until we moved. So, this summer I was ready to get after it. A few weeks ago I hung some craft paper up over my naked bed and let it sit for a week or so. I traced a shape I thought I would like and wanted to live with it  for a while. I never even took a picture of this stage but here is the sad, sad room before. Note the “filing cabinet nightstand”, 10 year old mismatched lamps and the “foot board shin deathtrap”…

before pic

I made a few changes to the craft paper template, cut it out then handed it to my husband. The next step included talking my husband into building the frame and cutting the wood for me. He is a night owl so these things magically happened late at night after I was asleep. I actually woke up one morning to a finished headboard. Yes I’m very lucky, I know :) He used plywood for the main shape and used 2×4’s for the frame and the legs.

DIY Headboard

For the upholstery part I used 1″ Foam, 5 yards of quilt batting, an old sheet and 5 yards of upholstery fabric. First I had to adhere the foam to the headboard. I only put foam on the plywood part of the headboard, not the legs. I had to use two foam panels and spray adhesive directly on the plywood. IMG_6921

DIY Headboard

DIY Headboard

I waited about 30 minutes or so to make sure the spray adhesive was dry. Then I trimmed around the headboard.

IMG_6928

DIY Headboard

I did a little research before I started and I learned that many people suggested this next step. I was originally going to layer the foam then the batting then the upholstery fabric. But the tip I found over and over was to add muslin or another layer of fabric between to achieve “total smoothness”. I took it as a sign so I went with it. I’m really glad I did, I totally see what everyone was talking about. Fabric on fabric is easier to smooth out than fabric on batting. I used an old king sized sheet and put that on the floor first then I laid my batting down.

DIY Headboard

I used 5 yards of batting and cut it in half.

IMGDIY Headboard

Make sure the sheet is pretty flat (I didn’t iron it but I should have). Then I started the fun part… stapling! My main tip is on the first side just make sure to smooth it as you go but you don’t have to pull, then on the opposite sides you have to pull really tight. I started on one side then did the top, other side and bottom last. I didn’t trim the excess fabric until I was done because in a few spots I had to remove staples and redo them.

DIY Headboard

After I went all the way around, the corners had some puckering. This is when I took out a few staples and redid them. This is also why it’s important to add the extra fabric layer because the batting catches the fabric a little.

DIY Headboard

Tada. Layer one done. I didn’t add batting to the end of the legs because we screwed the legs into the bed frame.

DIY Headboard

Here it is from the back.

DIY Headboard

THIS. FABRIC. I could die! It’s my most favorite fabric in the universe. It’s so me, made up of my very favorite colors and it makes me so happy. I saw it long ago on a chair. Then months later I started seeing it on DIY projects.  I knew this was the fabric I wanted to stare at every night and every morning. It’s called Santa Maria Desert Flower by Waverly. They now sell it online and at Hobby Lobby. Ironically you can even get a headboard (in a very similar shape) in the same fabric from Land of Nod. Unfortunately my dream fabric is only 54″ wide so I was going to have to sew a couple of seams.

DIY Headboard

I thought about doing one seam right down the middle but I am not the best at matching patterns so I decided on two side seams. Honestly this was the hardest part of the project for me. I ironed my fabric then placed it right sides together. I kept checking for accuracy making sure the pattern lined up just right.  I had to redo one side  3 or 4 times but on the other side the heavens parted and it looked perfect!

DIY Headboard

Waverly Santa Maria Desert Flower Fabric

Waverly Santa Maria Desert Flower Fabric

I made this fabric long enough to fully cover the legs.

Waverly Santa Maria Desert Flower Fabric

I used the same technique for stapling. For the corners I stapled one side to the edge, then the other side to the edge then just pulled the fabric up to form a point and pulled it down right in the middle of the two sides and stapled. Once again, we screwed the legs to the bed frame really late at night so I didn’t take any pictures.

DIY Headboard

I have to say this is by far one of my favorite DIY Projects! I love the way it turned out. Isn’t it great when you picture something in your head and it turns out even better than you imagined? How cool that I get to sleep here :)

DIY Headboard

DIY Headboard

I ordered this bedspread almost a year ago and have been patiently waiting to put it on my new pretty bed. I made a triangle quilt pillow too because it can’t go totally pillowless. I found these amazing lamps from JC Penny. I told my husband I feel so grown up having matching nightstands and lamps, it’s the little things right?

DIY Headboard

DIY Headboard

Here is the other side. I love this dresser, we just got it from Overstock. My mom made the tree and that’s my Barrel Chair Makeover. Down the road I would love to have this one wall covered floor to ceiling with pictures and art.

DIY Headboard

I didn’t take a before picture of the previous fan but imagine it white, gold and very very squeaky… much improved! We also want to tear the carpet out one day. DIY Headboard

DIY Headboard

There is it, my favorite piece. Do you have something you have made that you just adore like me?

Filed Under: bedroom, fabric, home goods, tutorial Tagged With: furniture

Barrel Chair Makeover

February 17, 2013 By Taylor 30 Comments

This is the story of a chair. It all started two years ago when I bought a chair at a garage sale and was so happy to take it home and give it the makeover it deserved. Then I threw it in the garage because I don’t know the first thing about reupholstering furniture. I called around locally to find a place that would recover it… I was looking at over $400. I didn’t need it that bad, so there it sat collecting sawdust. Then I got a crazy thought… maybe I could do it? I said to myself- you’re crafty, how hard could it be… get out there and recover that chair. So I drug it inside, And I did it! Probably the most challenging DIY to date! It wasn’t that easy… and now I know why people wanted to charge me $400. It’s not perfect but I have a new chair and I’m glad I challenged myself.

Just in case my crazy plan didn’t work I didn’t want to spend a fortune on fabric. When I got the original quotes a few companies told me I would need about 6 yards of fabric, and upholstery aint cheap. I was telling my super smart mom all about my chair and she suggested getting a cheap muslin/canvas and make my own fabric. So that was my first step, props mom :) I got 6 yards of muslin for $2.99 and used my 40% coupon. Then I found a color palette I loved and some small foam pouncers.

The trouble was finding where to hand stamp 6 yards of fabric with two little boys on a rainy day. I left our only table to eat on like this for 3 days, my husband loved it :) Sometimes we have to make sacrifices for creativity, right?

After I took 1 million pictures of the chair “before” to reference, I started ripping it to pieces. I even posted a pic on Instagram about the OTHER fabric I found underneath. That’s right, this was not its first experience with reupholstering. That orange tweed was on the bottom and the whole inside of the chair.

This step also included some “outside time” on a pretty day… after the orange tweed situation there was dust and a smell :/ so I broke out the Lysol and some hot soapy water and went to town.

After my fabric was done my plan was to just lay out each piece on the fabric using that as a template, which worked really well.

I made sure to take out all of the previous staples that I could. I also used man tools like pliers and clamps :) Then I made yards and yards of piping. Overall, piecing the chair together was really fun, it was just a puzzle then involved a lot of staples. The cushion and the pillow were the only sewing I had to do. The hardest part was that back pillow because it was such an odd shape. 

The very last thing was the piping, and I just used hot glue because that’s how it was when I took the chair apart.

I really love the way it turned out. I also loved doing it, yes it was hard but this is my hobby… I don’t like boring crafting haha. It was a challenge but I am glad I can say I once reupholstered a chair. I will also be glad to pay someone else to do it next time :) 
Before and After

a million chair shots….

So what do you think? Have you ever reupholstered any furniture? Or does anyone have any tips?

Pin It

Filed Under: fabric, furniture, home goods Tagged With: furniture

DIY Kids Play Market

January 17, 2013 By Taylor 17 Comments

A few months ago, I had the really great idea that Santa would bring the boys a Play Market. Then all of a sudden it was Dec 20th and we had nothing. But thankfully Santa is really talented and he can stay up really late and he did just that :) I told my husband Santa just what I wanted and I drew it out. Then I came home from dinner with some girl friends one night and pulled up to the garage to see a market! He’s the best.

Imaginative Play is my favorite mainly because it’s what I would do if I was 3, and I’m here all day too so I am really catering to myself. But seriously who doesn’t love to play pretend? My mom and I used to play “checker lady” when I was little. I think I could go to the Children’s Museum without the kids and have fun.

I don’t have specific measurements or steps but here is kind of what we did. As usual, Bryan constructed and I designed and staged. He used a little over a half sheet of plywood for the top and the shelves. And scrap wood for the posts on the sides and the legs. We used metal dowels for the awning and I used the most perfect fabric ever for the top.

It is big and it does take up a lot of room but I wanted it “L” shaped so it felt more like a market with a counter. I also gave Bryan the measurements for the Land of Nod shopping cart and he custom built the little lip so it fits perfectly to that size.

For the Chalkboard  he cut me a piece of scrap plywood with two holes and I added a ribbon and sprayed it with Chalkboard Paint. Oh good they’re serving hot dogs this week.

I really wanted the baskets to sit at an angle so Bryan built them just to my liking and added a little lip so they stay in place.

He Braced everything and added these brackets for the back part that has legs. We also white washed the whole thing because I still wanted the wood to show through but I didn’t want it raw.

I found the shopping basket at a teacher store and the Shopping Cart and Register are from the amazing people at Land of Nod, who sent us these to review and giveaway last month. They boys still love them! Finn is only 3 so we pretend that everything is $1 to make it easy and he rings me up :)

This little critter snuck into my photo shoot :) Rough hair day.

I would say Santa did good under pressure. You always hope when you spent time on something that your kids will love it, thankfully this time they do! They still play with the Play Kitchen from Santa 2 years ago every single day! That Santa does good work.

What other “pretend play” toys do your kids have? I unfortunately don’t have any doll houses, doll beds, cute tiny ironing boards or washing machines, I’m the only girl here remember.

Pin It

Related Posts Plugin for WordPress, Blogger...

Filed Under: wood Tagged With: furniture

  • « Previous Page
  • 1
  • 2
  • 3
  • Next Page »

Welcome to Taylor Made

http://www.taylormadecreatesblog.com/about-me Hi Yall! I'm Taylor... an artsy mom of three from Houston, TX. I love sewing, collecting floral fabric, eating Mexican Food, photography, brights colors, rearranging, and rolling clay. Taylor Made Creates is all about creating a fun, colorful home, sewing cute things and eating good food. Check out my SHOP HERE HERE! Thanks for stopping by!

Search

Pin with me!

Like Me :)

Facebook Pagelike Widget

More Recent Posts

  • Kid's Animal Room
  • Kids Camping Shirts
  • Mermaid Birthday Party
  • Conversation Heart Cold Packs
  • Holiday Apple Tea Punch
  • Purple Princess Costume
  • Letterboard Costume
  • La Croix Costume

FAVORITES

  • Casserole Carrier
  • Playroom Reveal
  • a Happy Birthday Quilt Block
  • More Casserole Carriers
  • How to Shorten a Shirt
  • The Succulence Lillian Dress
  • Winged Peasant Dress
  • A DIY Nap Mat
  • Craft Room Reveal

Copyright © 2026 · Web Hosting By RFE Hosting