TaylorMade

DIY, Home Decor & Sewing

  • Home
  • SHOP
  • DIY & Sewing
    • For the Home
    • Sewing
    • Costumes and Holidays
    • Cricut Projects
    • Crafting
  • Parties
  • Recipes
  • Home Tour
  • Favorites
  • About

Bird Trio

April 1, 2011 By Taylor 10 Comments

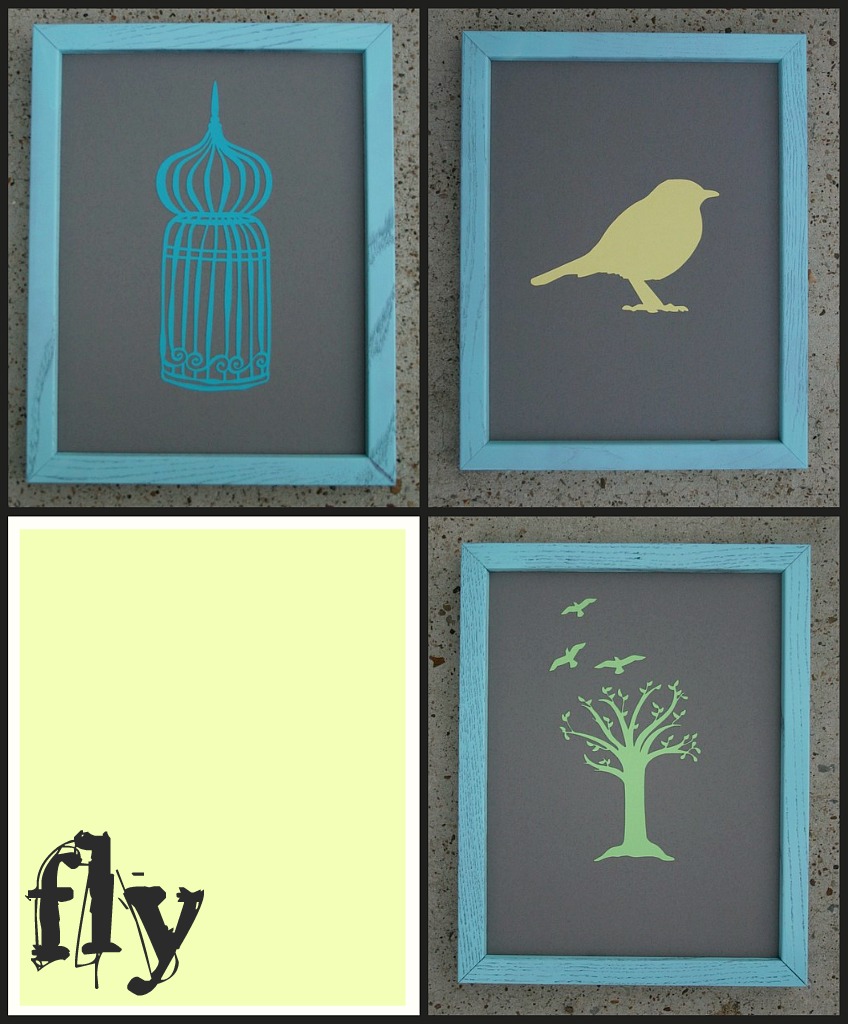
I love birds. Not in a “pet” way but in a home decor way. I didn’t even know how much I loved birds until I looked around my house about a year ago and realized I have a ton of bird stuff. Now I actually seek it out. I have at least one “birdlike” piece in every room of our home. Here is my newest edition, the Bird Trio, they are going to go over my craft table.

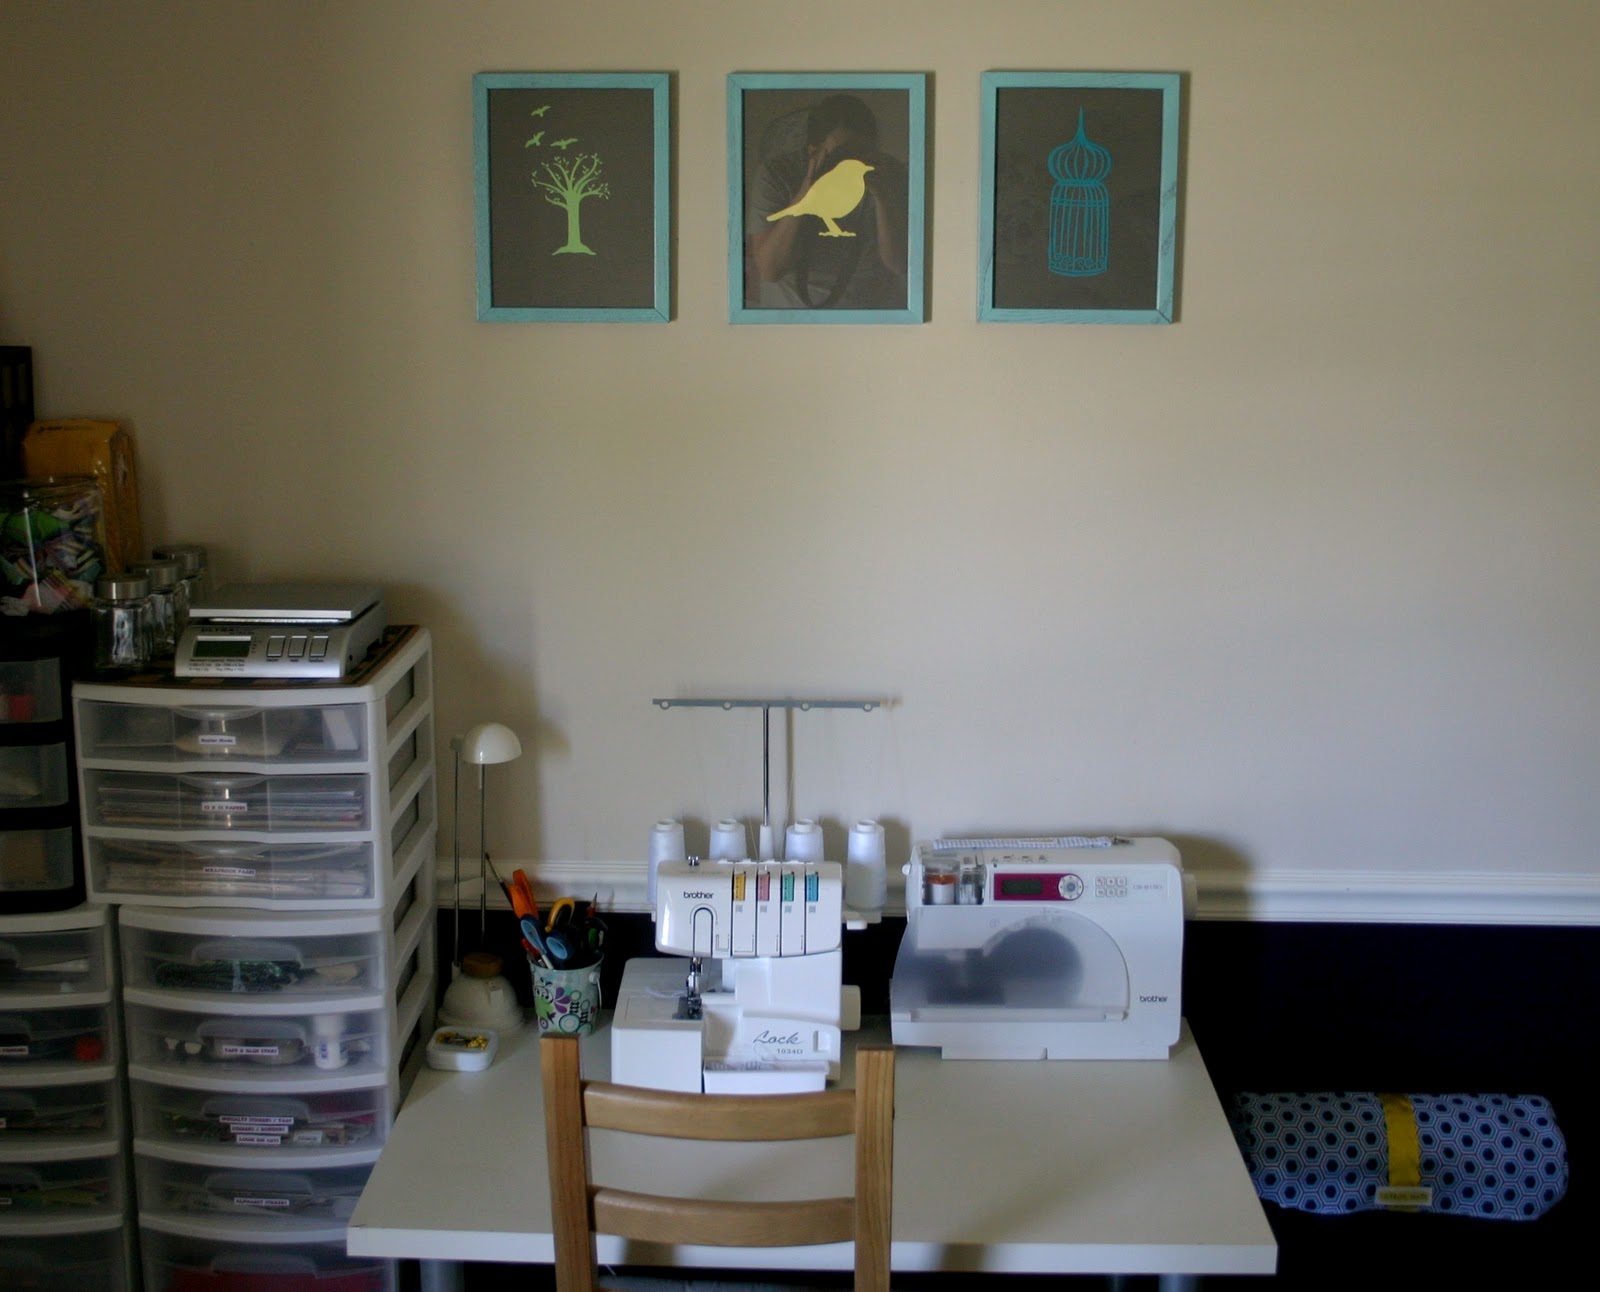
my craft space is so depressingly small in a picture
This project is so easy, I just spray painted three matching black frames. Then I cut all three images out with my Silhouette. The image on the right is available in the Silhouette online store. There were so many cute birdcages, I could hardly choose. Then the image on the left is a Taylor Made original. I just found a picture of a tree and used the “Trace” option (I love it) which you can read about here. When you use the Trace feature in the Silhouette software, you have to play around with the options in the sidebar. The middle image is from a Martha Stewart printable. Then all I did was mount them on grey card stock.
Here are just a few of the other birds that “live” in our house.
Welcome new birdies…

Filed Under: craft, home goods, paper, Silhouette Tagged With: decor

Love Sign with a Fence Frame

January 21, 2011 By Taylor 7 Comments


I know, I know, this should be in pink and red… but its going in my bedroom and staying up all year so yellow and blue it is. You could actually write anything, I thought about our last name but I like the way “LOVE” looks. My favorite part of this project is actually the frame which my husband whipped up. I got the supplies and told him what to do (naturally, hehe) but he made the actual cuts so I will give him some credit. I think this project is so simple that I really didn’t even take any pics of the steps for a tutorial, just the final product.


My mom had some fence posts she was going to throw away so I kept a few because I liked that they were weathered looking. So Bryan cut them in half “lengthwise” and I gave him the dimensions and he made a very basic frame. (43 X 23)


I got a foam board from Hobby Lobby and cut it about a 1 in. smaller than the dimensions of the frame (42 X 22). Then, I painted the background yellow. When the yellow was dry, I stapled the foam board to the back of the Fence Frame.


I also picked up some chipboard letters from HobLob and some blue paper. You could paint the letters too but the paper is much cheaper than buying 4 different colors of paint. I just traced the letters onto the paper, cut them out and applied 1 coat of Mod Podge between the letter and the paper. Then I used 2 coats on top of the letters (drying 20 mins between). Glue the letters on to the foam board. (My husband walked in at this point and wanted me to measure the distance between the letters to make sure they were evenly spaced… poor Bryan forgot who he married)


Lastly, I got a picture hanging kit from Home Depot and screwed it in to hang my “work of art”.

 
This reminds me that I need to get to work on the Valentine’s Day banner that I have been dreaming up for my mantle. Lets see if it happens :) Have a great weekend!
 

Filed Under: bedroom, craft, home goods, Mod Podge, paper, wood Tagged With: decor

Foodie Napkin Rings

January 6, 2011 By Taylor 4 Comments

First tutorial of 2011! These napkin rings have been on my to-do list for over 6 months but I was a little busy with Christmas so I am finally getting around to them. Poor Finn is loosing a craft room toy. They have been cut and on my shelf forever and he loves to play with them. Maybe I will make him some more?


Supplies:
– one 2′ x 1 1/2″ section of PVC pipe (cut into 2″ sections)
– an old magazine
– Mod Podge and brush

Directions:

1. Cut your PVC pipe into 2″ sections. My PVC pipe was 1 1/2″ in diameter. My husband controls the power tools over here so mine magically showed up in my craft room, cut perfectly! I asked him to cut 10 for me.


2. I wanted my napkin rings to look “foodish” so I used a Martha Stewart Whole Living magazine, they have really clean, pretty pictures. You can use whatever magazine or paper you like; newspaper, a book, fashion mag, an old map, scrapbook paper… get creative.


3. Go through and rip about 10-12 pages that are interesting to you. I looked for bright colors, cool bold words, and recipes.


4. Cut them into 2″ x 7″ strips. Cut them from the middle of the paper so you get interesting parts of the  pictures. Pick out your favorite strips and set them aside.


5. Apply a thin layer of Mod Podge (I’m using matte finish) to a napkin ring. Carefully place the strip of magazine into the ring. Gently smooth out the paper as you go. There will be a little excess paper just add a little Mod Podge underneath so it sticks. Do this to all the rings.


6. Once all 10 strips and rings have become one, we are going to apply the 1st topcoat of Mod Podge. There will be some air bubbles so just smooth them out with your fingers first. This layer should also be thin. Wait about 15-30 minutes for this coat to dry.


7. Apply your second coat of Mod Podge, a little thicker this time but not too thick. Let this coat dry for several hours. If you live in Houston like me, you should probably just wait overnight because it is January and a muggy 80 degrees :(


8. This step is optional: I am going to add a little pop to my napkin rings with a sequin ribbon. You can embellish with any ribbon or buttons or whatever you have. I cut my ribbon into 7″ sections. Glue them on with Elmer’s Glue and wait a few more hours to dry.


These babies will really add some pop to your table! If you are like me this makes you want to host a dinner party now. Happy Hosting!


Also, Don’t forget to enter the Taylor Made giveaway this week, you can read all about it HERE 


Filed Under: craft, Martha Stewart, Mod Podge, paper, tutorial Tagged With: crafting

Easy Light Switch Covers

October 21, 2010 By Taylor 3 Comments


This is a really simple project and I have them all over the house. Basically all you have to do is find scrapbook paper that matches the room, use the existing light-switch cover and Mod-Podge away!
 
Light-switch Covers
 
 
Here is your super boring light-switch cover before:
 
Cut your scrapbook paper a little larger than the cover.
 
Bring out your ole trusty friend Mod Podge and cover the front of the light-switch with it. (I like to use the cheapy sponge brushes with Mod Podge because it will ruin a nice brush)
 
 
Place the paper on top of the light switch. Fold the sides toward the back.
 
Snip the corners to make it easier to glue and less bunchy.
 
Glue (with a glue gun) all the way around the back edge of the light switch cover. Go side by side and immediately press the paper down before it has time to dry.
 
Glue down all of the sides and trim the excess paper.
 
 
CAREFULLY puncture a little hole in the middle of the light switch area
Cut a diamond to the corners and glue gun them down.
 
Same thing with the screw area… (don’t know what else to call that)
 
Mod Podge on top of the finished product with 2 coats. Wait about 10 minutes between the coats.
 
Here is one in my kitchen,
 
and in my breakfast room, 
and now my bedroom!
 
Related Posts Plugin for WordPress, Blogger...

Filed Under: craft, home goods, Mod Podge, paper, tutorial Tagged With: crafting

  • « Previous Page
  • 1
  • 2
  • 3
  • 4

Welcome to Taylor Made

http://www.taylormadecreatesblog.com/about-me Hi Yall! I'm Taylor... an artsy mom of three from Houston, TX. I love sewing, collecting floral fabric, eating Mexican Food, photography, brights colors, rearranging, and rolling clay. Taylor Made Creates is all about creating a fun, colorful home, sewing cute things and eating good food. Check out my SHOP HERE HERE! Thanks for stopping by!

Search

Pin with me!

Like Me :)

Facebook Pagelike Widget

More Recent Posts

  • Kid's Animal Room
  • Kids Camping Shirts
  • Mermaid Birthday Party
  • Conversation Heart Cold Packs
  • Holiday Apple Tea Punch
  • Purple Princess Costume
  • Letterboard Costume
  • La Croix Costume

FAVORITES

  • More Casserole Carriers
  • Swan Wings + Hello Ollie Fabrics
  • Documenting Life… How I Do It
  • Batman and Robin
  • Cider Beetles: A Teacher Gift
  • Mini Fabric Lamps
  • The Succulence Lillian Dress
  • Happy Rocks
  • Playroom Reveal

Copyright © 2026 · Web Hosting By RFE Hosting