This is a sponsored conversation written by me on behalf of Cricut. The opinions and text are all mine.

I have been wanting to jump on the neck scarf trend forever but honestly I just don’t know that I’m a neck scarf girl. When I saw this project for Scarf Tees in the Cricut Design Space I pushed it right to the top of my to-make list!


I have been DIYing custom shirts forever with an iron, which is doable but not very effective so, last year I purchased a heatpress machine. I have really liked it but I will say it is very bulky and in a small craft space might not work. When Cricut came out with the Cricut EasyPress 2 I was super curious and last month I finally got my hands on not 1 but 2 of them!

My first question was what does the EasyPress do that my heatpress machine or iron can’t? After playing with them for a few weeks now, my best way to describe it is that they combined the best features of each a heatpress and an iron and packaged it in one machine! The EasyPress has the heat capabilities and speed of a heatpress but the convenience of an iron.

The EasyPress has an edge to edge heat plate that will get up to 400 degrees with totally even heating. This is the problem with making custom tees with an iron… the heat source is usually in the middle of the iron so you are not getting a consistent temperature and you end up with peeling vinyl. I had a learning curve with my heatpress and it is also pretty big. I have to store it on the floor in my craft room and it takes up a lot of real estate. If you don’t have a big workspace the EasyPress would be perfect for you because I can actually store it right on my shelf. It is also portable, which would be so fun for showers or girls nights where there is crafting involved!

Cricut has an interactive online guide HERE that takes all of the guesswork out of it. On the guide, you enter the of type of material you are working with and what medium it is going on and it tells you the temperature and time needed. Then you set your machine and the cute little bug light will turn green when it is ready. I also love that after 10 minutes of idle time it will start to beep and then it will turn off for safety! If you are still working when you hear the beep you can just press any button and it stays on.

The EasyPress comes in 3 different sizes which is convenient for different types of projects. I have the petite and the jumbo (this is the jumbo pictured above). The jumbo is 12″x10″ and I love it! I have made shirts, pillows, bags etc. with this one. There is a mid-size that is 9″x9″ and the petite is 6″x7″. The petite one os perfect for, you guessed it… small projects; fabric scraps, onesies, hats, shoes, small quilt pieces etc.
Speaking of projects… lets gets started on the cute DIY Scarf Tees…


You will need:
- Cricut Machine
- Cricut EasyPress 2 and Pressing Mat
- Blank T-shirt (I love this brand)
- Cricut Heatpress Vinyl in Neon Blue, Red, Blush and Lilac
- House that Lars Built Design File in the Cricut Design Space

The two shirt files that I used are part of a shirt collection from House that Lars Built. There are quite a few more so be sure to browse around! You can find the ones I used HERE and HERE.


Once you open your file in the Cricut Design Space software, you can customize it. You can change colors, size, layout etc. I was making one of these for my daughter so I made her design a little smaller.

I always cut my vinyl beforehand to make sure I don’t waste any vinyl. When you choose “make it” on the software it will show you exactly where the design is on the cutting mat and you can move it around and that is how you will know what size to cut your vinyl and you where to place it.

With heatpress or iron-on vinyl there is a shiny side and a matte side. The shiny side is the “top” and that will be the side with the carrier sheet to help you later when you press it with the EasyPress. You always cut heatpress vinyl with the shiny side down to protect that carrier sheet and keep it intact. After you cut your vinyl to the correct size, place it shiny side down on your cutting mat. Now we are ready to cut our design! Remember we placed the “top” or the shiny side down so we want to make sure to mirror our image.


After your design is cut you will weed it. This means removing all of the negative parts of the design. You will do these same steps with each design.


Don’t let a design with multiple colors scare you! You take the same steps, just cut each color one by one and weed each layer.

Then you place the design with the carrier sheet (sticky side down!) on your shirt right where you want the design to live forever :)


Now it’s time to press the design with the EasyPress! I looked up the settings on the EasyPress Guide for the vinyl I was using and for this specific shirt so I set my settings to 315 degrees for 30 seconds based on their recommendation. It also told me to preheat my shirt for 5 seconds before pressing the design on.


For a design with multiple colors, you do the exact same thing… just start with the bottom color and work your way up. I started with the blush vinyl, then did the blue then lastly, the red.

I LOVE LOVE LOVE how these turned out! Bee and I love coordinating outfits and I am so excited to wear these!


Overall I’m super impressed with the Cricut EasyPress 2, I can tell that I will be using it a ton in the near future! Please let me know if you have any other questions about this machine that I didn’t answer! Happy Crafting!


 This costume could be as intricate or as last minute as you want; you can’t do Frida wrong! Here is how I made mine: I used a few basics from
 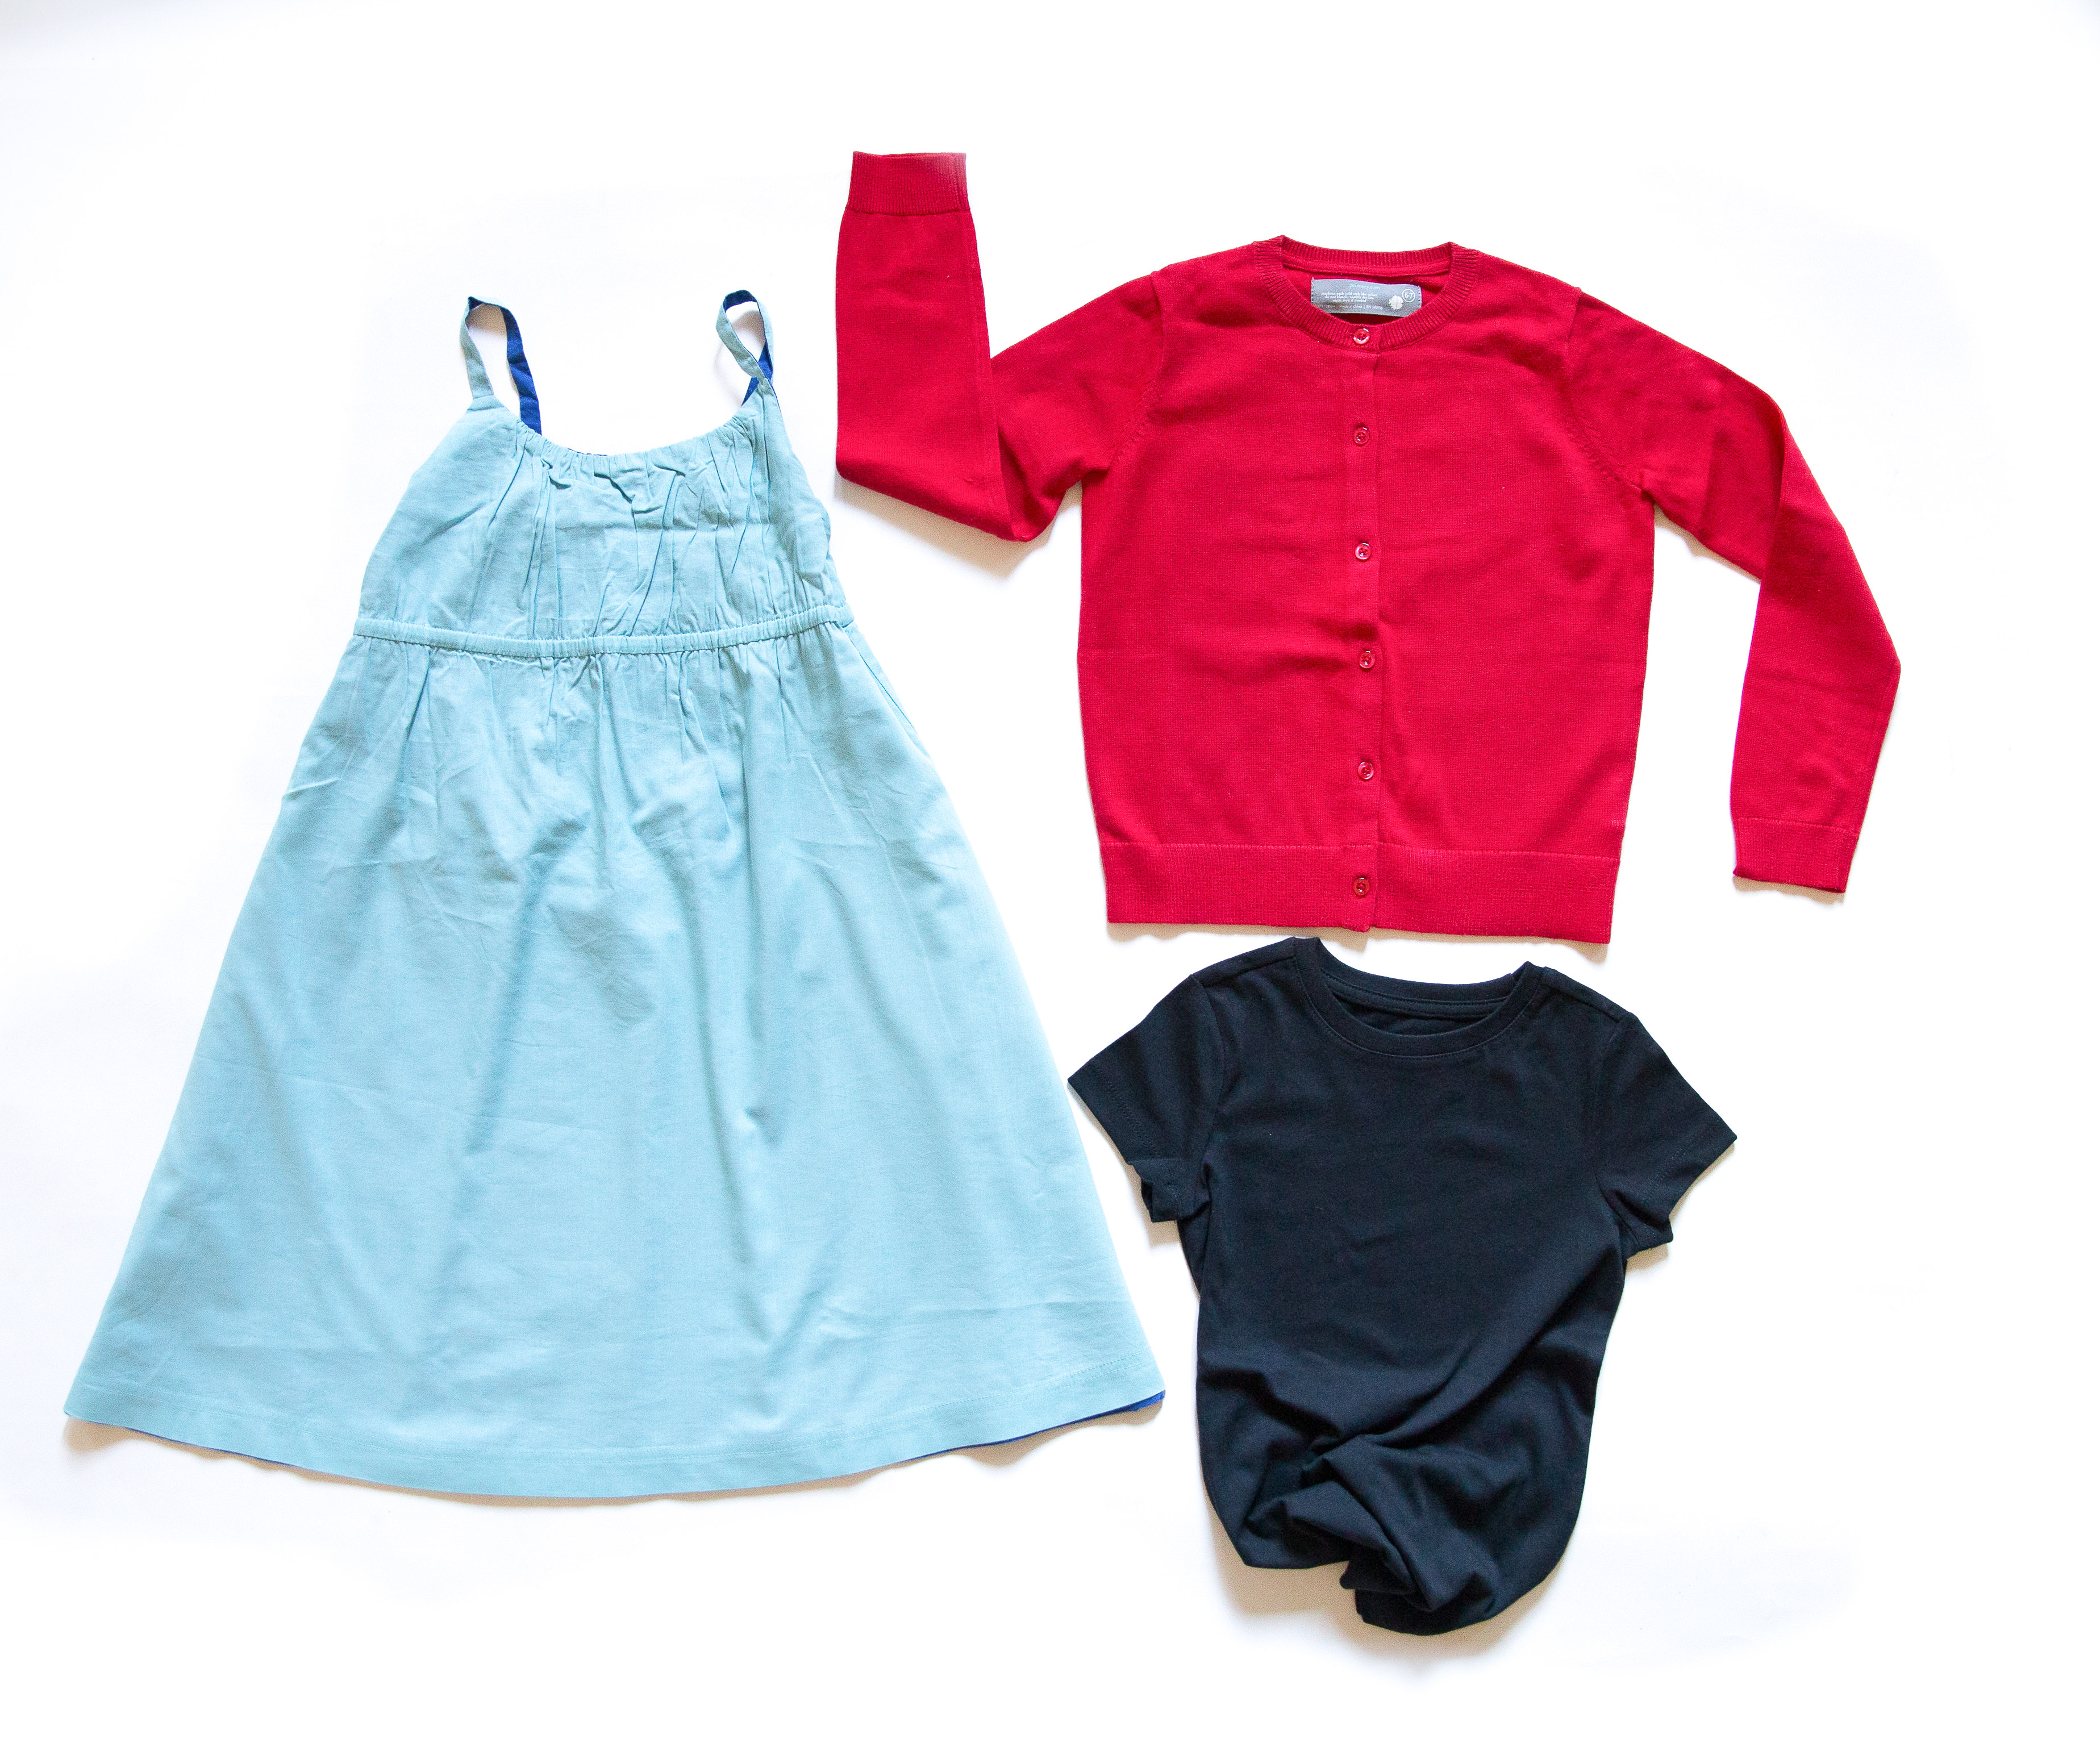 These were my inspiration photos. I love the photo of Frida on the left and I really love the Frida Barbie’s outfit so that is what I based this costume on. I’d say Bee nailed it right?!
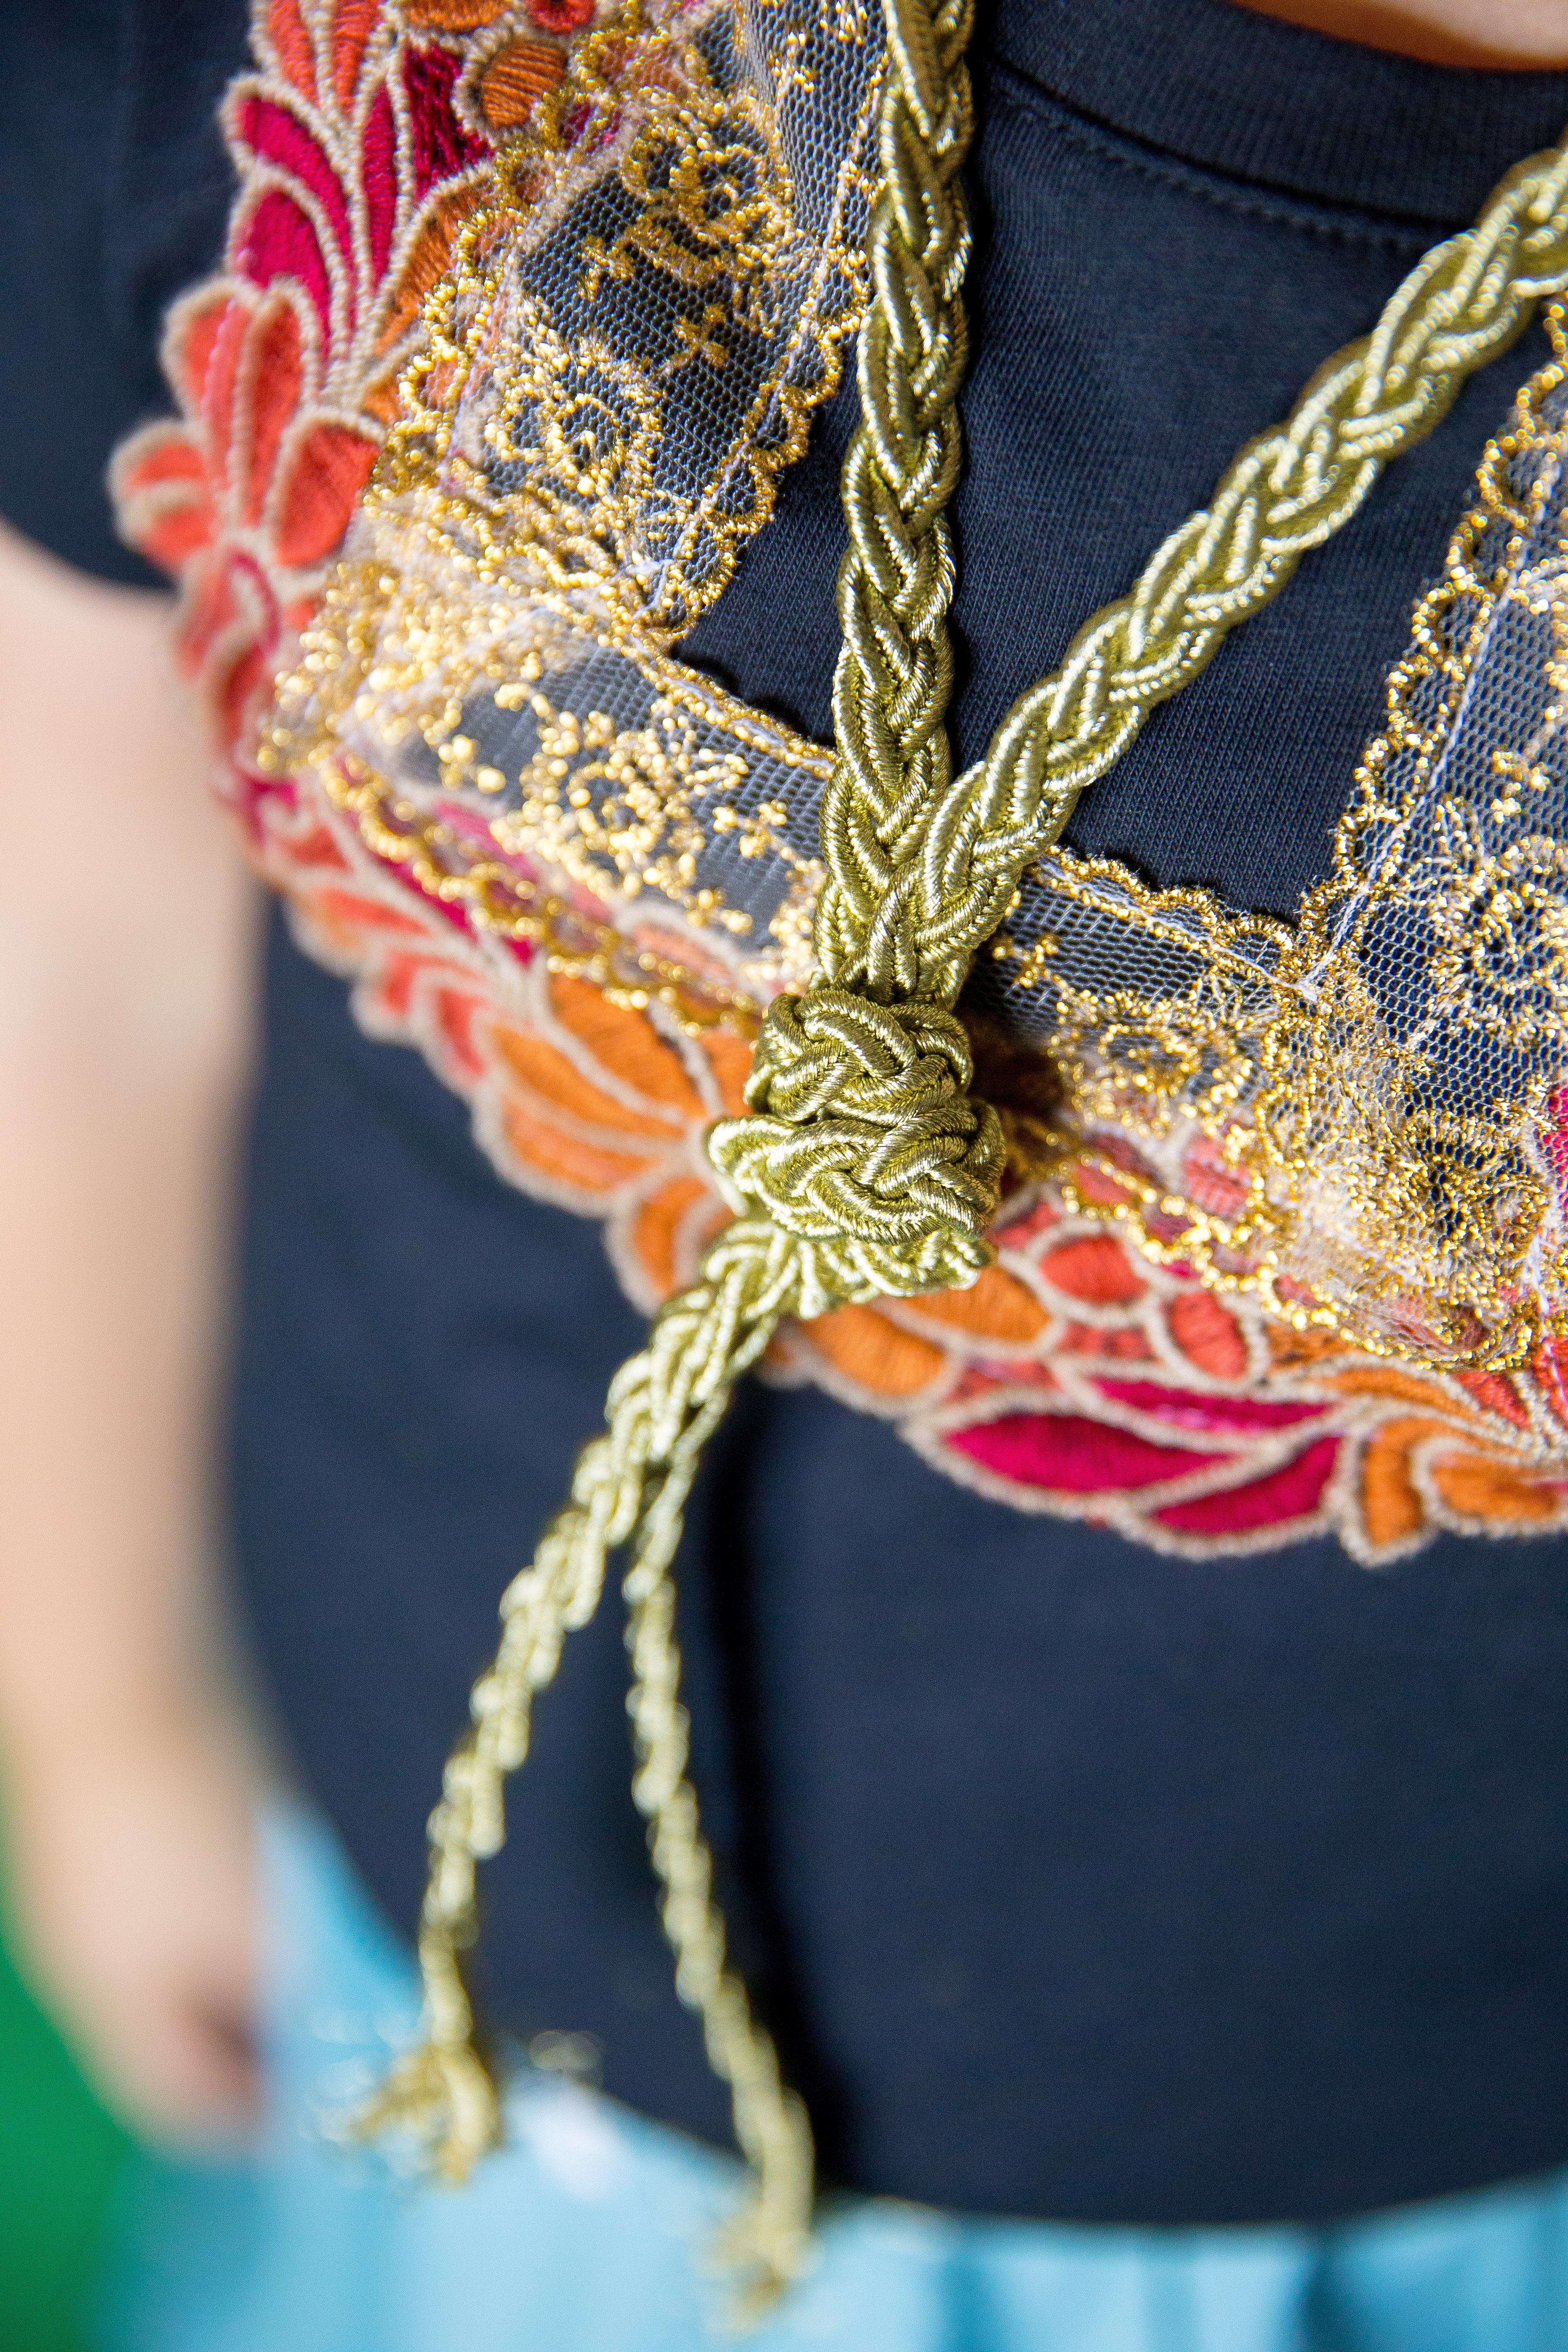
 I started with the shirt and found a few pieces of trim at Joann and sewed the trim on the black tee. You could definitely use fabric glue or wonder under. I also got a little piece of gold rope for her bolo necklace.
 I really liked the blue dress with the little white flowers on it so I cut some tiny white flowers out of heat transfer vinyl and pressed it on to the dress. Then I added a little trim to the bottom. Again, I sewed it on but fabric glue would work here as well!
 Lastly, is my favorite part… the headpiece. I bought some fake flowers from the dollar store and hot glued them to a solid black headband. I did a “faux crown braid”, not really sure what it’s called, I think I just made that term up. Good thing I’m not a beauty blogger because I barely know what I’m talking about haha! I think I’ll stick to crafts and costumes :)

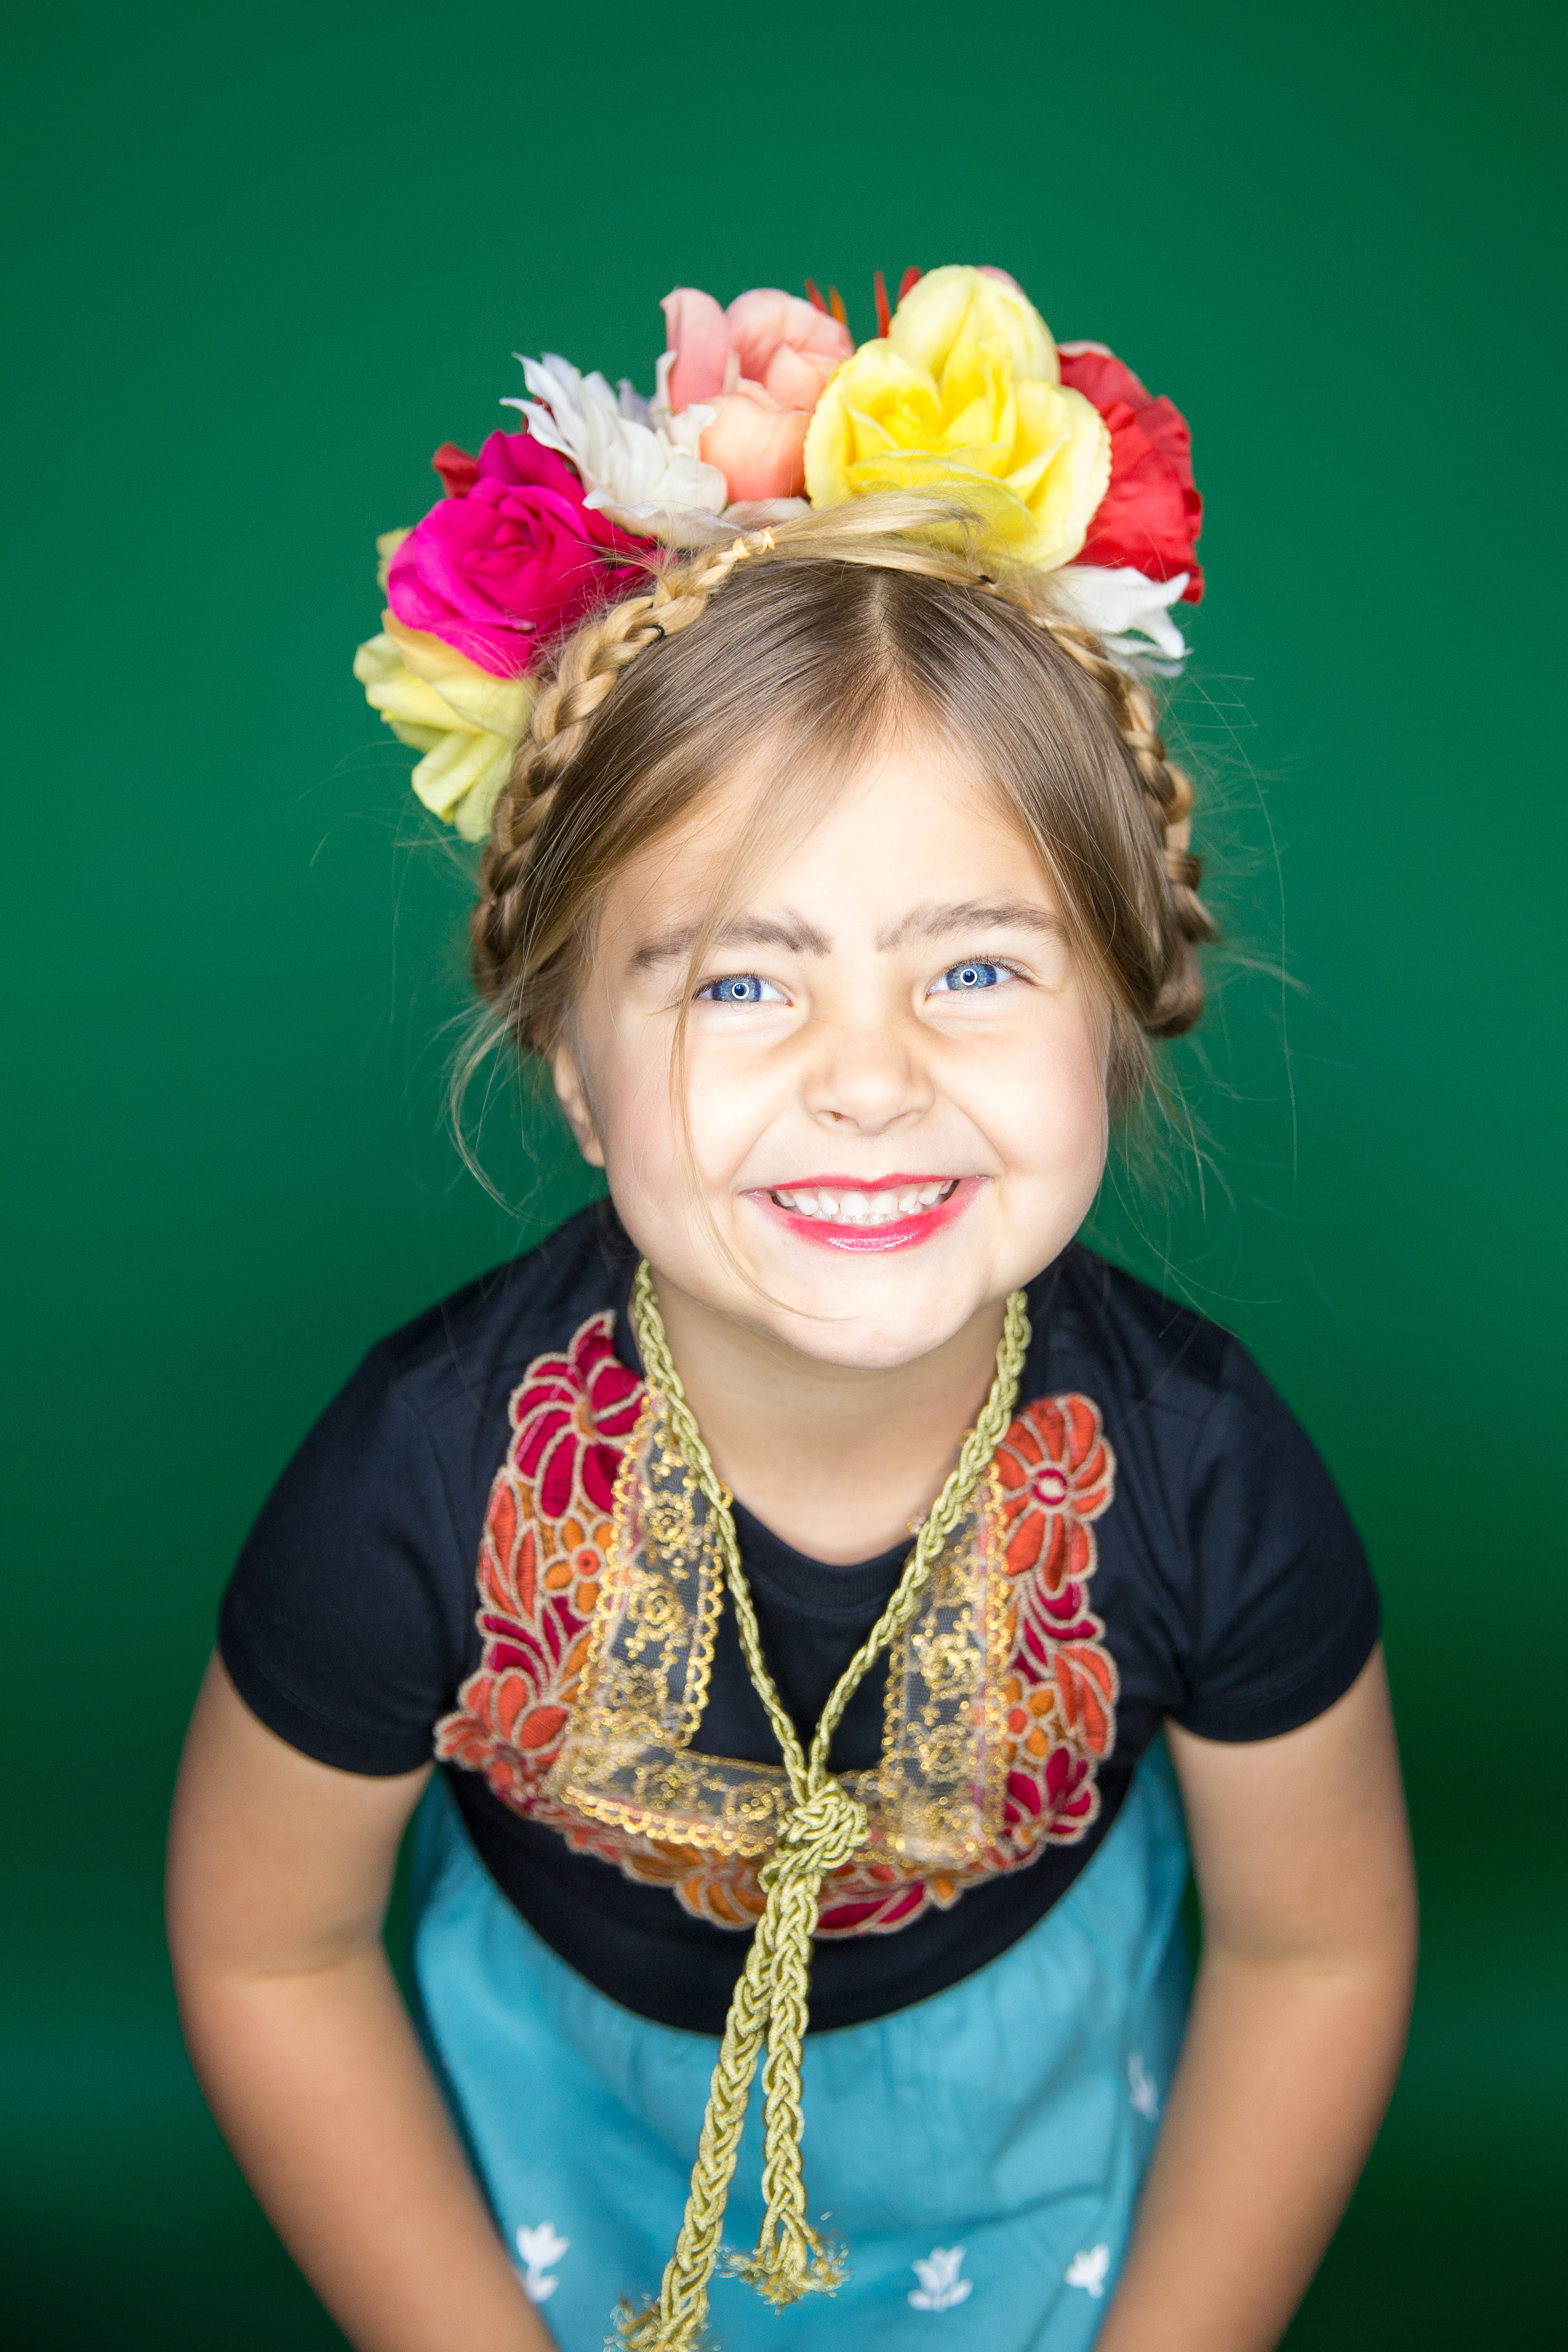 Don’t forget Frida’s signature thick brow. I used dark brown (almost black) eyeshadow and a q-tip to create the heavy eyebrow look. I also added a little pinky-orange lipstick which was Bee’s favorite part of this modeling session ha!

 Special thanks from me and my little Frida Girl to Primary.com for the clothes! Let me know if you have an questions and Happy Halloween!

 We love camping! Seriously, we can’t live without it! In honor of our love for camping I’m sharing some Kids Camping Shirts today with a free download to make your own!
 For our last trip we decided to make “official” camp shirts. I made the adults matching shirts but made something a little different for the kids and I just love how they turned out!
 All the moms picked a different colored solid tee for their kid. They are super simple but that’s kind of how camping is so it works :) I used black heat transfer vinyl and a heat press so they will hold up well, we are very hard on our camping clothes as you can imagine! (

 This last week Bee turned 4! We had a weekday playdate party at our house with some friends and fun was had by all! She requested a Mermaid Birthday Party months ago so I went with it… thankfully there is a ton of Mermaid stuff out right now :) For the decor I just did a balloon arch, one food table and then we had some fun party favors! We blew up a big kiddie pool, a slip and slide and we also had a mobile Snowcone Truck come to our house so that was a big hit!
 If you follow me on Instagram (


 I usually make all of our invitations but this year I was in a time crunch and I found this one on Etsy and thought it was pretty perfect…
  Total party planner fail.. I didn’t take any pics of the table once the food was all out but I promise it was pretty haha! We had a “brunch” theme. I made an egg casserole, lemon vinaigrette salad, chick fil a tray for the kids, goldfish and chips and fruit salad. The only thing I made that was on theme and cute were these little oyster cookies that I found all over pinterest. I just piped strawberry frosting between nilla wafers and added a candy pearl. I found the tablecloth, happy birthday banner, plates and napkins all from Target’s party area.


 I added just a few drops of blue food coloring to some lemonade to make it look mint and called that “mermaid lemonade”. I had some champagne and OJ for the moms because #brunch. The pink bevnaps are from amazon
 Bee and I have the same birthday so I always like to do something matchy matchy for us ;) This year I made us matching shirts for the party.
 Speaking of shirts… I made the cutest party favors. I found a place online who sells very affordable blank tees in tons of colors and sizes so for under $3 a piece I made all the party goers a tee with my silhouette machine, vinyl and my heat press. The boys got sharks and the girls got shells. I even had some mini guests :) I hung them up with twine and clothespins and the kids had fun finding their name after they swam.

 My mom is always in charge of the kids cake… thank God for her because I am no baker! This year she had a cake planned then a few days before the party while at Kroger she spotted this one just knew it would be perfect for the queen of flashy, I mean perfect for Bee :) She also got her matching cupcakes and of course Bee LOVED it!

 Just in case the kids didn’t have enough sugar, I found a snowcone company who comes to your party in a truck:) They make the ice part of the snowcone then the kids get to top it with their own flavor on the side of the truck… it was super cute!


 How cute is this little mermaid swimsuit?! Guess where I found it?? Amazon haha…
  We had such a fun and festive time! Thanks to everyone to who came to help us celebrate… our little mermaid loved it!
 Check out Bee’s past parties here!: