TaylorMade

DIY, Home Decor & Sewing

  • Home
  • SHOP
  • DIY & Sewing
    • For the Home
    • Sewing
    • Costumes and Holidays
    • Cricut Projects
    • Crafting
  • Parties
  • Recipes
  • Home Tour
  • Favorites
  • About

Tips for Catching up on Project Life

December 1, 2015 By Taylor 9 Comments

catching up with project life

If you are anything like me you have thousands and thousands of photos just sitting on your phone/camera/memory stick. What are you doing with them? Guys… print them and get those precious photos into a book!! You can do it! I was super behind when I started so today I have a few tips to share along with a GIVEAWAY so a lucky reader can make it happen too!!

 It’s no secret that I am a huge Project Lifer because it’s the quickest and easiest way for me to save all of our memories but still get to “scrapbook”. I got to try out some Project Life for Stamping’ Up (which was so exciting because you can’t just buy these kits anywhere!). Just like all of the other PL products I have tried the quality and designs of these cards were no exception! I was also super geeked out that I got to try their exclusive plastic page protectors!

catching up with project life

TIP: ORGANIZE! I print my pictures out online a few times a year (I usually wait for a snapfish or shutterfly sale) and then when they come in I organize them by month. I use plastic page protectors and a post it note. We have a drawer where “memorabilia” lives like receipts, to-go menus, programs and artwork. I organize all of that into the same page protector and put those into a box. And honestly that is the hardest and most time consuming part, which after a few months takes me under an hour.

project lifeCatching up on Project Life with Stampin Up!

Catching up on Project Life with Stampin Up!TIP: KEEP THE JOURNALING SIMPLE! I’ve noticed when I look at my books (or when I show them off :) no one really reads the long journaling. To save time, I only jot a few words about each picture if any at all. I’m such a sucker for a weekly card! These are my favorites because I can just slip in seven pics, one for each day of the week and then add a card like this with a few descriptions and there you have a page! I also love number stickers for this reason. These are from the “This Is The Life Project Life Card Collection”.

catching up with project lifeCatching up on Project Life with Stampin Up!

Catching up on Project Life with Stampin Up!

Catching up on Project Life with Stampin Up!

Catching up on Project Life with Stampin Up!

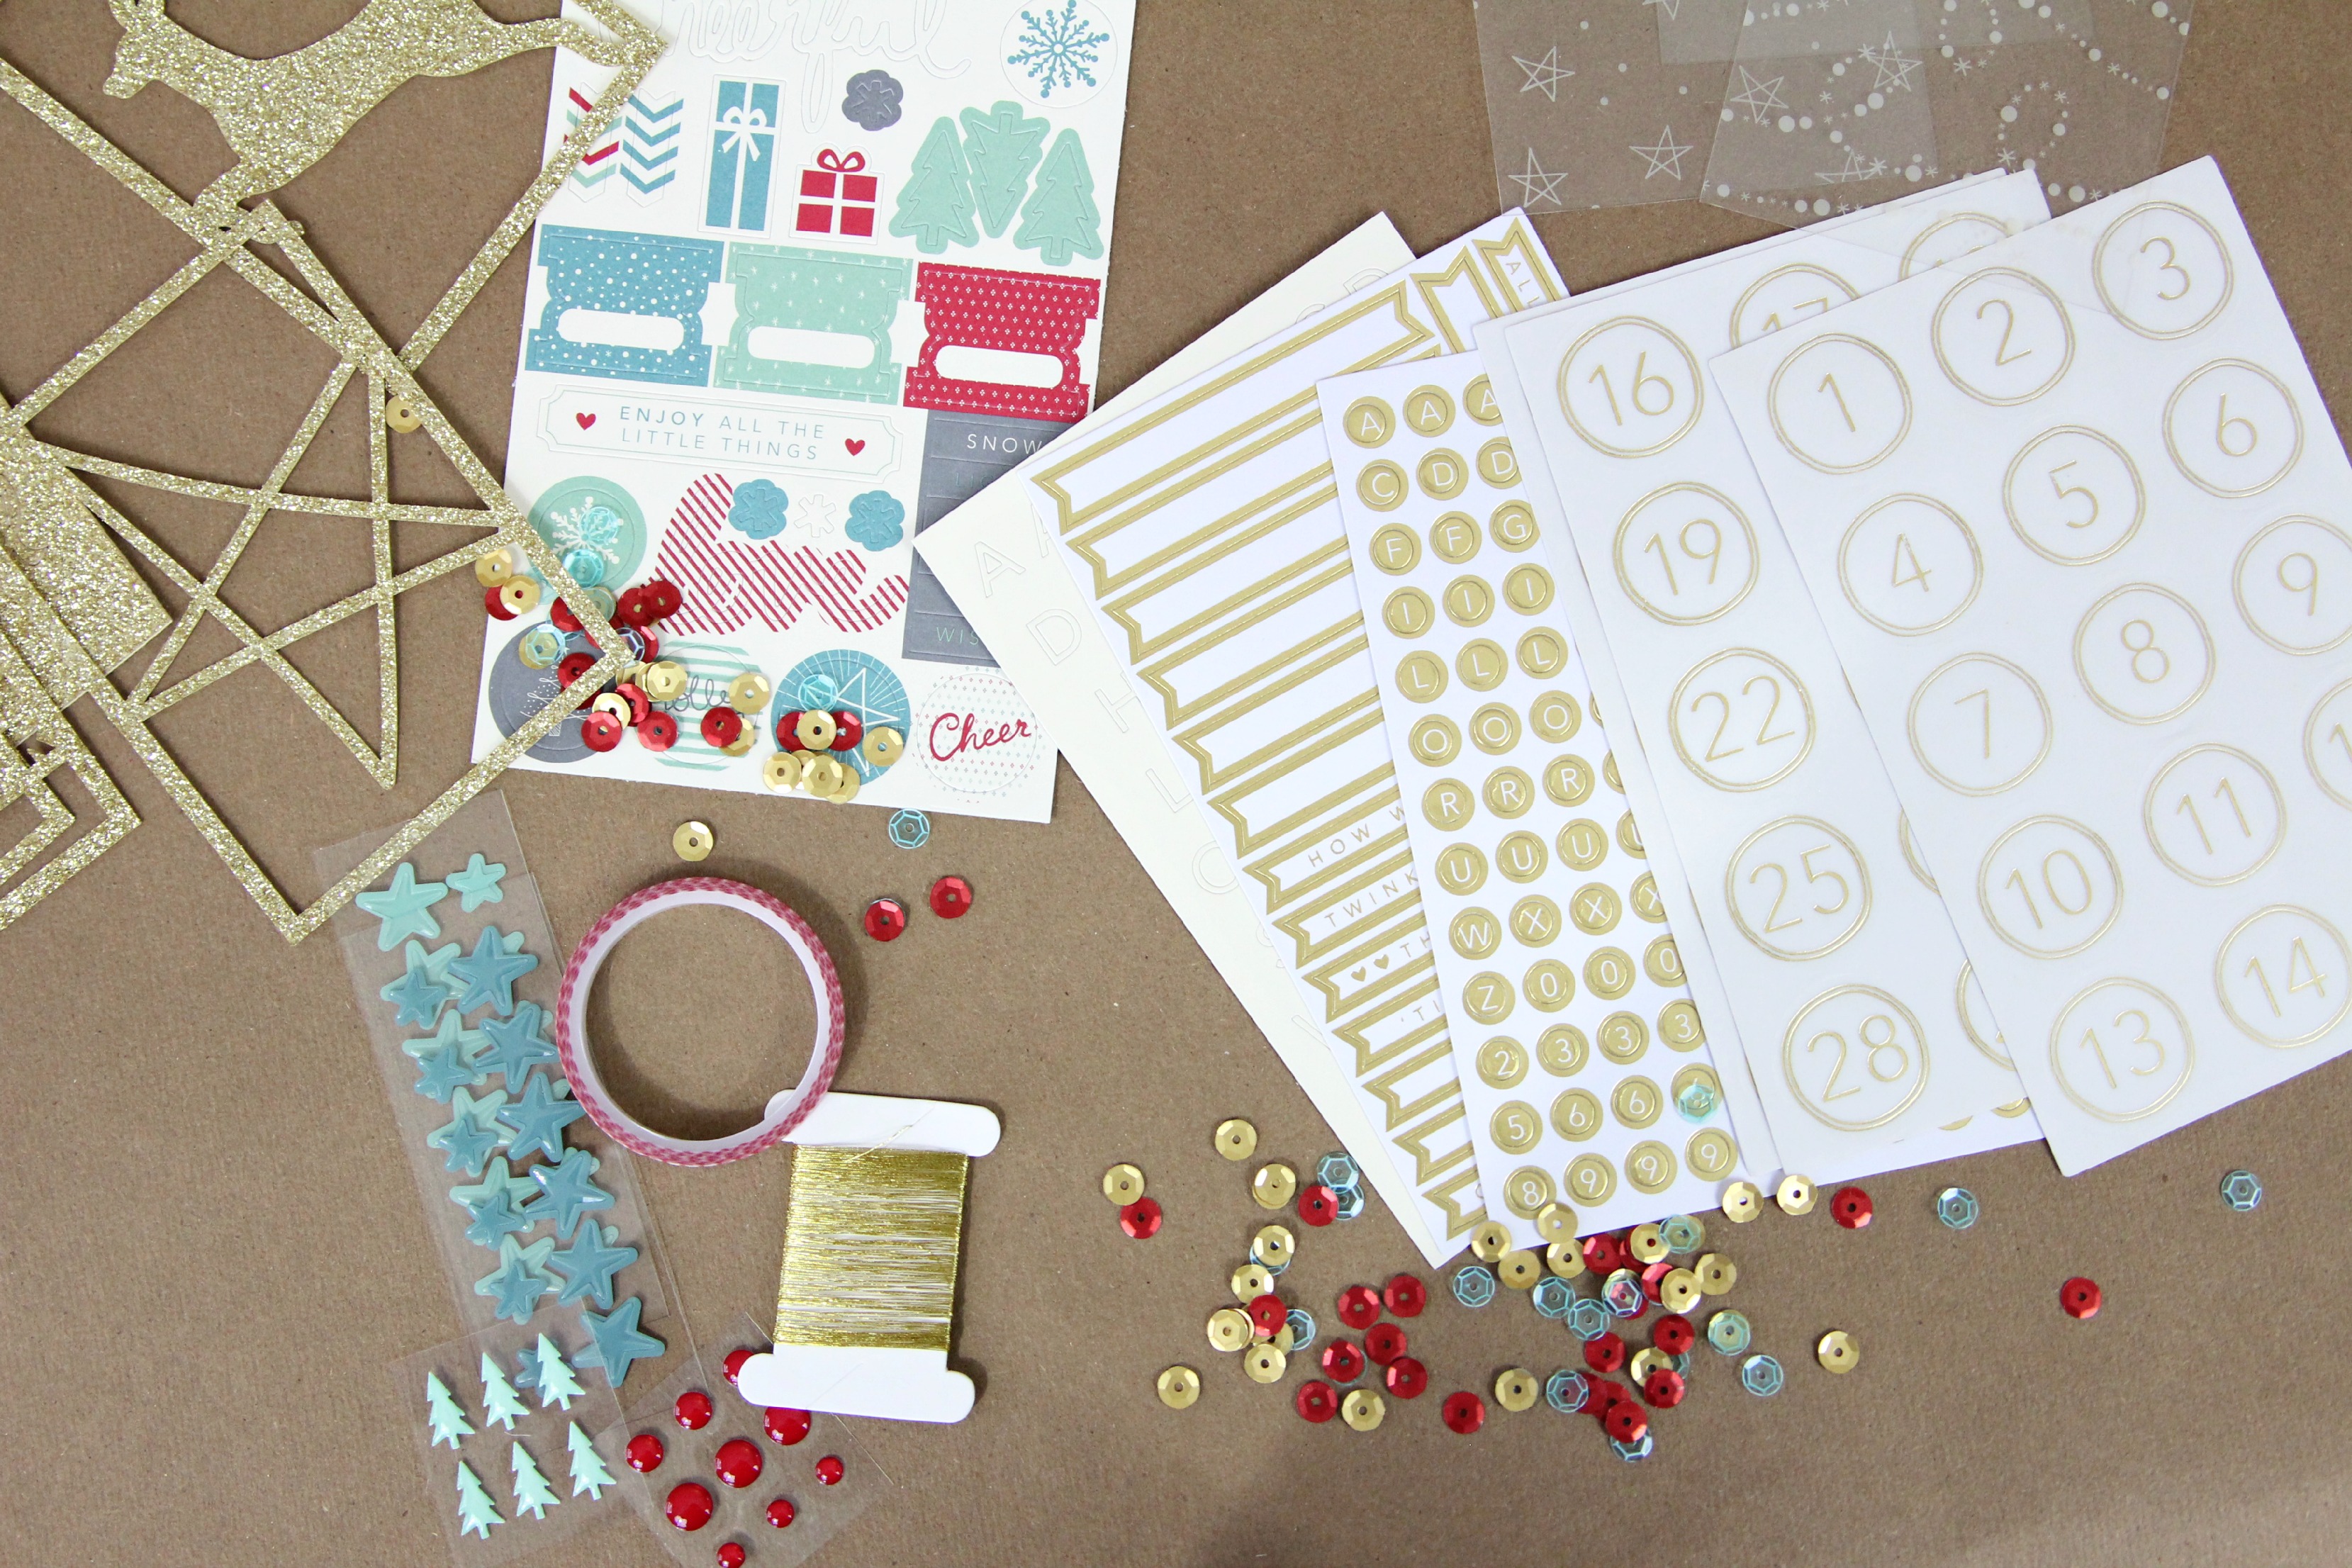
TIP: EASY EMBELLISHMENTS! Spend a few dollars on some good quality stickers, veneer embellishments, stamps and washi tape. These are my go-to for extra “wow” factor. It really takes no time at all to add stuff like this but it makes your album look unique. I love these skinny washi tapes from Stampinn’ Up! I also highly recommend month/days of the week stamps. Trust me, it makes Project Life even easier. Speaking of embellishments I usually go for fun colors that are generic except for one thing… I have so many photos from the Holidays each year I usually get a few packs of Holiday extras! I am LOVING this years “Hello December 2015” from Stampin’ Up.

Catching up on Project Life with Stampin Up!Catching up on Project Life with Stampin Up!Catching up on Project Life with Stampin Up!Catching up on Project Life with Stampin Up!Catching up on Project Life with Stampin Up!Catching up on Project Life with Stampin Up!Catching up on Project Life with Stampin Up!

Catching up on Project Life with Stampin Up! IMG_2438

TIP: DO WHAT YOU CAN WHEN YOU CAN! I leave my stuff out for a few weeks at a time, which is hard for people like me who can’t stand clutter haha! But think of it as a pretty mess. If you leave this stuff out, you can walk by, add a few embellishments, write a sentence for two and before you know it you have finished a few pages.

Catching up on Project Life with Stampin Up!

Catching up on Project Life with Stampin Up!

Catching up on Project Life with Stampin Up!

 TIP: KEEP IT SIMPLE, VERY SIMPLE. While I do love stickers and stamps etc. sometimes, I just slap my photos in and let them speak for themselves. It helps break up the album (and it helps you catch up faster).

Catching up on Project Life with Stampin Up!Catching up on Project Life with Stampin Up!

 If you work on your album when you can and keep it simple, before you know it you have a beautiful family yearbook! I’m working on my 5th one and Im still hooked!

Catching up on Project Life with Stampin Up!

Catching up on Project Life with Stampin Up!

Catching up on Project Life with Stampin Up!Stamping’ Up carries a ton of exclusive Project Life products as well as a ton of other stuff for scrapbooking and paper crafting! Their new catalog comes out on January 5th so be sure to check that out! Now for the best part!! One lucky reader is going to win the “This is the Life” bundle, which includes: the card collection, accessory pack and stamp set. More than enough to get you started on your scrapbook “journey”!! Good Luck guys :)

a Rafflecopter giveaway

Filed Under: project life, Uncategorized Tagged With: crafting

Project Life Card Holder

October 22, 2013 By Taylor 49 Comments

Project Life Card Holder

A few months ago I was playing on Instagram and looking at the hash tag #craftroom because it’s just plain fun. I came across an awesome Project Lifer, Miriam and her pretty feed. I looked back through her photos and fell in love with her Project Life Organizer! My husband is really handy so I started drawing up some plans.  Spoiler Alert: he built it and it’s amazing!!!

project life organization

The one I saw on Miriam’s Blog is a lot larger but mine has to fit on a shelf so I had to keep the size down. I gave my husband the dimensions and this weekend he went to work! Mine is 30″ long and 9 1/2″ deep.

project life organizer

My husband even made risers in each section so my cards have stadium seating. He glued and nailed the dividers in and I sprayed it white.  In other news I need to stop buying Project Life Kits :/

project life organizer

project life organizer

I have been using the plastic trays that the kits come in so the cards stand up. I find it SO much easier to use something if it’s already out. Not only are they handy but now they are even prettier in my new holder! When people walk in to my craft room they always say “what are these pretty papers?!” They are their own decoration :)

project life organizer

Project Life Organization

Thanks Bryan for building me the best Project Life Holder Ever!

Filed Under: organize, paper, project life, wood Tagged With: crafting

2013 Project Life Update (January to August)

September 18, 2013 By Taylor 5 Comments

IMG_6859

I haven’t done a Project Life Update in a while so I figured I would share a few pictures today :) It’s quite clear that I am a huge Project Life Fan, it changed the way I scrapbook and I think it is something that anyone and everyone can do. Here are some of my older posts: HERE, HERE, HERE and HERE. I started Project Life in 2011 but not until August so I was playing catch up all year, then when 2012 rolled around I wanted to be current with that so I was doing two books at a time. For the first time, this year I finally caught up with one book and have only had to work on one! Another first, I’m only one month behind which is huge for me… I’m usually years behind on my scrapbooks.

I am pretty nontraditional when it comes to Project Life and that’s what I like about it. It’s so custom. Most people that I follow on Instagram or in “blogland” tend to do the weekly layout. I have never done that because my pages don’t fall like that. For example, I might only have 10 pictures from the entire month of April but then I might have 30 pictures just from one day like a birthday.

Also, I am kind of a “Project Life Kit Junkie”. Some people buy one kit and use that one the whole year. I like to buy as many as I want and then each page is different. I also started subscribing to Studio Calico’s PL Kit each month so I have a lot to choose from. I will add links for products that I love (please note some are affiliate links on Amazon)lineHere is an example of one page from an event, and I didn’t use any papers in this layout. Just pictures and snippet of the invitation. I used Photo Pocket Pages – Design B.IMG_6860

One of my new favorite plastic pages are actually not even the Becky Higgins brand (I wish she would make some) But these hold Instagrams perfectly! I order my pictures from Postal Pix which is an App right on my iPhone. Also a tip for all women… try to put as many pictures of yourself in your book, my first year I realized I am never in any pictures so I try to make a point now! I used the Square Ring Photo Sleeve Protectors.IMG_6861

IMG_6863

I got inspiration from Elise Joy and I started sewing my actual calendar pages in to an 8×10 Page protector. I sometimes add sequins in before I sew :)IMG_6865

An example of random pictures from a month. I usually have photos from events, holidays, parties etc. Then for the few pictures that don’t fit into those pages, I make them their own page. This is my favorite plastic page Photo Pocket Pages Design A ,and they are often sold out on Amazon. You can find these at Hobby Lobby now too. These papers are from the Studio Calico subscription kit.IMG_6866

Sometimes I don’t have any journaling so I just add a title right to a photo.IMG_6868

A page all about my juice cleanse, using my new favorite stamp – (similar Mason Jar Wood Stamp)IMG_6869

Another favorite plastic page is the Photo Pocket Pages – Design F. I use these for cell phone pics. I have way more cell phone pics in my albums than “real photos”. These cards are from Studio Calico and the Heather Bailey Olive Kit. IMG_6870

Another page with no journaling.IMG_6871

I am also obsessed with “Thickers”! You can get them on Amazon or you can find them at almost every craft store, Target even has them!IMG_6872

When I have a lot of photos from something but I don’t want to spread it over so many pages, I will make collages and print them to 4×6 size. This is using the plastic page “A” again. I use it most often. The papers are from the Clementine EditionIMG_6873

I use the 5 x 7 Page Protectors often for invitations, pamphlets, school pictures etc…IMG_6875

Favorite Thickers :) IMG_6877

For this little road trip, I only took my pictures with my iPhone. Also, I when I go out of town, I always look for a 4×6 postcard for my layouts. PicMonkey Collage

Another road trip post with just my iPhone. This is using the Honey Kit and these are going to be my new favorite plastic pages I can already tell! They just came out, Photo Pocket Pages – Design K. They hold 6 Instagrams and have 4 pockets for journaling or cell phone pics. IMG_6881

In August I decided to do a “day in the life” type page and I tried to take a picture every hour… kind of fun! I used PicMonkey to add the times right to the pictures.IMG_6883

I also have 2 new “toys” that I use ALL THE TIME now! After researching a ton, I decided to get the Canon SELPHY Photo Printer. I love it! It makes it so much easier when you have your quality photos right there. I will still use snapfish for my big orders but this is perfect for cell phone pictures or when I forget to order something, of if I just can’t wait for my pictures to get here :) IMG_6885

IMG_6886

And I have been looking for something to cut 3×4 pictures FOREVER! I finally found one at Hobby Lobby!IMG_6888

Also, being the “collector”  that I am I just purchased the Sunshine Kit and the Flea Market Mini Kit, can’t wait to break in to these…IMG_6912

Is anyone out there a Project Lifer? I LOVE looking at other peoples pages because I think everyone is so inspiring in their own way! Please leave a link if you have a book!

Filed Under: project life Tagged With: crafting

5th and Frolic Project Life Core Kit

August 12, 2013 By Taylor 15 Comments

5th and Frolic Project Life

This post is part of a paid campaign with American Crafts, but all opinions are 100% my own. This is a product I have used and loved for years.

If you have been reading TaylorMade a while, you know that it’s no secret how much I love Project Life. I don’t just talk about it here on my blog, I also talk about it in person too :) I have even converted some friends because I am just that happy about it. I started memory keeping before I was 10 years old, before I even knew what memory keeping was. In High School I started a traditional scrapbook. But after college, life got busy and I stopped. Which is a similar story that a lot of people have and now that I have kids, preserving our memories are more important than ever to me! Enter Project Life.

Project Life is a super-simple approach to scrapbooking created to simplify the process. It requires no scissors, no glue, no tools and no skills of any kind. If I want to I can whip out 10 pages in an hour. If I am feeling especially creative, it also can be customized and “fancied up”. I even bought my non-scrapbooking sister a kit last year :) I love that it appeals to the person who’s never made a scrapbook in their life as, as well as those with lots of traditional scrapbooking experience. I have posted some of my tips and tricks  HERE, HERE and HERE.

IMG_6662

Project Life used to be sold exclusively online but is now available at Micheals! YAY! For all our immediate crafting needs, Michaels carries one of the largest selections of Project Life, including two exclusive core kits and several exclusive albums.

IMG_6672

The two exclusive kits are both awesome. The Dear Lizzy 5th and Frolic Core Kit is my personal favorite and it features an array of light blues, pinks, greens, yellows and airy neutrals. The fun icons include birds, trees, foxes, houses, keys and clipboards. The edition has a distressed feel. They also carry the The Vintage Travel Core Kit which features deep blues, reds and browns, along with a variety of darker neutrals. The icons in this Edition include trains, airplanes and maps.

I usually have a good mix of DSLR photos and iPhone photos so I love the smaller pockets for those! Here is a spread I did with the Dear Lizzy 5th and Frolic Kit with some pictures from March, I tend to skip around a little (click on the picture to see them larger)…

(Left Side)

5th and Frolic Project Life

(Right Side)

IMG_6658

IMG_6668

IMG_6669

I did add some embellishments for this week’s spread but this kit would be so pretty if you did nothing but slide your pictures in.

IMG_6677

So, how many of you out there are “project lifers”?

Related Posts Plugin for WordPress, Blogger...

Filed Under: paper, pictures, project life Tagged With: crafting

  • 1
  • 2
  • Next Page »

Welcome to Taylor Made

http://www.taylormadecreatesblog.com/about-me Hi Yall! I'm Taylor... an artsy mom of three from Houston, TX. I love sewing, collecting floral fabric, eating Mexican Food, photography, brights colors, rearranging, and rolling clay. Taylor Made Creates is all about creating a fun, colorful home, sewing cute things and eating good food. Check out my SHOP HERE HERE! Thanks for stopping by!

Search

Pin with me!

Like Me :)

Facebook Pagelike Widget

More Recent Posts

  • Kid's Animal Room
  • Kids Camping Shirts
  • Mermaid Birthday Party
  • Conversation Heart Cold Packs
  • Holiday Apple Tea Punch
  • Purple Princess Costume
  • Letterboard Costume
  • La Croix Costume

FAVORITES

  • White Wine Sangria
  • Handmade Mother’s Day: Recipe Oven Mitt
  • Fresh Peach Dump Cake – a Recipe
  • Salt Dough Napkin Holders
  • Black Bean Salad
  • Stethoscope Covers
  • Tips for Catching up on Project Life
  • DIY TeePee with Forest Fables Fabric
  • Playroom Reveal

Copyright © 2026 · Web Hosting By RFE Hosting