TaylorMade

DIY, Home Decor & Sewing

  • Home
  • SHOP
  • DIY & Sewing
    • For the Home
    • Sewing
    • Costumes and Holidays
    • Cricut Projects
    • Crafting
  • Parties
  • Recipes
  • Home Tour
  • Favorites
  • About

Etched Juice Glasses

April 11, 2011 By Taylor 5 Comments

I think I am having a love affair with Monograms (as seen in my recent post here). I know I’m not alone, right? You know who else loves monograms; couples getting married that’s who. I know when I was engaged I loved receiving gifts with my new name on it. It seemed so magical.

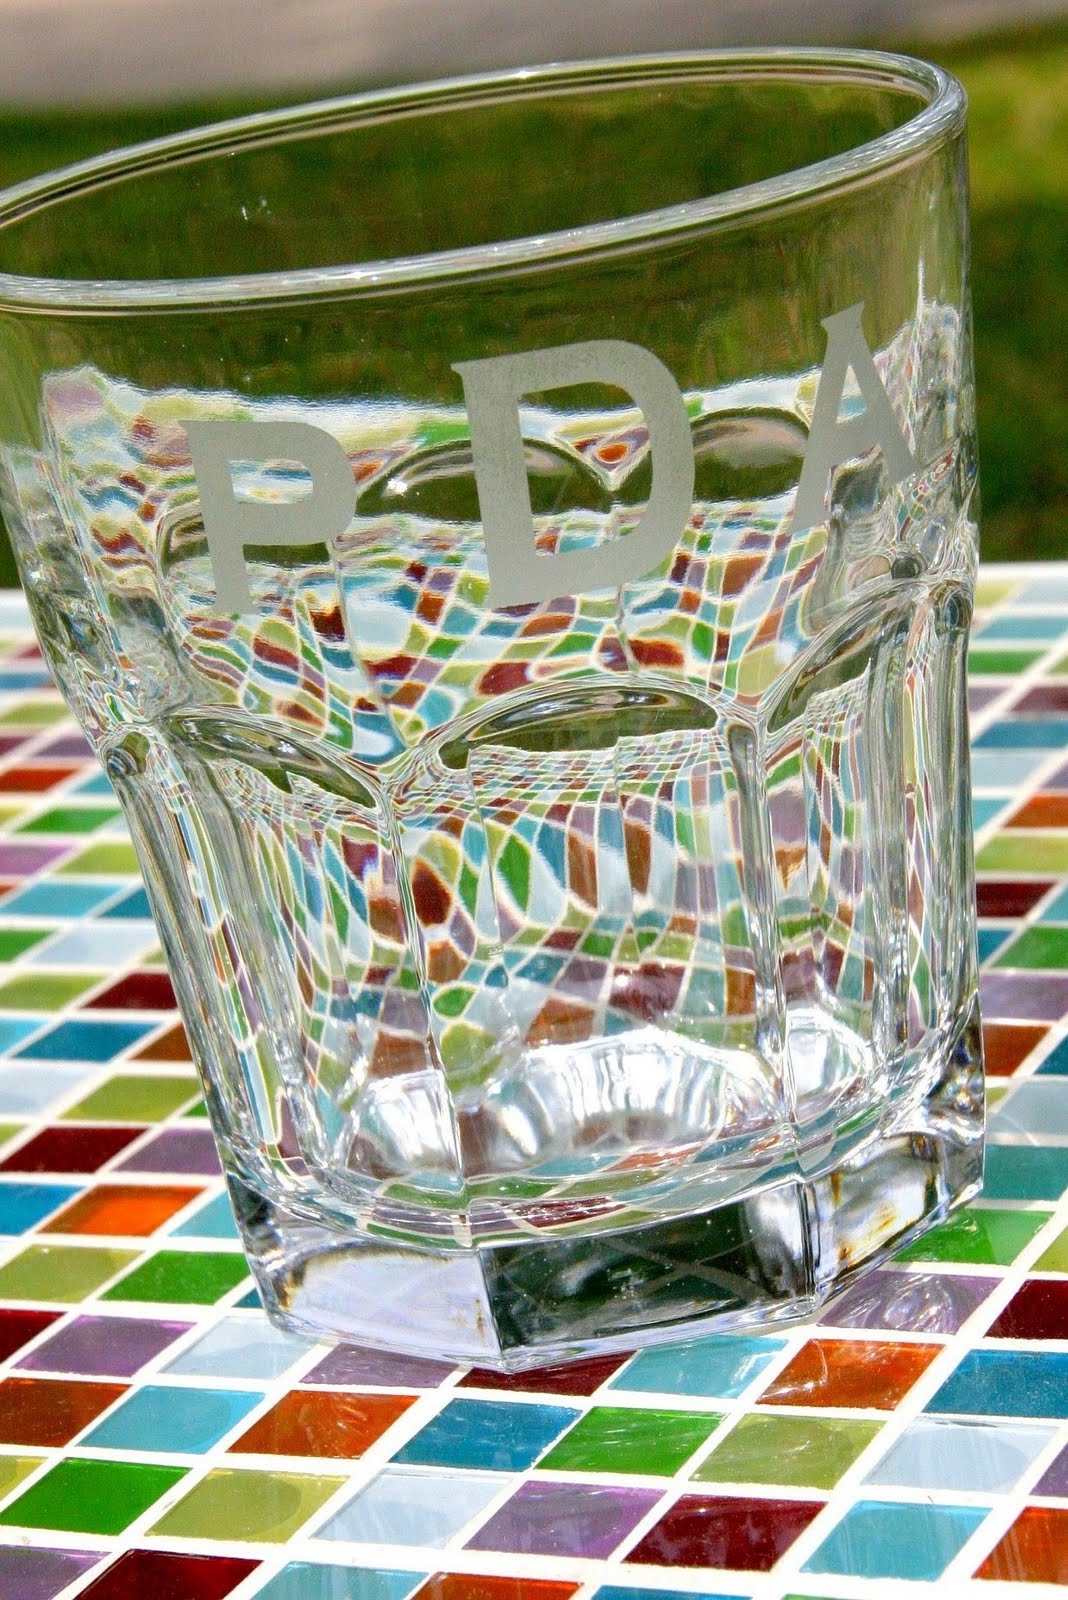
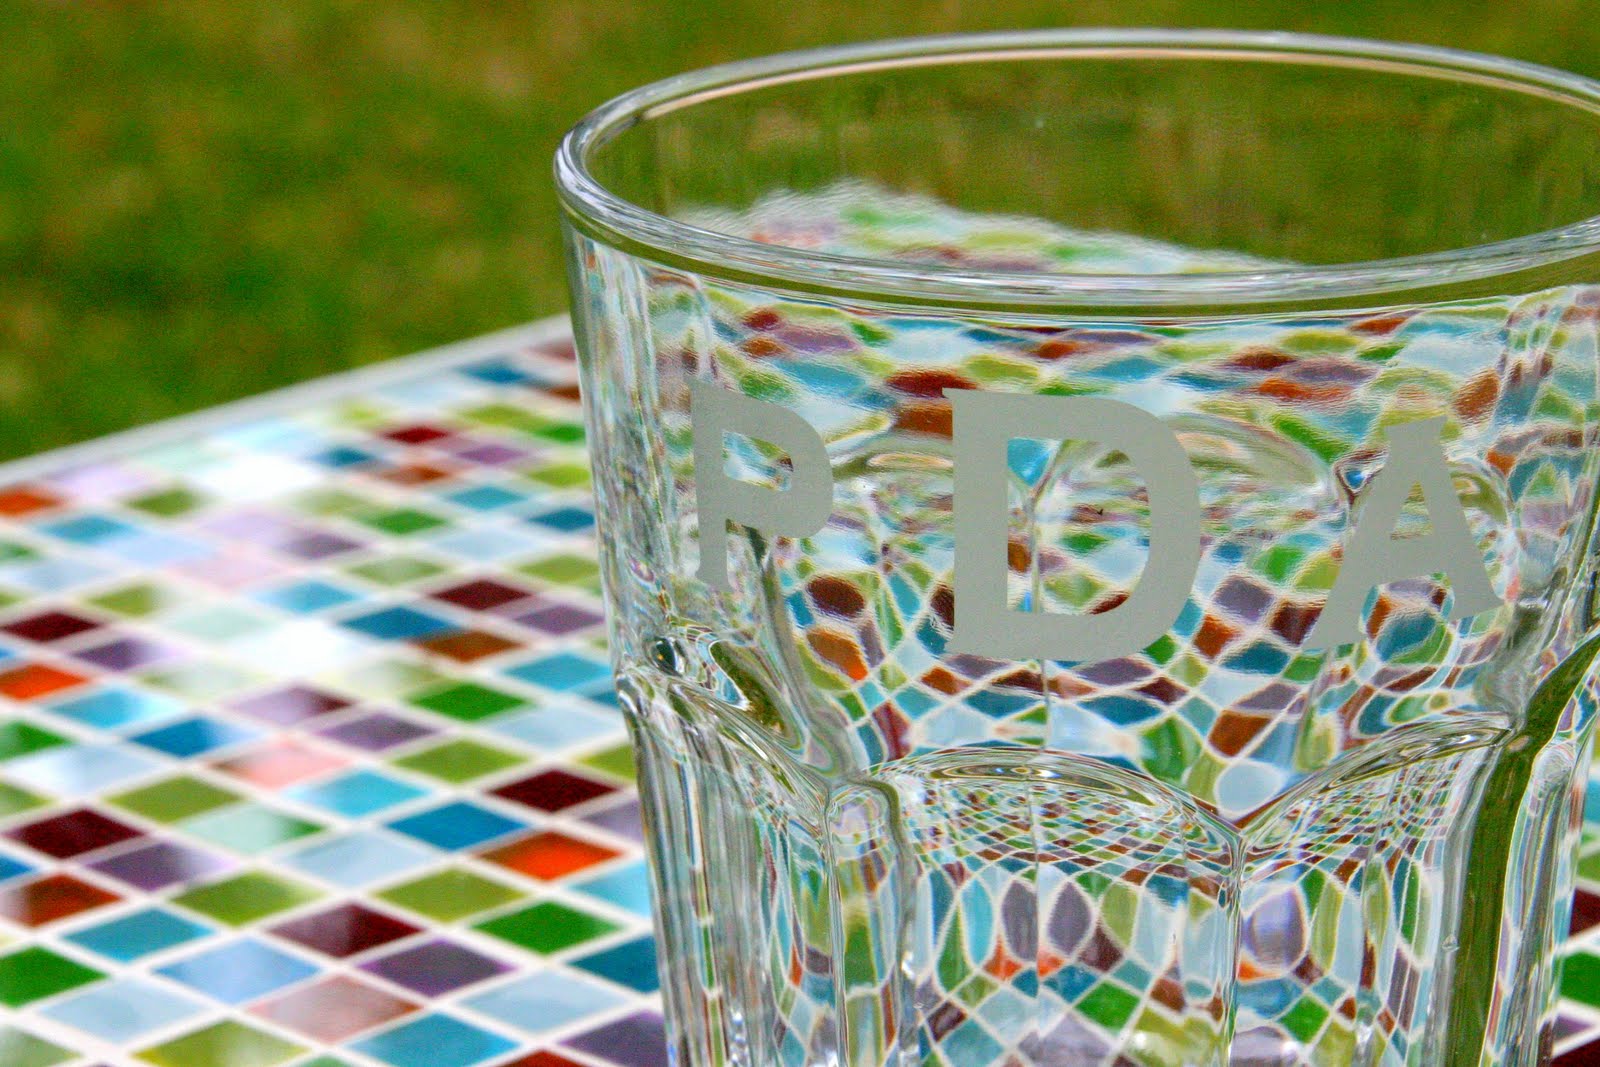
Our friends are getting married next month and we got them a juicer off their registry but I of course like to add something personal too. So I found these cute juice glasses and I monogrammed them. (I also maybe wanted an excuse to use my new Etching Cream that I just got.)

I created a stencil with vinyl using my Silhouette but you could easily just cut out the letters with an Exacto. Then I followed the directions on the back of my Etching Cream, kind of. My directions said to apply a thick, even layer, wait for 5 minutes then completely wash off. I looked after 5 minutes and it wasn’t a very strong etch, so I left mine on for about 12 minutes. I picture the newly weds having fresh squeezed orange juice out of these on Sunday mornings.

Filed Under: craft, etched, gift, kitchen, monogram, Silhouette Tagged With: crafting, DIY

El Cid Chili

February 2, 2011 By Taylor 1 Comment

OK, so this past weekend in Houston it was in the 70’s and I wore capris. Apparently we could see snow flurries by the end of this week! So to celebrate the cold weather (because yes, I like cold weather in winter – call me crazy) I decided to make some warm Chili. I have this cookbook that I love called Celebrate! by Shelia Lukins, its awesome! It’s set up by occasion like Easter, Vday, Mother’s Day… so this recipe for Chili came from the “Superbowl” section. It’s called El Cid Chili and its Amazing! It doesn’t call for any beans or extras; just the meat, tomatoes and spices. Add some shredded cheese and green onion on top and you are ready for these “Houston Snow Flurries”.

Ingredients:


2 tablespoons olive oil
2 pounds sirloin steak, cut into 1-inch cubes
1/2 pound ground beef
12 ounces chorizo sausage, casing removed, cut into 1/2 cubes ( I used sausage not chorizo)
1 large yellow onion, coarsely chopped
1/4 cup chili powder
1 tablespoon garlic salt
2 teaspoons cumin
1 teaspoon dried basil
2 (14.5-ounce) cans beef broth
2 (14.5-ounce) cans whole tomatoes, drained
1 cup cilantro, chopped
1 cinnamon stick
3 bay leaves
2 green jalapenos, slit lengthwise 3 times each
1 tablespoon yellow cornmeal
Salt and pepper, to taste
Garnish with Cheddar and sour cream, if desired

Directions:

Place oil in a large, heavy pot over medium heat. Brown the sirloin in batches. Remove to a bowl with a slotted spoon.

Add ground beef, chorizo (or sausage- I’m not brave enough for chorizo) and onions to the pot and brown. Make sure to break up the meat. Return sirloin to the pot.

Stir in remaining ingredients, except for garnishes.

Bring to a boil, reduce heat, simmer for 2 hours. Stir occasionally, breaking up tomatoes. Before serving, discard cinnamon stick, bay leaves and jalapenos.

Garnish, if desired

Filed Under: dinner, kitchen, recipe Tagged With: food

Spinach Artichoke Pasta Bake

January 17, 2011 By Taylor 4 Comments

What is for dinner tonight at your house? You don’t know either do you? Well here is an option… Spinach Artichoke Pasta Bake. I saw this recipe in Real Simple Magazine a few months ago and had to try it. By the way I loooove getting my real simple magazine in the mail, its like a little treasure and it usually comes on the same day as my Martha Magazine, double whammy. Anyway here it is; I changed the recipe a little so here is my TaylorMade version:

Ingredients:
8 oz penne pasta
14 oz can of artichokes (rinsed and chopped)
9 oz pkg of frozen creamed spinach (thawed)
1/4 c grated Parmesan
2 c grated mozzarella
black pepper
(optional) I added some chopped Italian ham

  • Heat your broiler
  • Cook pasta according to instructions on package, drain and return to pot
  • Add artichokes, spinach, Parmesan, half of the mozzarella, and 1/4 tsp black pepper (and ham if using) to the pasta and toss
  • Transfer to a baking dish and sprinkle remaining mozzarella on top
  • Broil for about 5-8 minutes or until cheese is browned on top

I love that it only uses 2 pots/dishes for the whole recipe! Before Bryan and I lived in our current house, we didn’t have a dishwasher so we became really good at using as few dishes as possible! What is a recipe you make that only uses a few dishes? Do share!

Filed Under: dinner, kitchen, recipe Tagged With: food

Play Kitchen

December 30, 2010 By Taylor 32 Comments

I finally got around to re-taking some pictures of the new kids kitchen since all of my other pictures are in purgatory. (Still, keep your fingers crossed). So, this was the big present from Santa this year. I have seen quite a few play kitchens out there in the blogging world and there is even a Flickr group for them. There are a ton of ideas! I saw many people making them out of nightstands and entertainment centers. My mom had the perfect shaped nightstand that she didn’t need and thankfully she donated one to the cause. My husband and his dad did all of the “woodworking” on it. I drew them a picture and after a few trips to home depot it started looking like a kitchen! Then we spent many nights adding to it. I even found a lot of good materials at Goodwill. Here is what we ended up with, I really like the way it turned out and my son loves it! It was a bigger hit than we thought it would be.

We used wooded plaques from Hobby Lobby for the burners. I painted them with metallic black paint and cut out the red swirl for the burners then applied 2 coats of Mod Podge. The dials are wooden car wheels painted and Mod Podged also. We didn’t bolt them in all the way so they spin.

We cut a hole in the back wall and I found that frame that fit perfectly at Goodwill. I just printed out a picture of that field on my computer for the window scene.

My favorite part is the backsplash!! We just hot glued and caulked those tiles on the back. The sink is a bowl from Goodwill and we had trouble finding a used faucet so that was our most expensive purchase. It’s from Home Depot for $9.00 but it looks so perfect!

For the oven, my husband added that shelf in between where the drawers were then just removed the bottom drawer for storage. He cut a hole in the top one and we added the Plexiglas and a hinge so it really opens and closes.

Final touches are some hooks on both sides for “utensils” and cookware. I’d say he loves it! Here he is on Christmas Morning. Maybe you will see him on Top Chef in 20 years?
Related Posts Plugin for WordPress, Blogger...

Filed Under: Christmas, kid stuff, kitchen, wood Tagged With: furniture

  • « Previous Page
  • 1
  • 2

Welcome to Taylor Made

http://www.taylormadecreatesblog.com/about-me Hi Yall! I'm Taylor... an artsy mom of three from Houston, TX. I love sewing, collecting floral fabric, eating Mexican Food, photography, brights colors, rearranging, and rolling clay. Taylor Made Creates is all about creating a fun, colorful home, sewing cute things and eating good food. Check out my SHOP HERE HERE! Thanks for stopping by!

Search

Pin with me!

Like Me :)

Facebook Pagelike Widget

More Recent Posts

  • Kid's Animal Room
  • Kids Camping Shirts
  • Mermaid Birthday Party
  • Conversation Heart Cold Packs
  • Holiday Apple Tea Punch
  • Purple Princess Costume
  • Letterboard Costume
  • La Croix Costume

FAVORITES

  • Handmade Mother’s Day: Recipe Oven Mitt
  • White Wine Sangria
  • DIY TeePee with Forest Fables Fabric
  • Playroom Reveal
  • Fresh Peach Dump Cake – a Recipe
  • Salt Dough Napkin Holders
  • Black Bean Salad
  • Stethoscope Covers
  • Tips for Catching up on Project Life

Copyright © 2026 · Web Hosting By RFE Hosting