TaylorMade

DIY, Home Decor & Sewing

  • Home
  • SHOP
  • DIY & Sewing
    • For the Home
    • Sewing
    • Costumes and Holidays
    • Cricut Projects
    • Crafting
  • Parties
  • Recipes
  • Home Tour
  • Favorites
  • About

DIY Black and White Curtains

July 2, 2013 By Taylor 39 Comments

IMG_6382

We are finally getting into the swing of things over here at the new house. How long does that take by the way? We have been here a month and stuff is coming together! Our dining room is one of first rooms you see when you walk in to the house and I wanted a graphic punch. I mean, once I found the “plate wall box” and pushed the chairs in I felt pretty good.
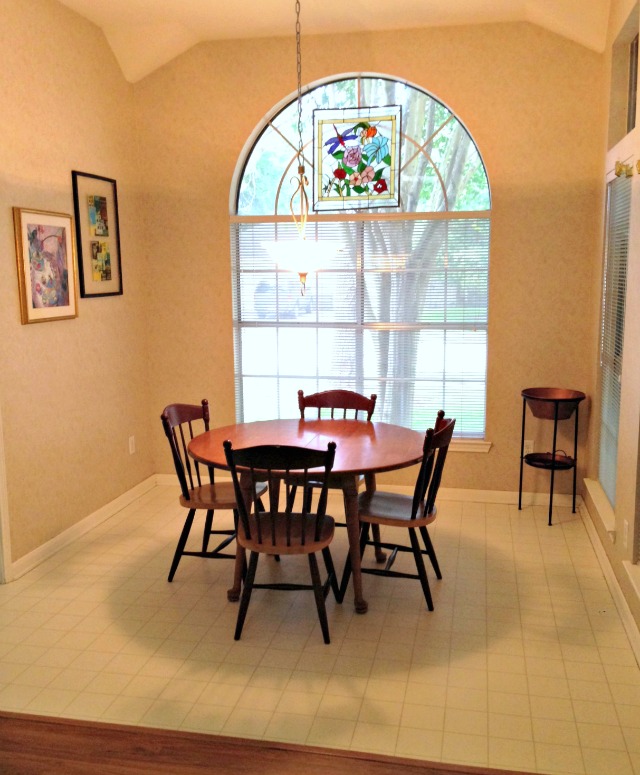
naked before shot:

IMG_6359 dining room

But over a year ago I saw some big black and white striped curtains and I knew I wanted them for my next dining room. I found some no-sew options, and thought about sewing black and white fabric together, and even painting some. But then I came across this tutorial with a link to the perfect fabric.  Catharine at “Your Modern Couple” has a great tutorial, I even ordered the same amount of fabric and pretty much followed just what she did. I ordered 5 yards, cut them in half twice and sewed the length together.

IMG_6363

I love how they turned out in our dining room. They make the ceiling look so tall and it dresses up our casual but modern room.  I kept the plate wall from my old house. Next on our list is getting rid of that bad light fixture. plate wall

IMG_6370

And I added this… my mom bought it for me last October, it was my 5th wedding anniversary and she found a dish towel from Anthro that is marked with our wedding date, so perfect.

IMG_6378

black and white curtains

IMG_6366

Down the road we hope to not have carpet in here but it’s in pretty good shape so we are fine with it.  Right before I started sewing, I showed my husband the fabric and he said “well, isn’t it a little loud?” But I thought nothing of it because he is a boy and he is traditional. But then I showed my mom and I said don’t you love them? And she replied, “well yes but they remind me of the Hamburglar”. Which I think is an awesome name for them. So far I don’t have rave reviews but they make me so happy. What do you think? Too loud and clown-esque or do you love them like I do?

Filed Under: fabric, home goods, sewing Tagged With: home goods

Home Sweet Home

June 25, 2013 By Taylor 6 Comments

Guess what, we moved. If you follow me on instagram or facebook you have already been bombarded with pictures. But that is why the ole blog has been a little on the light side. That, and it’s summer so my kids are crazy.
We are so in love with our new house. I still can’t believe we live here. It feels so grown up. I took this picture the day we closed. This is the entrance when you walk in the front door. And this is our new paint (that we paid people to do- not very DIY of us).

We moved ourselves which is a fun activity with 2 & 3 year old boys (not). We couldn’t have done anything without our families and we are so lucky that they all live within 10 minutes of us! We only moved a mile away so we kind of just loaded our cars, trucks and my dad’s trailer with everything (sometimes not even in boxes) and threw everything in the new house. Which led to things like this…

We put a lot of extra stuff in storage to stage our old house to sell it. My kids thought it was Christmas when they got their old toys back again 2 months later. This is the new play room. The house is a 4 bedroom and the boys wanted to share a room. There are two bedrooms connected with a jack-and-jill bathroom, so we have one room for beds and clothes and one room for toys and games. It’s working out great so far! We have never had a “playroom” and I spent half my day at our old house picking up toys. I love having it out of sight (however I still try to clean it daily) what is wrong with me? It is looking better these days, still needs a lot of help but that’s every room. 
Here is a little glimpse of the house via bad iphone photos, lets call these the “before” pictures:
Kitchen: 
I LOVE our huge kitchen, it’s the center of everything. We can’t wait to do something about the wallpaper, bad office lighting, and the flooring, that will all be down the road

Breakfast and Laundry: 
again with the wallpaper, new light and we want to do built in cubbies in the laundry room down the road

Dining:
we need a new lighting fixture asap, but I did just make curtains :) I will share those soon
Living:
here is the day we closed… after pictures coming soon, I have actually done some stuff to that room :)
Craft Room:
it needs so much help, but its first on the list, mainly because it is such a mess! Built in desks and a huge work table are coming soon
Master:
we need everything, don’t even know where to start haha… for example my nightstand is currently a filing cabinet :/ DIY plans include a new headboard that I’m really excited for
Boys room:
 I’ve actually done a lot to this room and I will share the pretty pictures soon
Guest Room:
looks like a bomb of junk exploded- that and I could probably open a day care in there with the amount of baby stuff

Playroom: 
needs decor, like stat! I have a few ideas that include vintage books, a chalkboard wall 
and a pegboard tool area 

Backyard: 
we love it and there are a ton of cool plants and trees out here! we want to build a little deck and awning eventually

and there you have the grainy iphone tour – I can’t wait until next year at this time so I can look back at this post and say “look how much it’s changed!”

Follow on Bloglovin

Filed Under: home goods

How to Save Your Leaves – Leaf Art

May 15, 2013 By Taylor 7 Comments

Last fall my Mom, Sister and I took a girls trip to the East Coast. It was on my Mom’s bucket list to see the leaves change and we came along for the ride :) Here in Texas we have no seasons… we have warm, hot, hotter, warm again then a series of cool fronts for a winter with mild days between. We were in awe with all of the colors and the history of the cities. The locals there told us we “were a week late” to see the really good colors- Of course we didn’t know that! To anyone who lives on the east coast and sees this every year- I think you take this for granted.


I wanted a way to “save” some leaves so I placed them away in a notebook and brought them home. My mom is going to start a gallery wall for her office so I though some leaf art from New England might be the perfect touch. 
I measured the frame and used craft paper cut the the right dimensions and taped it down.

Then I mod podged the back of the leaves and placed them on the craft paper where I wanted. 

I pressed them down a little and then mod-podged the tops. Careful not to get it too thick outside of the leaf or it will dry darker. 

Then I added a little trip reminder.

The Mod Podge makes the paper a little “rumply” so I stacked book on top after it dried. 

Then frame it. The Mod Podge has sealed in the colors so far so hopefully they don’t fade too much. 

So who all is from the East Coast and gets to live in this beauty… and who is with me on no seasons?
Follow on Bloglovin

Filed Under: craft, home goods, Mod Podge Tagged With: crafting

Barrel Chair Makeover

February 17, 2013 By Taylor 30 Comments

This is the story of a chair. It all started two years ago when I bought a chair at a garage sale and was so happy to take it home and give it the makeover it deserved. Then I threw it in the garage because I don’t know the first thing about reupholstering furniture. I called around locally to find a place that would recover it… I was looking at over $400. I didn’t need it that bad, so there it sat collecting sawdust. Then I got a crazy thought… maybe I could do it? I said to myself- you’re crafty, how hard could it be… get out there and recover that chair. So I drug it inside, And I did it! Probably the most challenging DIY to date! It wasn’t that easy… and now I know why people wanted to charge me $400. It’s not perfect but I have a new chair and I’m glad I challenged myself.

Just in case my crazy plan didn’t work I didn’t want to spend a fortune on fabric. When I got the original quotes a few companies told me I would need about 6 yards of fabric, and upholstery aint cheap. I was telling my super smart mom all about my chair and she suggested getting a cheap muslin/canvas and make my own fabric. So that was my first step, props mom :) I got 6 yards of muslin for $2.99 and used my 40% coupon. Then I found a color palette I loved and some small foam pouncers.

The trouble was finding where to hand stamp 6 yards of fabric with two little boys on a rainy day. I left our only table to eat on like this for 3 days, my husband loved it :) Sometimes we have to make sacrifices for creativity, right?

After I took 1 million pictures of the chair “before” to reference, I started ripping it to pieces. I even posted a pic on Instagram about the OTHER fabric I found underneath. That’s right, this was not its first experience with reupholstering. That orange tweed was on the bottom and the whole inside of the chair.

This step also included some “outside time” on a pretty day… after the orange tweed situation there was dust and a smell :/ so I broke out the Lysol and some hot soapy water and went to town.

After my fabric was done my plan was to just lay out each piece on the fabric using that as a template, which worked really well.

I made sure to take out all of the previous staples that I could. I also used man tools like pliers and clamps :) Then I made yards and yards of piping. Overall, piecing the chair together was really fun, it was just a puzzle then involved a lot of staples. The cushion and the pillow were the only sewing I had to do. The hardest part was that back pillow because it was such an odd shape. 

The very last thing was the piping, and I just used hot glue because that’s how it was when I took the chair apart.

I really love the way it turned out. I also loved doing it, yes it was hard but this is my hobby… I don’t like boring crafting haha. It was a challenge but I am glad I can say I once reupholstered a chair. I will also be glad to pay someone else to do it next time :) 
Before and After

a million chair shots….

So what do you think? Have you ever reupholstered any furniture? Or does anyone have any tips?

Pin It

Related Posts Plugin for WordPress, Blogger...

Filed Under: fabric, furniture, home goods Tagged With: furniture

  • « Previous Page
  • 1
  • …
  • 5
  • 6
  • 7
  • 8
  • 9
  • …
  • 13
  • Next Page »

Welcome to Taylor Made

http://www.taylormadecreatesblog.com/about-me Hi Yall! I'm Taylor... an artsy mom of three from Houston, TX. I love sewing, collecting floral fabric, eating Mexican Food, photography, brights colors, rearranging, and rolling clay. Taylor Made Creates is all about creating a fun, colorful home, sewing cute things and eating good food. Check out my SHOP HERE HERE! Thanks for stopping by!

Search

Pin with me!

Like Me :)

Facebook Pagelike Widget

More Recent Posts

  • Kid's Animal Room
  • Kids Camping Shirts
  • Mermaid Birthday Party
  • Conversation Heart Cold Packs
  • Holiday Apple Tea Punch
  • Purple Princess Costume
  • Letterboard Costume
  • La Croix Costume

FAVORITES

  • Cute Little Girl Clothing… found on Amazon!
  • DIY Leather Tote
  • Stethoscope Covers
  • Mini Journals
  • More Casserole Carriers
  • El Cid Chili
  • Cobb Salad with Red Wine Vinaigrette
  • Southwest Chicken Salad & Cilantro Lime Vinaigrette
  • DIY Roach Costume

Copyright © 2026 · Web Hosting By RFE Hosting