TaylorMade

DIY, Home Decor & Sewing

  • Home
  • SHOP
  • DIY & Sewing
    • For the Home
    • Sewing
    • Costumes and Holidays
    • Cricut Projects
    • Crafting
  • Parties
  • Recipes
  • Home Tour
  • Favorites
  • About

Business Card Holders

March 20, 2013 By Taylor 2 Comments

If you are reading this on Thursday Morning, I am already well on my way to Blissdom :) I’m excited/nervous/sad to leave my boys/happy to be with girls; but mainly excited.

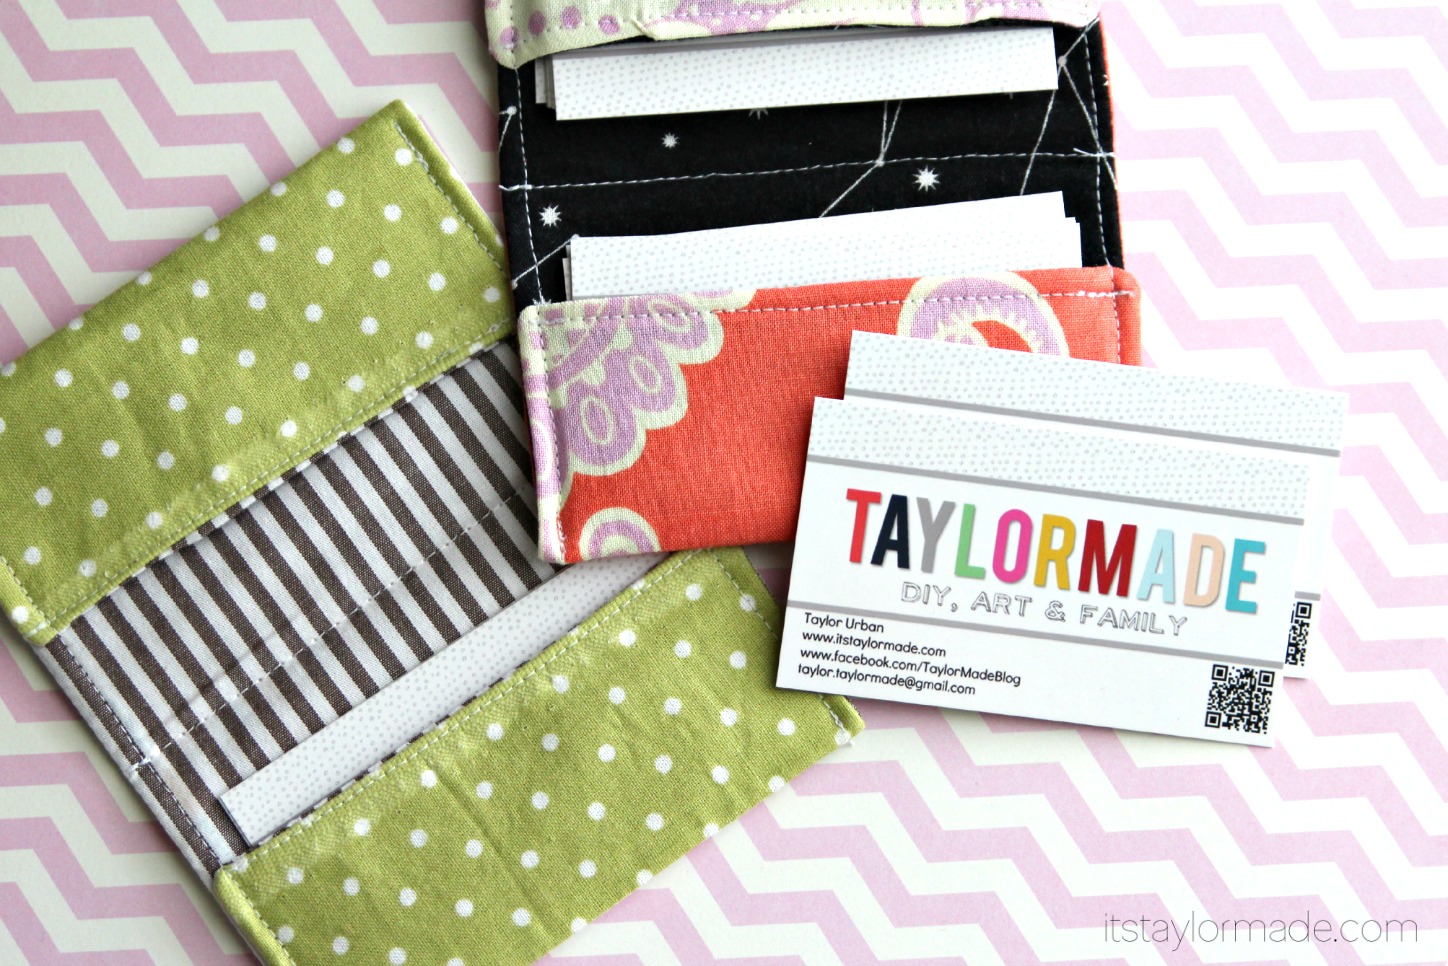
A few weeks ago I signed up for a little craft swap with “newbies” that will be at Blissdom. My partner said she loves, tea, yoga, blank notebooks and neutral colors with greens and blues. I got her a few things that I  bought. For the handmade part I decided on a business card holder for the conference (and of course had to make one for me too). I found a great tutorial HERE. Mine matches my new tote in coral.

Hopefully these will be busting the seems next time you hear from me.

Until next week, wish me luck! When I come back I will have a million pictures, stories and new friends to share, xoxo.

Pin It

Follow on Bloglovin

Filed Under: fabric, sewing Tagged With: accessories

the taylor tote

March 17, 2013 By Taylor 15 Comments


Meet my new favorite thing; The Taylor Tote. I am headed to Blissdom this week (eeek!). I should be planning what I am going to wear or packing or doing laundry. But instead I prepared by making a tote bag, And I love it.

I wanted black and white stripes, hot pink trim and brown leather… but after a late night JoAnn’s visit that involved all the boys, a toddler meltdown and one throwing up – this is what I came home with (yes one really did throw up at JoAnn’s)

From what I hear, I will need to carry around a lot of stuff. There are 3 classes the first day and 2 on the second day. I’m going to bring my DSLR and I need space for all the i’s- so made an iPad and an iPhone pouch.

I also made extra wide handles, which are a definite must so I can load my bag full of stuff from the handmade market :)

Apparently everyone loves the new tote, including a red wasp who tried to be a part of my photo session.
Random fact- last summer I was attacked my a ball of red wasps that my son was trying to grab, he was un-phased and I couldn’t walk for days. Now I call them tracker jackers.


Speaking of packing, if you have been to a blog conference pretty please give me some tips!! What does everyone wear on the dress up night? How fancy do people get for the classes? And what do I need to bring besides the “regular stuff”? And if you are going to Blissdom in Dallas this week then leave your info!!

Pin It

Follow on Bloglovin

Filed Under: fabric, sewing Tagged With: accessories

Envelope Clutch

February 27, 2013 By Taylor 7 Comments

Last week Kate from See Kate Sew announced a new Sew-Along. And I never miss a See Kate Sew Sew-Along :) She has the free pattern HERE if you want to jump on in. It was super easy to follow, I whipped mine up from start to finish in less than an hour!

I originally wanted a gold button but I vowed to make this only from things I already had in my craft room, and this button was the perfect shade of green. Also, I love anchors. Does anyone else have issues cutting into their own hoarded fabric?

I am in LOVE with the lining!!

I wanted to make it look like a real envelope so I added an “address and stamp”.

Thanks Kate for another fun sew-along!

Pin It

Filed Under: fabric, sewing Tagged With: accessories

Silhouette Cameo Dust Cover (with pattern)

September 24, 2012 By Taylor 42 Comments

Remember last Thanksgiving when I WON a Silhouette Cameo? It was an exciting moment in my blogs life. I used to own a regular ole Silhouette and I was totally fine with it. I even made it a Dust Cover HERE. But when I won my new one, it went naked for a while. This has been on my to do list for about a year. Better late than never :) 
You will need a piece of fabric that is 22 1/2″ x 13″. Then you need to print out the Edge PATTERN PIECE HERE. Made sure your edge pieces are facing opposite directions, you can cut on the fold too. Disclaimer: I used a serger to finish my edges, however if you want to add a hem, you might want to add a 1/2″ to these measurements.

Then, with right sides together start pinning the edges to the main square of fabric. 

It will soon look like this, then you sew. Clip Your corners after you sew. 

Then I serged, or you could do 1/2″ hem.
Now she’s not naked, but she does have matching underwear :) Did anyone else make a custom face-plate or am I the only one? Oh come on guys, anyone?

Pin It

Related Posts Plugin for WordPress, Blogger...

Filed Under: fabric, pattern, serger, sewing, Silhouette Tagged With: accessories

  • « Previous Page
  • 1
  • 2
  • 3
  • 4
  • …
  • 6
  • Next Page »

Welcome to Taylor Made

http://www.taylormadecreatesblog.com/about-me Hi Yall! I'm Taylor... an artsy mom of three from Houston, TX. I love sewing, collecting floral fabric, eating Mexican Food, photography, brights colors, rearranging, and rolling clay. Taylor Made Creates is all about creating a fun, colorful home, sewing cute things and eating good food. Check out my SHOP HERE HERE! Thanks for stopping by!

Search

Pin with me!

Like Me :)

Facebook Pagelike Widget

More Recent Posts

  • Kid's Animal Room
  • Kids Camping Shirts
  • Mermaid Birthday Party
  • Conversation Heart Cold Packs
  • Holiday Apple Tea Punch
  • Purple Princess Costume
  • Letterboard Costume
  • La Croix Costume

FAVORITES

  • Briar Rose Strip Quilt
  • Mini Fabric Lamps
  • More Casserole Carriers
  • Barrel Chair Makeover
  • Casserole Carrier
  • Happy Rocks
  • Skunk Costume
  • The Frozen Fox
  • DIY Leather Tote

Copyright © 2026 · Web Hosting By RFE Hosting