TaylorMade

DIY, Home Decor & Sewing

  • Home
  • SHOP
  • DIY & Sewing
    • For the Home
    • Sewing
    • Costumes and Holidays
    • Cricut Projects
    • Crafting
  • Parties
  • Recipes
  • Home Tour
  • Favorites
  • About

Another Project Life Update

September 17, 2012 By Taylor 12 Comments

If you know me, you know I love this Project! I have no affiliation with PL, I just love it :) Read my other Project Life Posts HERE and HERE. I am working on my 2011 and 2012 at the exact same time which is crazy and not recommended ha! I keep forgetting what year and writing the wrong dates! Especially with the boys being only 18 mos apart I’m like what kid is that… and what year?? Here is a little update from the craft room. I am up to date on both years through May… woo hoo! For 2011 I have the Amber Core Kit and for 2012 I have the Cobalt Core Kit.
I am trying to use different materials like sequins and buttons. I have a love for sequins.

Another new thing I love, I just staple embelishments right onto the photo which is kind of liberating for some reason. I used quite a few staples on this page… also please don’t judge these one month old Clyde pics, yes he is almost 2. Better late than never?

As I work more on my book I get more creative with other textures. It looks so much more interesting to break up the solid picture pages.

I am in love with this Monthly Calendar stamp. HERE is a similar one. I use it all the time!

I have been using these 6×12 page protectors for cards.

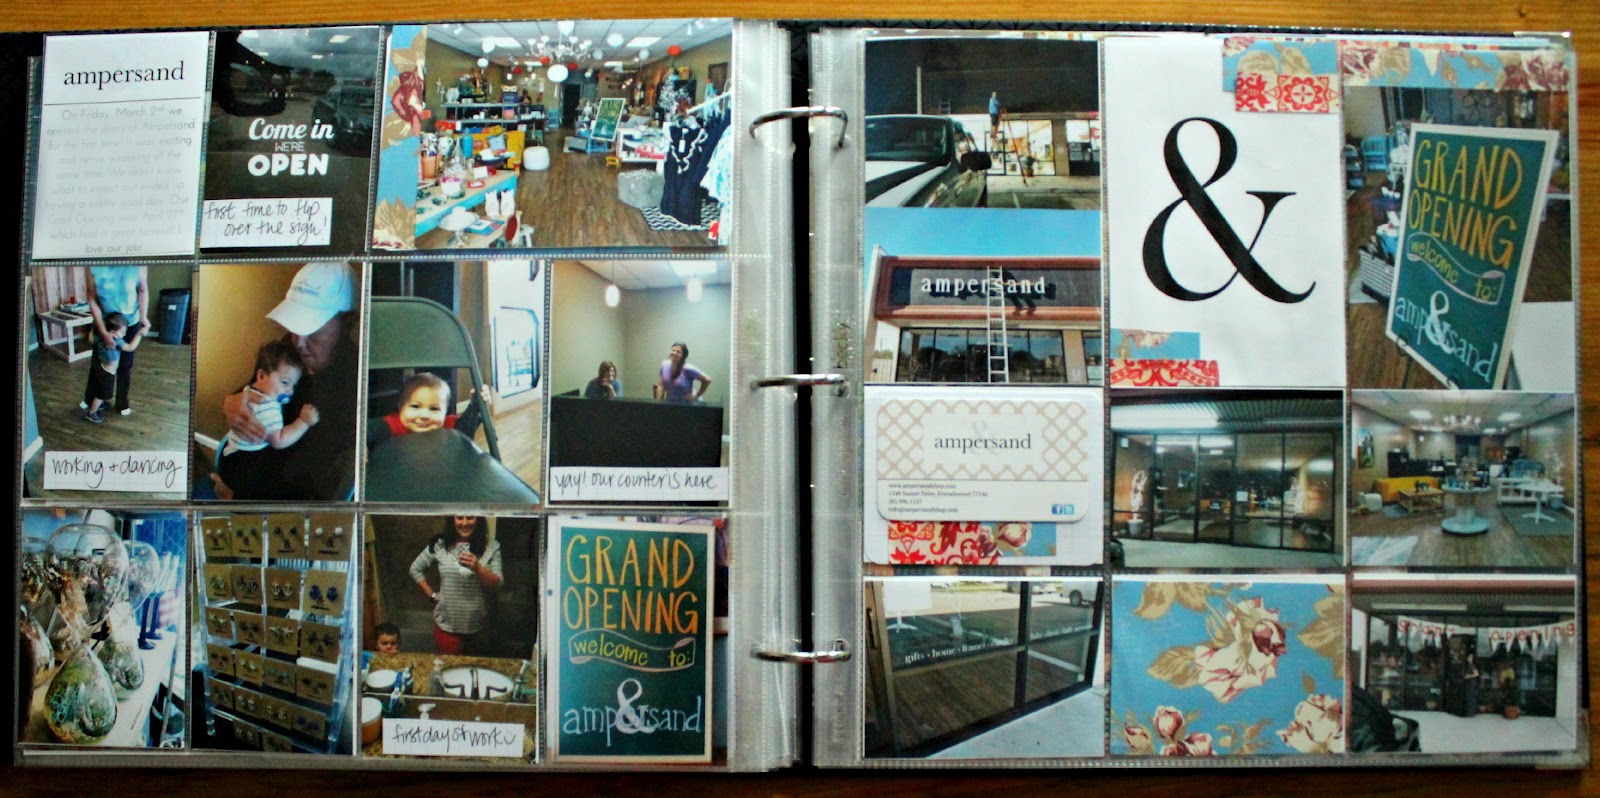
A lot of people use Project Life as a “week in the life project” or a “photo a day” but that’s not really my style. Sometimes, like with Clyde’s Bday above I have 50 pictures from one day. Then some months we don’t have a lot going on so a whole month will fit on 1 page. Here, I made a whole page just about ampersand. These pics range from about 3 months but I thought they would look better together.

And here is a whole month on a page.

I love using these pages Design G and Design H for the Monthly Updates. I want them to be on their own page but I don’t need 4 or 5 of the same picture so these smaller pages work great for me.

And two of my favorite title pages….

I used a real band-aid for a page all about first Clyde’s ER Trip. I thought I was being so original but then I saw some band-aid stickers last week that looked just like it.

So does anyone out there do project life? If you have pictures PRETTY PLEASE link them up in the comments, I would love to see some new ideas.

Pin It

Filed Under: paper, pictures, project life Tagged With: crafting

Embroidery Hoop Art

September 4, 2012 By Taylor 12 Comments

Remember when I jumped on the Embroidery Hoop Bandwagon, well I am still on it folks. And after the latest project, I’m not getting off any time soon. I wanted to add a quote about bikes to my Gallery Wall (random I know). And I needed something round. So, I broke out my trusty silhouette.
I used the clean cut interfacing, ironed my fabric to it, fed it into my machine and let it cut away.

Then I arranged my designed and ironed it down to my main fabric. I found the cute bike file in the Silhouette Store.

I hand embroidered around the words “life is a” to add a little something extra.

I wanted the “vintage” look of a wrapped hoop so I tore strips of fabric and glued them down to the embroidery hoop.


Then I just put my hoop back together, made sure my design was centered and cut the excess fabric off.

And of course in true TaylorMade style I had to rearrange part of my Gallery Wall. I also added something else that I got at Anthro… who can spot it?


Pin It

Filed Under: craft, fabric, home goods, Silhouette Tagged With: crafting

Color Washing and A Paper Mache Hippo Head

August 22, 2012 By Taylor 10 Comments

Yes you can believe it, I made a Paper Mache Hippo Head. I guess I am officially crazy now :) You know I love the whimsy. I was a little on the fence with the whole animal bust craze but when I saw the Hippo Bust at West Elm and knew I needed to get on board. Then I saw the paper mache unicorn tutorial at Lil Blue Boo and got to work. Ashley has an amazing tutorial so you can check hers out. And to be honest my hands were way too messy to attempt to take pictures during this project. Paper Mache is messy y’all!

We have lovingly named him ThomNis, which is how Finn pronounces Hippopotamus. I love how he turned out. It’s kind of hard to get a good picture- I guess ThomNis is not very photogenic.

I mounted him on a wooden plaque that I found from Joanns and wanted to keep the wood grain so it would look rustic so I used one of my favorite painting techniques: A Color Wash.


How to Color Wash:
Start with your paint, a paintbrush and a cup of water.

Put a little paint in your cup then add a little water, I mixed 3 different colors of paint. The more water you add the more see through the wash will be; showing more wood grain. Mix and add until you get a good consistency you like.
Then just paint. Mine went on really watery but as it dried the color became more vibrant.
Have you color washed anything? Also do you think I’m crazy for making a Hippo Head and hanging it in my living room? At least Ashley put her unicorn in her playroom :)

Pin It

Filed Under: craft Tagged With: crafting, decor

Fish Soap Party Favor – a Tutorial

August 6, 2012 By Taylor 18 Comments

Remember Finn’s Fish Party last week? I was pretty casual about the whole thing because the biggest slip-n-slide ever was the main event :) But I did make the kiddies party favors. It was almost a craft fail, but I saved it and it ended up OK. Seriously though, I almost ruined the only homemade aspect of the bday party… tragedy!
When I was looking up fish party ideas, I came across this Martha Stewart Tutorial. Of course, Martha’s “Fish in a Bag Soap” were way better looking than mine- in my defense I found this the Thursday before the Saturday party. My BFF and my mom totally came to the rescue with supplies!
What you need:
Pure Glycerin
Scented Oil (optional)
Plastic Treat Bags
Fish
I wanted to find plastic fish but I couldn’t find them anywhere. My BFF called me and told me she found these erasers, perfect! I later found out the fish I wanted were available on Oriental Trading.com and Amazon. But the erasers looked good too.
About the bags, I originally bought craft bags with a pleat on the side, and the soap got stuck after drying… boo! You HAVE to get the bags with only one seam on the side and no folds. My mom came to the rescue because I found this out the day before the party.
What I Did:
Fold the bag down (about halfway)
I used clothespins and an old shoe box and clipped the bag to the side of the box, making sure the bag was touching the bottom too.
My glycerin came pre-cut, so I used one and a half squares of glycerin. Then using a glass measuring cup, I melted it in the microwave for 45ish seconds. That is when I added my Grapefruit Citrus oil, just one drop.
Then pour the melted soap into the bag carefully, you don’t want to get soap on the sides of the bag, a funnel would help but I didn’t have one… procrastinator.
Carefully place a fish eraser into the bag, make sure not to splash.
Continue with these steps and let them cool.
I used ribbon to tie them up. Because of the clear color they are kind of hard to photograph but they turned out really cute. And for twelve fishies I spent about $15ish which I was pretty happy with.
Have you ever made your own soap? I really liked doing it, I want to do another girl craft party with different girly soaps. We could use mint leaves and lemons and other cool fresh ingredients!

Pin It

Related Posts Plugin for WordPress, Blogger...

Filed Under: craft, party Tagged With: crafting, parties

  • « Previous Page
  • 1
  • 2
  • 3
  • 4
  • 5
  • 6
  • …
  • 10
  • Next Page »

Welcome to Taylor Made

http://www.taylormadecreatesblog.com/about-me Hi Yall! I'm Taylor... an artsy mom of three from Houston, TX. I love sewing, collecting floral fabric, eating Mexican Food, photography, brights colors, rearranging, and rolling clay. Taylor Made Creates is all about creating a fun, colorful home, sewing cute things and eating good food. Check out my SHOP HERE HERE! Thanks for stopping by!

Search

Pin with me!

Like Me :)

Facebook Pagelike Widget

More Recent Posts

  • Kid's Animal Room
  • Kids Camping Shirts
  • Mermaid Birthday Party
  • Conversation Heart Cold Packs
  • Holiday Apple Tea Punch
  • Purple Princess Costume
  • Letterboard Costume
  • La Croix Costume

FAVORITES

  • Swan Wings + Hello Ollie Fabrics
  • Vintage Sheet Quilt
  • How to Glaze Furniture
  • Siberian Husky Costume
  • Color Wheel Clock
  • Baby Activity Tree Mat
  • Winged Peasant Dress
  • 30 Minute Sundress with Forest Floor Fabrics
  • Christmas Candy Tablecloth

Copyright © 2026 · Web Hosting By RFE Hosting